This website uses cookies to ensure you get the best experience on our website.
Please note that by continuing to use this site you consent to the terms of our
Privacy and Data Protection Policy
.
Some of our partner services are located in the United States. According to the case law of the
European Court of Justice, there is currently no adequate data protection in the USA. There is a
risk that your data will be controlled and monitored by US authorities. You cannot bring any
effective legal remedies against this.
Accept
AV-Comparatives’ 2016 small-business software review looks at security products suitable for a company running either the Foundation or the Enterprise edition of Microsoft Windows Server 2012 R2. As can be seen on the Microsoft Website, the Foundation version is suitable for small companies with up to 15 users, while the Essentials version allows an additional ten users. The report thus considers products for a network of up to 25 client PCs, with one file server.
We have used 64-bit Windows 7 Professional SP1 as a test client for all products. Server and client systems were configured as a Workgroup rather than as a Domain. While some of the products tested provide Active Directory integration, it is not essential for any of them.
Both the Foundation and Essentials versions of Windows Server provide simplified management options, relative to the Standard edition. This recognises companies with 25 users or less that may not have the financial resources to employ a full-time IT administrator. Consequently, some or all of the IT management tasks will be carried out on a part-time basis by staff members who may be very proficient with consumer products, but are not very familiar with business networks.
In accordance with this scenario, we have considered how easy-to-use the products would be for a non-expert administrator. We allow for the option of having an external IT consultant install and configure the software initially, and train the relevant company staff how to use it. However, in a number of cases we have noted that a high level of technical expertise is not needed to set the product up, and that non-expert administrators could perform the task themselves with help from the product manual.
The manufacturers either provided us with the newest versions of their respective products, or confirmed that the latest version was available from their website (as at August 2016). The products tested for the review are listed below:
Because of the emphasis on small businesses, the review covers only the essential everyday tasks needed in all networks. Full details of the points we have looked at for each program are given below.
Supported operating systems
Here we list Windows client and Windows Server operating systems supported by the manufacturer.
Documentation
We have looked at the external documentation, i.e. manuals and online knowledge base (as opposed to the console’s built-in help features). These could be used to help install the console where applicable, whereas a help-feature built into the console obviously could not.
Management Console
Installation and configuration
How to set up the console so that the administrator can proceed with deploying endpoint protection software to clients.
Layout
Console design, with emphasis on finding major features.
Preparing devices for deployment
Is it necessary to configure the management server and/or the clients, e.g. by opening firewall ports or enabling file sharing, to enable deployment and management?
Deploying the endpoint protection software
Deployment methods available, e.g. remote push, emailing a link to users, local installation on the client itself. For the purposes of the test, we used the simplest method available to deploy the endpoint protection software to the clients.
Monitoring the network
Status and alerts How does the console show overall security status of the network, and warn of anything that the administrator should take action on, such as malware detections or outdated signatures?
Responding to alerts How can the administrator find more details of any warnings shown?
Program version
Which version of the client software is currently installed on each device?
Managing the network
Scanning How to run on-demand malware scans on protected devices.
Scheduling Scans How to set up a regular scheduled scan.
Updates How to run a manual update of malware definitions on managed clients.
Removing devices from the console
If a device is lost, stolen or becomes unusable, how can its entry be deleted?
Integrated help feature
Details of the console’s built-in help feature (if any) and how to access this.
Windows client protection software
Installation
Are there any choices to be made?
Main program window
What functionality is available from the program’s main user interface?
Windows Security Center/Windows Defender
Whether the program registers as antivirus, antispyware and firewall (where appropriate) in Windows Security Center, and whether Windows 7’s Windows Defender is disabled by the setup process.
System Tray icon
What functions can be accessed from the System Tray icon?
Unauthorised access
If a user logs on to the computer with a standard user account, i.e. without administrator privileges, is it possible to disable real-time protection or uninstall the program?
Malware alerts
What sort of alert is shown if the EICAR test file or AMTSO PUA test file is downloaded, or the AMTSO phishing test page is accessed?
Windows server protection software
A brief guide to the installation and user interface of the malware protection software for the server.
Console types
There are two main types of management console covered in this review.
Cloud-based consoles run on the manufacturer’s servers. They can be accessed from any web browser on any Internet-connected device, by going to the URL provided by the manufacturer and logging in with the appropriate credentials. They have the advantages for small businesses that no installation of the console is required, and that deployment of the client software is very straightforward for non-expert administrators. Additionally, a device can be monitored and managed easily wherever it is in the world, as long as it is connected to the Internet; this is obviously very useful for businesses with staff who frequently work outside of the office and are thus not connected to the company LAN.
Server-based consoles run on the company’s own internal server on the LAN. Generally speaking, small businesses are likely to need an IT professional to install the product. The user interface component of the program may be integrated into the program that runs on the server, available as a separate component that can be installed on the administrator’s desktop or laptop PC, or accessible by web browser if a suitable HTTP server-function has been set up by the server component. Client-software deployment options may include those available for cloud-based consoles, with an additional option of remote push installation for devices connected to the company LAN. In this case, some configuration of client devices is usually necessary (such as enabling file sharing), after which the endpoint protection software can be sent out to multiple clients at once from the administration console. Server-based consoles may offer greater functionality than cloud-based ones, and some admins may prefer to have the system completely under their own control. Management of devices outside the LAN would require e.g. a VPN to be set up, however.
Clients: Windows XP, Vista, 7, 8/8.1, 10, all 32 and 64-bit
Servers: Windows Server 2003/R2, 2008/R2 (32 and 64-bit), 2012/R2; Small Business Server 2003, 2008, 2011
About the product
As its name suggests, AVG CloudCare uses a cloud-based console to manage security software for Windows. In addition to malware protection, the endpoint security software includes a firewall. Online backup, web content filtering and remote control of client PCs are also provided by the product.
Please note that CloudCare differs from most other AV management consoles in terms of its target market. It is not sold directly to end users, but rather to IT service companies who act as resellers of AVG products. This means that part of the interface is devoted to management of customers, as opposed to management of security products. However, the IT service company can configure an account for the customer which allows them to manage the security products themselves. We are using this scenario for our review, that is to say, from the point of view of a small business that has bought AVG security products from an IT service company and chosen the self-management option. We have not considered the areas of the console relating to customer management.
Good points
We feel that AVG CloudCare provides all the essential features for small-business security management, in a very user-friendly design that would suit both expert and non-expert users equally well. Functionality is well spread-out over 6 suitably named pages. The neatly laid-out console makes it easy to navigate among these, using a single row of buttons at the top. The integrated help feature is very clear. In our test, managed computers responded quickly to commands sent from the console – within a few seconds. Installing endpoint protection from the console is very straightforward, with options such as component choice clearly presented. The endpoint protection software is very similar to AVG’s user-friendly consumer products, making local management very easy.
Suggestions for improvement
In our test, we found that the Protection Disabled alert on the dashboard took some time to appear (usually longer than the console’s auto-logout time), unless we clicked Refresh. We suggest that the auto-refresh frequency of the console could be increased.
Documentation
Manuals
We could not find a manual for the CloudCare console or CloudCare AntiVirus (but please see section on integrated help feature below).
Knowledge base
There is a short FAQ page for the product. This is clearly oriented towards AVG Partners who are using CloudCare to manage their customers’ IT security, as opposed to customers who manage it themselves.
Management Console
Installation and configuration
The console is cloud-based, so no installation or configuration is required.
Layout
The console opens on the Dashboard page, which provides an overview of alerts, so that the admin can instantly see if there are any problems to be resolved. A single row of buttons along the top of the console allows navigation to the other main pages: Alerts, Devices, Policies, Reports, and Account.
Preparing devices for deployment
We did not make any changes to client or server machines before deploying the protection software.
Deploying the endpoint protection software
We deployed the endpoint software by logging on to the cloud console from the machine to be protected, and downloading the installer directly.
Monitoring the network
Status and alerts The All Open Triggered Alerts section of the Dashboard page displays a number of tiles, representing different possible warnings. By default, Threat Detected and Out-of-Date Virus Definitions are configured; tiles for other alerts are shown in grey, meaning they have not yet been set up. The admin can activate an alert simply by clicking its tile and completing the resulting dialog box. The colour scheme shown underneath the section title indicates the presence and seriousness of the alerts: High, Medium, Low, or No alert. High-importance alerts are shown by displaying the relevant tile in red, with an exclamation mark above it, while green indicates that all is well:
The Devices page also shows whether the main components of the software, such as AntiVirus and Content Filtering, are enabled:
Responding to alerts If an alert is shown on the dashboard page, the admin can get more details by clicking on the relevant tile, which opens the Alerts page:
Having taken the appropriate remedial action, the admin can dismiss the alert by selecting the alert and clicking Acknowledge.
Program version The version of the installed endpoint protection software can be seen by clicking the name of the client computer on the Devices page. We note that this is displayed in a different format in the console relative to the client software itself; in our case, the console displayed version 2016.0.7640, while the endpoint client showed version number 16.81.7640. Evidently the 16 and the 7640 are the relevant parts.
Managing the network
Scanning The admin can scan all computers by clicking Scan Company on the Devices page, or an individual computer by clicking Scan on its properties page, shown below:
Scheduling Scans A scheduled scan can be set via policy. This is very straightforward; on the Policies page, Antivirus section, Scan Settings tab, the admin sets the date and time for the scan to be run:
The process is completed by clicking Save & Apply to Devices at the top of the Policies page.
Updates In similar fashion to scans, updates can be run on all computers using the button on the Devices page (Update Company), or on an individual computer from its properties page (Update).
Removing devices from the console If the admin clicks Uninstall CloudCare on a computer’s Properties page, the device’s entry will be removed from the console, regardless of whether the device is contactable at the time.
Integrated help feature
The Help link in the top right-hand corner of the console opens the product’s online help pages. The left-hand column contains links for both AVG Partners (IT-Service companies) and Customers, the latter being relevant to our review. The Customer User section provides an overview of the pages of the console and their functions (shown in screenshot below), while Customer – How To displays instructions for common tasks such as Add Device and Assign Devices to Policies. In both cases, simple and straightforward directions are provided, well illustrated with appropriate screenshots.
Windows client protection software
Installation
To install the client protection software on a local machine, the admin logs into the console, and clicks DashboardAdd Desktop-Server DeviceInstallation Packagethen Download on the Devices page (which opens automatically). The admin can choose which protection components to install, and whether to use a full offline installer, or a smaller agent-only package that downloads the protection components when run:
We kept the default options shown above. Once the installer file is double-clicked, installation proceeds automatically without any input from the admin. After a few minutes, the installer dialog indicates that setup is complete and the computer should be restarted:
Main program window
This includes a status display, which shows a clear warning and Fix Now button if real-time protection is disabled. Updates and full/custom/scheduled scans can be run from the home page; settings, quarantine (Virus Vault) and logs (History) can be found in the Options menu. We could not find a local help feature.
Windows Security Center/Windows Defender
AVG CloudCare AntiVirus registers as antivirus and antispyware in Windows 7’s Action Center (we did not install the AVG firewall for our test). Action Center displays a full alert if AVG’s real-time protection is deactivated. Windows Defender is not disabled.
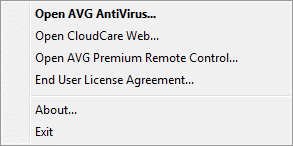
System Tray icon
AVG’s System Tray icon shows the following menu when right-clicked:
Unauthorised access
The protection features cannot be disabled without entering administrator credentials.
Malware alerts
The following alert is shown when the EICAR test file is downloaded:
A similar warning is shown for the AMTSO PUA test file. The AMTSO Phishing Test Page was not recognised in our test.
Windows Server protection software
The Windows Server protection software is installed in exactly the same way as the Windows client software, although the default configuration is slightly different. In keeping with the nature of a server, the Identity Protection feature is not available, and the Web Protection feature is not installed by default. We also noted differences in the handling of the AMTSO Feature Settings Checks. On the server, the alerts for both the EICAR Test File and AMTSO PUA Test File allow the admin to choose whether to run the file, in contrast to the client configuration (which removes it automatically without prompting in both cases):
Clients: Windows XP, Vista, 7, 8, 8.1, 10
Servers: Windows Server 2003/R2, 2008/R2, 2012/R2, Small Business Server 2003, 2008, 2011
About the product
Bitdefender GravityZone Advanced Business Security Cloud uses, as its name suggests, a cloud-based console to manage Mac and Linux clients (not covered in this review), along with Windows client and Windows Server computers. The GravityZone range also includes an on-premise console which can be downloaded as a ready-made virtual machine that runs in a range of popular virtualisation systems.
Good points
The console is very easy to navigate using a single menu column on the left-hand side. The Dashboard page provides an at-a-glance overview of the security status, and we like the fact that the admin can customise it very simply to his/her own personal requirements. Deployment of endpoint security software to clients is very simple and quick, and documentation is comprehensive. Experienced administrators will immediately feel at home with the product, and it would take minimal learning for inexperienced admins.
Suggestions for improvement
We looked unsuccessfully for the scheduling options for scan tasks in Full Scan Task… in the Tasks section of the console, where one might reasonably expect to find them. We then searched the manual for assistance. Whilst instructions for scheduling scans are provided, a fair amount of scrolling and reading is needed to find out which area of the console is being referred to. We suggest that including scheduling options in the Full Scan Task… settings under Tasks would make it much easier for the average administrator to find them.
Documentation
Manuals
A comprehensive 70-page Installation Guide in .PDF format is available to download from the manufacturer’s website. This is applicable to all variants of the GravityZone range and all supported platforms. It can be navigated via bookmarks and a clickable contents page, is clearly laid out and formatted, and has some screenshots. There is also 233-page Administrators Guide, covering all aspects of using the console to manage endpoints, in identical format.
The console is cloud-based and thus needs no installation or configuration, the admin simply creates an account and logs on via the URL provided.
Layout
The console opens on the Dashboard page, which provides a graphical overview of protection status and malware discoveries. A left-hand menu column allows the administrator to navigate to other pages such as Quarantine and Reports.
Preparing devices for deployment
We did not make any changes to client computers before installation.
Deploying the endpoint protection software
We deployed the endpoint protection software by logging on to the console from the computer to be protected and downloading the installer. A pop-up screen that can optionally be displayed after the admin logs on provides an obvious link:
It is also possible to use the first endpoint to perform a remote push installation of other computers on the network, or to email users a link with which to install the software themselves.
Monitoring the network
Status and alerts These are shown in the Dashboard. Additionally, devices with problems are marked in the Network section with a red exclamation mark. Clicking on an individual machine displays the reason for the warning.
Responding to alerts The administrator can click on a graphic showing an alert on the Dashboard page, which will then open a details page showing exact details of the alert.
Program version This can be seen by clicking Network, Computers and Groups, which displays a list of managed computers, then clicking on the name of an individual device to display detailed information.
Managing the network
Scanning To scan managed computers, the admin goes to the Network page, selects Computers and Groups, then clicks Tasks and Scan. A dialog box opens, from which the type of scan (quick, full, custom or memory) can be selected.
Scheduling Scans According to the manual, the admin can schedule a scan in the dialog box used to configure other scan details. However, in our test we were not able to find this section.
Updates Clients can be updated using the same procedure as for scans, but selecting Update from the Tasks menu.
Removing devices from the console A client can be removed from the console by selecting it in Network | Computers and Groups, and clicking Delete.
Integrated help feature
The Help and Support link in the menu column provides download links to the documentation and support pages on the vendor’s website, plus a link to the Essential Steps page (which can be displayed at logon).
Windows client protection software
Installation
The 3 MB installer file obtained via the console is a downloader, which copies the necessary binaries from the server. Once the administrator has run this by double-clicking it, no further action is required and the installation completes within a couple of minutes.
Main program window
The endpoint software window shows detailed status information for the program’s components. Scans and updates can be run by clicking the circular graphic in the top right-hand corner of the window, while settings are accessible from the button in the top right-hand corner.
Windows Security Center/Windows Defender
Bitdefender Endpoint Security Tools registers as firewall, antivirus and antispyware. Windows Defender is disabled.
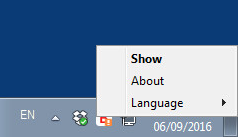
System Tray icon
A short menu is displayed when the System Tray icon is right-clicked:
Unauthorised access
We could not find any means of disabling any protection features from the client itself, regardless of the account used and even if the program is run as administrator. The program cannot be uninstalled with a standard user account.
Malware alerts
In our test, the EICAR test file was blocked silently. The status-display in the main program window noted that the “threat” had been blocked, however. In the case of the AMTSO PUA test file and phishing test page, an alert is shown in the browser window:
Windows Server protection software
This is installed in the same way as the client protection software, and is very similar in design. In keeping with its use on a server, some features, such as the firewall and content control, are not installed.
Clients: Windows 7, 8 and 10, all 32 and 64-bit
Servers: Windows Server 2008/R2 and 2012/R2, 64-bit and 32-bit where applicable
About the product
Emsisoft Enterprise Console is a server-based console used to manage Emsisoft Anti-Malware for Windows endpoints on the local area network.
Good points
The very simple design of the console makes it exceptionally easy to navigate, and the client software has a very clean, modern design that makes important functions easily accessible. The user manual is excellent, being comprehensive but clearly laid out, well written, generously illustrated with screenshots, and easy to navigate via a clickable contents page.
Suggestions for improvement
In our test, although the endpoint software installed correctly on our Windows client PC, we were unable to connect it to the console. After consulting Emsisoft, we discovered that this was due to the specific requirements of their management software. These are described in the documentation, but may nonetheless be confusing even to experienced administrators, as they deviate from standard Windows principles in some areas. For example, clients can only be discovered by searching for the hostname; using an IP address, even for machines with a fixed address, does not work. Membership of a Windows Workgroup, which is otherwise an administrative convenience with no technical significance, is also important when adding clients to the Emsisoft console. Emsisoft inform us that in a new release, due at the end of September 2016, they will make the deployment process simpler, and describe the updated functionality in the documentation.
Documentation
Manuals
A comprehensive 61-page manual can be downloaded from the same page as the console installer. This covers installation of the console and using it to deploy, configure and manage the endpoint software.
A 52 MB installer file is downloaded and run. The setup wizard can automatically download Microsoft Visual C++ if necessary. Otherwise there are no decisions to be made, and the installation completes very quickly and easily.
Layout
The console design is extremely simple and consequently very easy to navigate. By default, the console opens on the Clients page, which lists managed computers and their status. A row of tabs along the top of the console allows the admin to switch to Policies, Reports and Settings.
Preparing devices for deployment
The administrator needs to open a number of specific ports on the server firewall, and run a configuration script on client PCs, before deployment. Full details are provided in the manual.
Deploying the endpoint protection software
Emsisoft Anti-Malware can be deployed by remote push or local installation. We chose the latter method. The manual explains how to create an installation package, which can then be put in a shared folder on the network, USB flash drive etc.
Monitoring the network
Status and alerts Status and alerts are shown in the Clients tab of the console. Any problems are shown in the Issues column on the right-hand side.
Responding to alerts A solve link is provided next to the alert in the Issues column; clicking on this opens an appropriate dialog box to resolve the problem.
Program version This can be seen on the Clients page by customising the view (right-click and click Select columns) and selecting Version.
Managing the network
Scanning To scan client computers, the admin selects the devices to be scanned in the Clients page and clicks Scan. A dialog box opens, providing the choice of full, quick or custom scans, and the admin clicks on the desired type to start the scan.
Scheduling Scans Scans can be scheduled from the Policies tab, Computer policies page. A scheduled scan is not set by default but can easily be enabled from the dialog box:
Updates Whilst regular (hourly) updates are configured automatically, we could not find a means of running a manual update from the console. Emsisoft inform us that this will be provided in a future release, however.
Removing devices from the console Computers can be deleted from the console from the Policies tab, and Emsisoft tell us that a Delete option will be added to the right-click menu in a future release.
Integrated help feature
A comprehensive help file in Windows Help format is available by clicking the ? symbol in the top right-hand corner of the console. The text is well formatted and illustrated with screenshots.
Windows client protection software
Installation
The setup wizard is very straightforward, the only choice being whether to enable detection of PUAs.
Main program window
This includes protection status, update and scan buttons, licence information and help.
Windows Security Center/Windows Defender
Emsisoft Anti-Malware registers as antivirus and antispyware. Windows Defender is disabled.
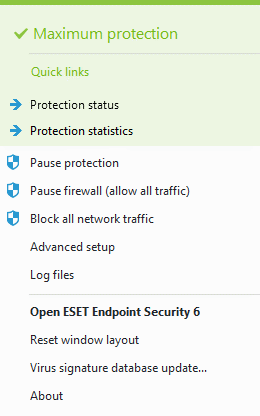
System Tray icon
The System Tray icon shows the following menu when right-clicked:
Unauthorised access
It is possible for a standard user without admin credentials to disable the protection using the System Tray menu, and that in this case there is no warning from Windows Security Center. We note that the administrator can password-protect the settings from the console to prevent this. A standard user cannot uninstall the software.
Malware alerts
The following alert is shown when the EICAR test file is downloaded:
In the case of the AMTSO PUA test file, the user is shown a dialog box and can choose an action:
The AMTSO phishing test page is not supported by Emsisoft.
Windows Server protection software
This can be regarded as identical to the client software.
ESET Remote Administrator can be used to manage ESET security software on the following Windows Operating Systems:
Windows 2000, XP, Vista, 7, 8, 8.1, 10 for clients;
Windows Server 2000, 2003, 2008, 2008 R2, 2012, 2012 R2 for servers.
Additionally, it can manage ESET security software for Mac OS X, Linux and Android operating systems, although these are not covered by this review.
About the product
ESET Remote Administrator can be installed on an on-premise Windows client, Windows Server or Linux computer, or run as a virtual appliance under Microsoft Hyper-V, VMware or Oracle virtualisation system. There is also a cloud-based virtual appliance that runs on Microsoft Azure.
Good points
For an experienced Windows administrator, ESET Remote Administrator is very straightforward to set up, and we liked the support features within the installation wizard. With a little help from the excellent documentation and help features, we quickly found our way around the console and its functions; we liked the customisable Dashboard page and the very consistent layout and functionality. The client and server versions of the protection software are very similar to each other and make local management very easy via their very clear design.
Suggestions for improvement
We feel that the ability to reactivate real-time protection from the console would be valuable; ESET inform us that this will be included in the next release.
Documentation
Manuals
ESET provide a wide range of manuals for the product, including at least one document for each of the individual components (Remote Administrator console, License Administrator console, Windows file server etc.). All are detailed, produced to a very high standard, and generously illustrated with appropriate screenshots.
Knowledge base
An extensive searchable knowledge base is provided on ESET’s website, covering a wide range of tasks. There are clear step-by-step instructions, also accompanied by annotated screenshots.
Management Console
Installation and configuration
A 611 MB .ZIP file is downloaded and extracted, and the installer file run on the computer that will function as the administration server. Whilst setup involves multiple steps and making some choices, ESET provides appropriate assistance: the first page of the setup wizard shows various help resources (screenshot below), and links are also provided for installing any additional required software such as Java.
When the admin first logs on to the console, a welcome page appears, which is the start of an introductory wizard (this can be cancelled) covering important console functions.
Layout
The menu panel on the left-hand side of the console, seen in the screenshot above, allows the admin to access the five main functional areas of the console, namely Dashboard, Computers, Threats, Reports, and Admin. Moving the mouse over this panel displays the features’ names in addition to the symbol.
Preparing devices for deployment
We did not make any preparations on client or server systems before deployment.
Deploying the endpoint protection software
The first step is to install the ESET agent, which enables communication between client PC and management server. This can be done by putting the installer in a shared folder on the server, or by emailing a link to the PC’s user, who then carries out the installation. After this, the endpoint protection software can be pushed out from the console, or installed via share or email link (as with the agent).
Monitoring the network
Status and alerts The Computer statuses overview panel of the Dashboard shows security status of the network in the form of a pie chart, with each segment showing the proportion of all devices in a particular state:
Other panels of the Dashboard provide further status information, such as Top computer problems, Rogue computers ratio, Computers with problems.
Responding to alerts Clicking on Detailed information shows a list of affected computers, from which details of the specific problem can be seen:
Program version This is shown on the Computers page.
Managing the network
Scanning Scans can be run by selecting the relevant computer(s) from the Computers page, and clicking Scan in the Tasks menu, which runs a standard scan. Alternatively, the admin can click New Task… and choose In-Depth, Smart or Custom Scan.
Scheduling Scans To set a scheduled scan, the admin creates a new scan task, and then selects one of the Scheduled options under Trigger:
Updates To update malware definitions, the admin selects computers from the Computers page, then clicks Update Virus DB in the Tasks menu. The update then runs with no further interaction required.
Removing devices from the console
To do this, the admin runs a Task to uninstall the ERA Agent, by selecting ESET Remote Administrator under Task Category, and Stop Managing (Uninstall ERA Agent) under Task.
Integrated help feature
This is web-based and context-sensitive, i.e. opens at the correct section for the console page currently being viewed. A comprehensive list of tasks is shown in a left-hand panel, with detailed, well-illustrated instructions in the main panel:
Windows client protection software
Installation
For our test, we copied the ESET Endpoint Security installer file from a share on server, and ran it over the Local Area Network. The admin needs to choose whether to join ESET Live Grid (data-sharing scheme), and whether to enable detection of potentially unwanted applications (PUAs).
Main program window
The program window displays the security status along the top. If protection is disabled, a clear warning is shown, along with a link to reactivate the relevant components:
Windows Security Center/Windows Defender
ESET Endpoint Security registers as firewall, antivirus and antispyware in the Windows 7 Security Center. Windows Defender is not disabled.
System Tray icon
When right-clicked, the System Tray icon displays the following menu:
Unauthorised access
The protection cannot be disabled using a standard user account. Whilst we were not able to uninstall the program using non-administrator credentials, we note that the deinstallation process started, and that the egui.exe process (which provides the program’s user interface) was ended, before admin credentials were demanded by the Windows UAC prompt. Protection services were not affected, however. ESET inform us that the endpoint protection can be password protected, in which case the deinstallation process will not even start unless appropriate credentials are entered.
Malware alerts
The following alert is shown when the EICAR test file is downloaded:
If detection of PUAs is enabled during (or after) setup, the following alert is shown if the AMTSO PUA test file is downloaded:
This allows the user to choose whether or not to download the program. When we attempted to access the AMTSO phishing page, the following alert was shown in the browser:
Windows Server protection software
The installer provides the installation options Core (for use with a Windows Server Core configuration), Standard or Custom. Once installation is complete and the main program window is opened, the questions relating to participation in ESET LiveGrid (data-sharing scheme) and detection of PUAs are displayed on the Monitoring (home) page of the main program window:
FortiClient Endpoint protection Clients: Windows 7, 8/8.1, 10, all 32 and 64-bit
Servers: Windows Server 2008 R2, 2012, 2012 R2
Enterprise Management Console Windows Server 2008 R2, 2012, 2012 R2
About the product
FortiClient Enterprise Management Console is a server-based console used to manage Windows client and server systems; iOS and Android devices can also be managed, but are not covered in this review.
Good points
The design of the console is very clean, modern and clear, and we liked the help options shown when the admin first logs on. Creating the installer package and URL from which to download it requires the admin to read a short section of the (very clear) manual, but is then very quick and easy and allows for very simple deployment of the endpoint software to client computers. We feel that managing the network with FortiClient Enterprise Management Console would be a very easy task for an experienced administrator, and even an inexperienced admin would require minimal training to use the product for everyday network administration.
Suggestions for improvement
In our test, we deliberately disabled real-time protection on client PCs (by editing the relevant policy in the console) in order to generate an alert. Having re-enabled the protection in the policy, we found that it was not reactivated on the clients some hours later, despite restarting the PCs several times in order to make them pick up the updated policy. Clearly this is something that needs to be improved.
Documentation
Manuals
An 84-page Administration Guide and a 21-page Quick Start Guide can be downloaded via the console. Both are clearly laid out, navigable via a clickable contents page, and well illustrated.
Knowledge base
A knowledge base is provided, although we could only find articles relating to the FortiClient endpoint protection software rather than the console.
Management Console
Installation and configuration
Running the setup wizard on the server is a very quick and straightforward process, not requiring any decisions. If necessary, Microsoft SQL Server Express 2014 is installed automatically.
Layout
The console consists of a left-hand menu column with links to the Dashboard (default), computer groups and policies. We found that this very simple layout made the console extremely easy to navigate.
Preparing devices for deployment
We did not make any changes to client PCs before deploying the endpoint protection software.
Deploying the endpoint protection software
The manual explains how to make installer packages available from a URL on the server. These are configured in the settings, and provides a web address to browse to from the client PC. We used this method to deploy the endpoint software in our test. It is also possible to use Active Directory to discover clients and to deploy the software to them via remote push.
Monitoring the network
Status and alerts Network security status is shown in the form of pie charts and the Event Summary, a list of clients with e.g. outdated signatures.
Responding to alerts Clicking on an item in the Event Summary section of the Dashboard opens a details pane listing the computers affected and providing more information:
Program version This can be seen in the Client Details view, accessed via Domains or Workgroups, as appropriate for the network being managed:
Managing the network
Scanning An entire group of clients can be scanned at once by right-clicking the name of the group in the left-hand panel of the console in Client Details view, and clicking either Full AV Scan or Quick AV Scan:
An individual computer can be scanned by selecting it in Client Details view and clicking Quick scan now or Full scan now as appropriate.
Scheduling Scans Scheduled scans can be set using the Profile (policy) applied to a group of computers:
Updates Endpoints are updated automatically via policy. We could not find a means of running a manual update.
Removing devices from the console This can be done by right-clicking the computer on the Client Details page and clicking Delete device.
Integrated help feature
Selecting Technical Documentation from the Help menu in the top right-hand corner of the console opens a support page of the Fortinet website from which the manuals in .PDF format can be downloaded. When the admin first logs on to the console, various help options are displayed:
Windows client protection software
Installation
The installer package is downloaded from the server using the URL created in the console. Installation is very quick and easy with no decisions required.
Main program window
This provides a status display, access to the help feature, plus buttons for updates (if available) and scans.
Windows Security Center/Windows Defender
FortiClient registers as antivirus and antispyware. Windows Defender is not disabled.
System Tray icon
The System Tray icon shows the following menu when right-clicked:
Unauthorised access
A standard user cannot disable or uninstall the program.
Malware alerts
When the EICAR test file is downloaded, the following alert is shown:
If the AMTSO PUA test file is downloaded, an alert is shown in the browser window:
A similar alert is shown for the AMTSO phishing test page.
Windows Server protection software
This can be regarded as identical to the client protection software.
Clients: Windows XP (32-bit only), Vista, 7, 8, 8.1, 10
Servers: Windows Server 2003, 2008/R2, 2012/R2
Linux, Mac OS X, iOS and Android devices are also supported, but not covered by this review.
About the product
G Data Management Server is installed on a Windows computer on the company premises, and used to manage the G Data endpoint protection software on client and server computers on the local area network.
Good points
Installing the G Data Management Server, and then using the console to deploy and manage clients, will be a routine task for anyone familiar with standard Windows Server administration. The installation of Microsoft SQL Server Express is seamlessly integrated into the setup process (if needed), while the similarity with the standard Microsoft Management Console makes the G Data management interface very familiar. The manual is produced to an excellent standard, being clear, comprehensive, well illustrated and easy to navigate.
Suggestions
We would recommend small businesses without full-time IT staff to have a consultant install the management server and provide some training in client deployment and management. Inexperienced administrators should then have no difficulty performing everyday management tasks.
Documentation
Manuals
The zip file containing the installation files very conveniently also includes a 179-page manual in .PDF format. This covers all aspects of installing and using the management console, including client deployment, configuration, monitoring and management. Individual sections are accessible via bookmarks and a clickable contents page, and the document is well illustrated with screenshots.
Knowledge base
We could not find a knowledge base on the manufacturer’s website. There is however an FAQ section in the manual.
Management Console
Installation and configuration
A 1.2 GB .ZIP file is downloaded from the vendor’s website and extracted, and Setup.exe run. The admin then clicks on G Data Management Server. There is a choice of 6 European interface languages, installation folder, installing as primary or secondary server, and type of SQL server to be used (Microsoft SQL Server 2014 Express can be installed automatically if required).
Layout
The G Data Administrator console has a similar layout to the Microsoft Management Console, with a narrow left-hand pane displaying the names of the server(s) and clients, and a larger right-hand pane showing various details of the selected device or group. A lower pane of the left-hand column (Overview) contains 8 shortcuts to items such as logs.
Preparing devices for deployment
In accordance with the instructions in the manual, we opened firewall port 7169 on Windows clients (along with a number of ports on the management server).
Deploying the endpoint protection software
The client software can be deployed by remote push installation, or local installation; the latter can be performed using logon script, group policy, or manually. We used the last of these in our test.
Monitoring the network
Status and alerts The status of devices on the network is shown in the G Data Security Status panel on the dashboard. This provides a very detailed overview by listing the individual protection components, and showing how many of the total number of devices conform to optimal settings. Components which are not installed, or not configured correctly, are shown with an exclamation mark symbol in a red circle.
Responding to alerts Clicking on an item shown to be non-functional or incorrectly configured shows the individual devices affected, and allows the administrator to solve the problem by selecting the device(s) concerned and clicking Enable:
Managing the network
Scanning Individual scans are run by selecting the client or group from the left-hand panel, then clicking the Tasks tab and the Single Scan Job icon on the toolbar below.
Scheduling Scans The procedure is identical for an individual scan, except that the admin clicks the Periodic Scan Job icon on the toolbar.
Updates Updates can be run by clicking the Clients tab, selecting the device(s) to be updated, right-clicking and selecting Update Virus Signatures Now.
Removing devices from the console A device can be removed by right-clicking it (e.g. in the Clients view shown above) and then clicking Delete.
Integrated help feature
A comprehensive Windows Help file is provided, covering all aspects of using the console. Instructions are illustrated with some screenshots.
Windows client protection software
Installation
The same installer file used to install the server can be used to set up the endpoint protection software, by selecting Security Client from the options. There is a choice of languages, and the administrator needs to enter the IP address or hostname of the management server. In our test, the system had to be restarted after installation completed.
Main program window
The G Data Security Client does not have a program window as such. The interface consists of the System Tray icon’s menu, shown above. By default, this only displays the entries Internet Update and About. The functionality available to the user can be extended from the console, so that the user can run scans, change options and display the quarantine.
We note that the administrator can password protect the settings if desired.
Windows Security Center/Windows Defender
With its default configuration, G Data Security Client registers as antivirus and antispyware in Windows Security Center. Windows Defender is not disabled.
System Tray icon
This displays the menu shown above when right-clicked.
Unauthorised access
This is effectively prevented. The default interface does not allow the user – regardless of privileges – to alter the configuration at all. Using the options shown above, the administrator can allow user to change settings, but limit this to certain individuals by means of setting a password.
Malware alerts
The following alert is shown in the browser window when the EICAR test file is downloaded:
Similar alerts are shown for the AMTSO PUA test file and test phishing page.
Windows Server protection software
This can be regarded as effectively identical to the client software.
Clients: Windows XP 32-bit; Windows Vista, 7, 8, 8.1, 10, all 32 and 64-bit
Servers: Windows Server 2003/R2 32 and 64-bit; Windows Server 2008/R2, 2012/R2 64-bit; Windows Small Business Server 2008/2011 64-bit
About the product
Kaspersky Endpoint Security Cloud provides endpoint protection software for Windows Server and Windows client operating systems, managed by a cloud console. Protection for Android devices is also available, but not covered in this review.
Good points
The management console is clearly laid out, making a majority of features easy to find. Deploying the endpoint protection software is as simple as installing iTunes. The GUI of the endpoint software provides the administrator with very detailed status information, whilst allowing the user to carry out update and scan tasks. Comprehensive, well-produced documentation is provided.
Suggestions for improvement
It is not obvious how to run or schedule scans and updates from the console; we had to look it up in the knowledge base. It is only possible to define a manual OR a scheduled scan or update, so to run a manual task it is necessary to switch off the schedule, run the task manually, and then switch back to the schedule. We feel that finding and running these everyday tasks could be made easier.
Documentation
Manuals
A comprehensive, 484-page manual for the Endpoint Security client is available from the product’s download page.
Knowledge base
There is a comprehensive, clear and well-illustrated knowledge base for the cloud console.
Management Console
Installation and configuration
As the console is cloud based, no installation or configuration is necessary.
Layout
The console opens with the Information pane, Getting started sub-page, which provides an overview of the features and their configuration status. Other sub-pages are Monitoring (which shows threats and protection status), Summary statistics, Events and Licences.
The left-hand side of the console has a menu column, from which the admin can navigate to the pages Users, Devices, Security Profiles (policies), Backup, Distribution Packages and Settings.
Preparing devices for deployment
We did not need to make any changes to client or server computers before deploying the endpoint protection software.
Deploying the endpoint protection software
There are two means of deploying Kaspersky Endpoint Security to devices: the administrator can email a link to users for them to install the software themselves, or log in to the console on a specific device, and download and run the installation package directly on that device. Clicking on the Devices link in the left-hand pane of the console displays information about this, with more details provided under How to add a new device:
We chose the direct installation method for our test.
Monitoring the network
Status and alerts The Monitoring page of the Information Pane shows licensing and status information and threats:
Responding to alerts Clicking on the link for an alert displays a list of the individual computers affected by it. In our test, we found that the list of affected computers displayed was sometimes not in agreement with the alert itself. For example, the Anti-Virus protection warning showed 1 device affected, but clicking the link displayed a list of three devices. Kaspersky Lab have since released a fix for this issue.
Program version We could not find a means of showing a client’s program version in the console, although Kaspersky Lab intend to implement this in Q4 2016.
Managing the network
Scanning, Updating and Scheduling Updates and scans can be run or scheduled from the Settings page. There is a separate page for each function, which allows the task to be run manually or a schedule set:
We note that if the administrator wants to run a one-off scan, it will be necessary to change the settings to manual, run the scan, and then reset the configuration to On schedule. The administrator can edit the policy to allow users to run scans locally, if desired.
Removing devices from the console To remove a device from the console, the admin selects its entry on the Devices page and clicks Delete.
Integrated help feature
The Help link in the bottom left-hand corner of the console opens the product’s online knowledge base.
Windows client protection software
Installation
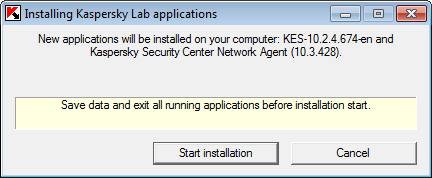
To install the endpoint software on a computer, the admin logs on to the console from that computer, then clicks on Distribution packages, Download. A 340 MB installer is downloaded and run; the admin merely has to click on Start installation, then Close when the setup process has finished.
Main program window
The Protection section of the Protection and Control tab shows the status of the individual protection components, while scan and update tasks can be run from Tasks panel on the same page.
Windows Security Center/Windows Defender
Kaspersky Endpoint Security registers as antivirus, antispyware and firewall. Windows Defender is disabled.
System Tray icon
The System Tray icon displays the following menu when right-clicked:
Unauthorised access
By default, the endpoint security can be completely disabled from System Tray menu using a non-admin account. The administrator can prevent this by setting up password protection.
Malware alerts
If the user attempts to download the EICAR test file, the Kaspersky Endpoint Security blocks the download and displays an alert in the browser window:
Similar browser alerts are shown for the AMTSO PUA test file and phishing test page.
Windows Server protection software
This can be regarded as identical to the client software. However, consistent with its use on a server system, some features such as application control and mail antivirus are either not installed or not activated.
Windows clients: Vista*, 7, 8, 8.1, 10* (* = Endpoint Protection client only)
Windows servers: Windows Server 2003/R2, 2008/R2, 2012/R2; Windows Small Business Server 2003, 2008, 2011, 2016; Windows Essential Business Server 2008
About the product
Symantec Endpoint Protection Manager is a server-based console which can manage endpoint protection software for Windows client and Windows Server operating systems. Mac OS X and Linux operating systems are also supported, but not covered in this review. Please note that at the time of writing (late September 2016), the product had not been released to the public.
Good points
Although the console is obviously very powerful and capable of handling large networks and a multitude of configuration options, we were still able to find essential monitoring and management functions without any difficulty. The client software is very similar to a consumer antivirus program and makes essential functions such as status, scans and updates easy to access.
Documentation
At the time this report was written, documentation had not been made available.
Management Console
Installation and configuration
The console can be installed on the Windows server by downloading and running an .EXE installer file. The setup wizard is extremely simple and only requires the admin to accept the licence agreement and choose the location of the installation folder.
Configuration: there are options for up to 500 clients or more than 500 clients; we chose the former. Server details such as ports used for client/server communication can be customised, though most administrators will be happy to leave them at the default settings. There is also an option to use the default Symantec database or a custom Microsoft SQL database; we chose the former. There is also an option to send anonymous data to Symantec. LiveUpdate runs when the configuration wizard is complete.
Layout
The main console window has a narrow menu column on the left-hand side, with the entries Home, Monitors, Reports, Policies, Clients and Admin. The Home page provides various panels showing the status of different items, including overall security status, status of endpoint clients, and licences.
Preparing devices for deployment
We did not need to make any special configuration of the clients in order to use the local installation method.
Deploying the endpoint protection software
We used the local installation method of deploying client software in our test. To do this, we exported installation packages for Windows clients by going to the Admin page, Install packages tab. The admin then only needs to right-click the appropriate installer package and then click Export:
An .EXE file for Windows can then be saved to e.g. a network share or flash drive, from where it can be run on the client.
Monitoring the network
Status This is shown in the Security Status and Endpoint Status panels on the Home page.
Status and alerts If protection is disabled on a client, the two status panels change as shown below:
Responding to alerts Clicking View Details in the Security Status panel shows a list of protection components, and which of them is disabled on which client.
Program version This can be displayed for any individual client by double-clicking the device’s entry in the Clients tab of the Clients page.
Managing the network
Scanning Scans can be run from Clients/Clients by selecting the relevant device or devices (standard Windows selection techniques such as Ctrl + A, Ctrl + click can be used to make multiple selections), right-clicking, pointing to Run command on computers and clicking Scan. A choice of quick, full or custom scans is provided.
Scheduling Scans Scheduled scans can be configured by going to the Policies page of the console and editing an existing policy or creating a new one. By default, a scheduled scan runs at 00:30 every day.
Updates Running an update is identical to the scanning procedure described above, except that the admin clicks Update Content.
Removing devices from the console A device can be removed very simply by right-clicking its entry under Clients/Clients and clicking Delete.
Integrated help feature
Clicking the Help link, then Help Topics… in the top right-hand corner of the console opens the local web-based help feature. This is context sensitive, i.e. it opens the help page relevant to the current feature being used on the console.
Windows client protection software
Installation
The program is installed by running setup.exe on the local PC. There are some options such as the location of the installation folder, but the product can be installed easily with default settings. A restart is required when setup is complete.
Main program window
This features a status display, links for updates and scans, and a help button.
Windows Security Center/Windows Defender
Symantec Endpoint Protection registers as antivirus, antispyware and firewall. Windows Defender is disabled.
System Tray icon
The System Tray icon allows the user to open the program window or disable protection.
Unauthorised access
The option to disable protection in the shortcut menu is disabled when a non-administrator account is used. The software cannot be uninstalled without entering administrator credentials.
Malware alerts
When the EICAR test file is downloaded, the following alert is shown:
A similar alert is shown for the AMTSO PUA test file. The AMTSO Phishing Test Page is not recognised.
Windows Server protection software
This can be regarded as identical to the client protection software.
Windows clients: Windows XP, Vista, 7, 8/8.1, 10, all 32 and 64-bit
Mac clients (not reviewed): OS X 10.7, 10.8, 10.9, 10.10, 10.11
Servers: Windows Server 2003/R2 (32 and 64-bit), 2008/R2, 2012/R2; Windows Small Business Server2008, 2011, 2012
About the product
Webroot SecureAnywhere Endpoint Protection uses a cloud-based console to manage endpoint protection software for Mac clients (not covered in this review), Windows clients, and Windows servers.
Good points
The Endpoint protection page of the console provides a very clear view of security status, and the single row of tabs, mostly clearly-named, makes navigation very straightforward.
The online Endpoint Protection Admin Guide is comprehensive, easy to navigate, and provides very clear step-by-step instructions with excellent illustrations.
Suggestions for improvement
In our test, we found that deletion of the EICAR test file by real-time protection was rather unreliable; it only worked sometimes, on other occasions the file was left intact.
We feel that the interactive knowledge base could be improved, to provide relevant answers to basic questions. The Resources tab of the console could be renamed “Deployment” to make its function clearer.
Documentation
Manuals
A number of manuals are provided, some as .PDF files, others as web pages. We looked at the online Endpoint Protection Admin Guide, which provides comprehensive instructions for installing, configuring and managing endpoint protection from the console. It can be accessed directly from a link in the right-hand panel of the console. A simple menu panel on the left allows the admin to navigate topics; step-by-step instructions are provided for each topic, very well illustrated with highlighted screenshots:
Knowledge base
There is a searchable knowledge base on the vendor’s website. We tested this by entering “scan endpoint” in the search box; the system responded with its own question, “Is it true that you want to know about scans?”. We answered “Yes”, and were shown the following options, none of which actually answered the question (how to run a scan on an endpoint via the console):
Management Console
Installation and configuration
The console is cloud-based, so no installation or configuration is necessary.
Layout
The Status tab of the Endpoint Protection page of the console has a left-hand panel showing overall status, a central panel showing recent threats and version numbers of installed security agents, and a left-hand panel with news, a threat blog and support links. The left-hand and right-hand panels can be minimised if desired. A single row of tabs along the top of the page provides access to other sub-pages such as Policies, Alerts and Settings.
Preparing devices for deployment
We did not need to configure our client or server computers before installing the protection software.
Deploying the endpoint protection software
The admin can deploy endpoint protection software by logging on to the console from the computer to be protected, clicking Resources tab, and clicking the Windows Download button. This downloads the installer file, which can then be run on the local computer.
Monitoring the network
Status and alerts These are shown on the Status sub-page of the console.
Responding to alerts Details of malware found can be displayed by clicking the View link at the end of a computer’s entry in the lower pane of the Status sub-page.
Program version The Agent Version Spread panel on the Status sub-page shows the total number of endpoints using a particular program version; details of individual computers are shown on the Group Management sub-page.
Managing the network
Scanning A default scan can be run from the Group Management tab. The admin selects the group to be scanned (there is an All Endpoints option), which displays the individual computers in the group in the right-hand pane. Having selected the computer(s) to be scanned using the check boxes, the admin then clicks the Agent Commands menu, Agent sub-menu, Scan:
Scheduling Scans
Scheduled scans can be set in the policy applied to a computer or group:
Updates Due to the cloud-based nature of the endpoint protection software, no update function is required.
Removing devices from the console A computer can be removed from the management console by selecting it in the Group Management sub-page and clicking Deactivate. A dialog box opens, asking for confirmation, and informing the admin that an uninstall command will be sent to the device:
Integrated help feature
The Help button in the top right-hand corner of the console opens the online Endpoint Protection Admin Guide, described in the Documentation/Manuals section above.
Windows client protection software
Installation
To install the endpoint protection software on a computer, the admin logs in to the console on the machine to be protected, then clicks Endpoint Protection, Resources, Windows Download. A 1 MB installer file is downloaded and run; the installation process completes silently, with no interaction required other than confirming the Windows User Account Control prompt. Within seconds, the Webroot icon can be seen in the System Tray. An initial scan is run.
Main program window
By default, a minimalist user interface is configured (a full GUI can be enabled by policy if the admin so chooses). If the user tries to open the main program window, e.g. from the Windows Start Menu, the following message is shown:
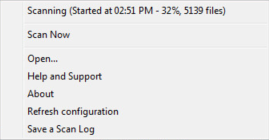
There is a System Tray icon, which shows a shortcut menu when right-clicked. This can be used to run a default scan, and open the help feature. While a scan is running, scan progress is shown in a separate entry at the top of the menu:
Windows Security Center/Windows Defender
Webroot SecureAnywhere registers in Windows Security Center as antivirus, antispyware and firewall. Windows Defender is not disabled.
Unauthorised access
The default user interface does not enable any user, whether admin or not, to disable protection. The program cannot be uninstalled without entering administrator credentials.
Malware alerts
If the EICAR test file or AMTSO PUA file is downloaded, no alert as such is shown. The System Tray icon changes to show an exclamation mark, and the file is deleted silently. If the user tries to access the AMTSO Phishing Test Page, this is blocked, and the following alert shown:
Windows Server protection software
This can be regarded as identical to the client endpoint protection software.
Award levels reached in this Business Security Tests and Review
AV-Comparatives Approved Business Product Award 2016
This year, we are once again pleased to report a very high overall standard, and that all the products reviewed receive our Approved Business Product award.
AVG CloudCare is a cloud-based management console for IT service providers. It can be used by the IT service provider or the end-user to manage small business networks. We found both the console and the endpoint protection software very user-friendly and ideal for expert and non-expert administrators alike.
Bitdefender GravityZone Advanced Business Security is a cloud-based console, although an on-premises version in the form of a preconfigured virtual machine is available. Its clear design and customisation options make it very easy to use, and only minimal training would be required for non-expert administrators.
Emsisoft Enterprise Console uses an easy-to-install server-based management console. Both this and the endpoint protection software are clearly designed and easy to navigate, making everyday administration an easy task for all administrators.
ESET Remote Administrator has a console that can be installed on a local server, or run as a virtual machine locally or on Microsoft Azure. Clear design, excellent help features and customisability make everyday management very straightforward.
Fortinet Enterprise Management Console is a very well-designed, modern management tool that runs on a server on the local area network. Good documentation makes deployment easy, and non-expert administrators would be able to perform day-to-day administration tasks with minimal training.
G Data Business Security uses a server-based console. Experienced administrators will feel very much at home with installation and deployment, and non-expert administrators will have no difficulty with everyday management tasks.
Kaspersky Endpoint Security Cloud is a new cloud-based console used to manage Kaspersky Lab’s familiar endpoint software. It allows very simple deployment and management, and both experienced and non-expert administrators should find it very straightforward to use.
Symantec Endpoint Protection provides client protection software with a very clear and familiar interface that expert and non-expert administrators will appreciate.
Webroot SecureAnywhere Endpoint Protection makes use of an easy-to-navigate cloud console to manage endpoint protection software. Deployment is particularly quick and easy, and documentation is good.