This website uses cookies to ensure you get the best experience on our website.
Please note that by continuing to use this site you consent to the terms of our
Privacy and Data Protection Policy
.
Some of our partner services are located in the United States. According to the case law of the
European Court of Justice, there is currently no adequate data protection in the USA. There is a
risk that your data will be controlled and monitored by US authorities. You cannot bring any
effective legal remedies against this.
Accept
We are an independent test lab, providing rigorous testing of security software products. We were founded in 2004 and are based in Innsbruck, Austria.
AV-Comparatives is an ISO 9001:2015 certified organisation. We received the TÜV Austria certificate for our management system for the scope: “Independent Tests of Anti-Virus Software”.
At the end of every year, AV-Comparatives releases a Summary Report to comment on the various consumer anti-virus products tested over the course of the year, and to highlight the high-scoring products of the different tests that took place over the twelve months. Please bear in mind that this report considers all the Consumer Main-Series Tests of 2021, i.e. not just the latest ones. Comments and conclusions are based on the results shown in the various comparative test reports, as well as from observations made during the tests (https://www.av-comparatives.org/consumer/test-methods/).
Tested Products
The following vendors’ products were included in AV-Comparatives’ Public Consumer Main Test-Series of 2021 and had the effectiveness of their products independently evaluated. We are happy that this year’s tests helped several vendors to find critical and other bugs in their software, and that this has contributed to improving the products.
The tested products of all the 17 vendors above are AV-Comparatives 2021 Approved Windows Security Products.
Management Summary
Tests
In 2021, AV-Comparatives subjected 17 consumer security products for Windows to rigorous investigation. All the programs were tested for their ability to protect against real-world Internet threats, identify thousands of recent malicious programs, defend against advanced targeted attacks, and provide protection without slowing down the PC.
Results and Awards
Whilst all of the programs in our test reached an acceptable level overall, some programs outperformed others. For details, please see “Overview of levels reached during 2021”. In order to recognise those products that achieve outstanding scores in our tests, we have given a number of end-of-year awards that highlight the best results in each test, and overall. The Product of the Year, Outstanding Product and Top Rated Awards are based on overall performance in the Public Consumer Main Test Series; there are also Gold, Silver and Bronze awards for each individual test type. Please see the Award Winners section for more details of the awards. The 2021 Product of the Year Award goes to McAfee; Avast, AVG and Bitdefender receive Outstanding Product Awards; the Top-Rated Product Award goes to Kaspersky.
Overview of tested products
Here we provide a summary for each of the programs tested, with a note of each one’s successes during the year. Although the user interface does not affect any awards, we have noted some of the best UI features as well.
Avast wins an OutstandingProduct Award for 2021. It received Advanced+ Awards in six of this year’s tests, and an Advanced in the other one. It also takes a joint Gold Award for Advanced Threat Protection. It has a very clean, modern interface, and the setup wizard offers ideal options for both expert and non-expert users.
AVG receives an Outstanding Product award this year. In six of this year’s tests it took an Advanced+ Award, along with an Advanced Award in the other one. It also received a joint Gold Award for Advanced Threat Protection. It has a touch-friendly interface and good setup options.
Avira took three Advanced+ and two Advanced Awards in this year’s tests. It features a modern, touch-friendly interface. Its sensitive on-access protection detects malware on external drives and network shares as soon as these are opened.
Bitdefender wins an OutstandingProduct Award for 2021, having received six Advanced+ Awards and one Advanced Award in the year’s tests. It additionally receives a Gold Award for Real-World Protection, and a joint Silver Award for Malware Protection. Its well-designed user interface includes a customisable home page, and external drives are automatically scanned on connection.
ESET receives the Gold Award for False Positives, a joint Silver Award for Advanced Threat Protection, and the Bronze Award for Performance. It reached Advanced+ level in three tests this year, and Advanced in a further two. Reviewers were impressed with the clear and simple layout of the GUI, and ease of use.
G Data takes this year’s Bronze Award for Advanced Threat Protection. It also received three Advanced+ and three Advanced Awards in the 2021 tests. Reviewers noted its proactive scanning of external drives, detailed status display, and excellent access control.
K7 got three Advanced+ Awards and one Advanced Award in the 2021 tests. Its highly sensitive on-access protection detects malware on external drives or network shares as soon as they are opened. The K7 Firewall co-ordinates perfectly with Windows’ settings, and reviewers noted its simple, easy-to-use interface.
Kaspersky takes the Top-Rated Product Award for 2021, having got 5 Advanced+ and 2 Advanced Awards in the year’s tests. In addition, it receives Silver Awards for False Positives and Performance, and joint Silver Awards for Real-World Protection and Advanced Threat Protection. External drives are automatically scanned on connection, and malware in network shares is detected as soon as they are opened.
Malwarebytes received two Advanced Awards in this year’s tests. Reviewers noted the clear status alerts and fine-grained access-control options. The choice of light and dark modes lets you optimise readability of the interface.
McAfee is AV-Comparatives’ Product of the Year for 2021, having received 6 Advanced+ Awards and one Advanced Award in the year’s tests. It took a Gold Award for the Malware Protection Test, along with joint Silver Awards for the Real-World Protection and Advanced Threat Protection Tests. Its user interface is clean, modern and touch friendly, and the McAfee Firewall co-ordinates perfectly with Windows’ settings.
Microsoft received two Advanced+ Awards in the year’s tests. The product is integrated into Windows 10, and has a simple, unobtrusive interface. Its sensitive on-access protection detects malware on external drives and network shares as soon as these are opened.
NortonLifeLock took two Advanced+ and three Advanced Awards in this year’s tests. It has a well-designed overall user experience, with detailed malware information accessible from alerts. Access control options are excellent.
Panda received two Advanced+ and two Advanced Awards in this year’s tests. Reviewers noted its security-blog feature, which lets you read articles on various IT-security related topics. Although it is a free product, upselling is very subtle and unobtrusive.
TotalAV takes the Bronze Award for False Positives this year. It also got three Advanced+ Awards and one Advanced Award in the 2021 tests. It features a very simple, easy-to-navigate program window. Malware alerts are informative, and let you manage multiple detections from a single dialog box.
Total Defense receives the Bronze Award for Malware Protection in 2021. It additionally took three Advanced+ Awards and one Advanced Award in this year’s tests. Its user interface stands out for its simplicity. External drives are automatically scanned on connection, and sensitive on-access protection detects malware on a network share as soon as this is opened.
Trend Micro received four Advanced Awards in this year’s tests. The user interface presents a simple overview, but allows easy access to advanced options. Its persistent malware and status alerts stand out, and the online manual is clear and easy to read.
VIPRE receives a joint Silver Award for Malware Protection, and Bronze for the Real-World Protection Test. It also took four Advanced+ and two Advanced Awards in this year’s tests. It has a very clean design and a good online help feature, which you can search directly from the program. Sensitive on-access protection proactively deletes malware on an external drive as soon as this is opened.
Advice on Choosing Computer Security Software
There is no such thing as the perfect security program, or the best one for all needs and every user. Being recognized as “Product of the Year” does not mean that a program is the “best” in all cases and for everyone: it only means that its overall performance in our tests throughout the year was consistent and unbeaten. Before selecting a security product, please visit the vendor’s website and evaluate their software by downloading a trial version. Our awards are based on test results only and do not consider other important factors (such as available interface languages, price, and support options), which you should evaluate for yourself.
Overview of levels reached during 2021
AV-Comparatives provides a wide range of tests and reviews in comprehensive reports (https://www.av-comparatives.org/consumer/test-methods/). Annual awards for 2021 are based on the Public Consumer Main Test-Series: Real-World Protection Test, Performance Test, Malware Protection Test,False-Alarm Test and the Advanced Threat Protection Test.
All the programs tested are from reputable and reliable manufacturers. Please note that even the STANDARD level/award requires a program to reach a good standard, although it indicates areas which need further improvement compared to other products. ADVANCED indicates that a product has areas which may need some improvement, but is already very competent. Below is an overview of awards reached by the various anti-virus products in AV-Comparatives’ consumer main test-series of 2021.
Key: * = Standard, ** = Advanced, *** = Advanced+
Unfortunately, we cannot provide results or an award for Microsoft Defender in the February-May 2021 Real-World Protection Test. During the testing, despite being configured for automatic updates and performing manual updates, parts of Defender were not correctly updated. As there were no error messages, this issue was only discovered at the beginning of June and required a new installation of the OS.
Award Winners
Awards for individual tests
For each of the test types* in the Public Consumer Main Test Series (Real-World Protection, Malware Protection, Advanced Threat Protection, Performance and False Positives), we give Gold, Silver and Bronze awards, for the first, second and third highest-scoring products, respectively.
Awards for all combined scores of all tests
As in previous years, in 2021 we are giving our Product of the Year Award to the product with the highest overall scores across all the tests in the Public Consumer Main Test Series. This depends on the number of Advanced+ awards received in all the tests. As the overall scores are considered, a product can receive the Product of the Year award without necessarily reaching the highest score in any individual test. A product cannot win the Product of the Year Award in 2 consecutive years if in the second year there is another product (or other products) with the same highest award levels.
We sometimes have a situation where two products reach exactly the same highest award levels. We think it is fair to highlight the fact that more than one product has reached an excellent level, and so in such cases we give the Product of the Year Award to the product that didn’t get it most recently. The other product with the same highest award levels will receive the Outstanding Product Award. It even happens that three or more products reach the same highest award levels (as is the case this year). In this situation, the product with the highest individual scores wins Product of the Year, while the others receive the Outstanding Product Award.
As in previous years, we will also be giving Top Rated Awards to a select group of tested products which reached a very high standard in the Public Consumer Main Series tests. We have used the results over the year to designate products as “Top Rated”. Results from all the tests are assigned points as follows: Tested = 0, Standard = 5, Advanced = 10, Advanced+ = 15. Products with 90 points or more are given the Top Rated award.
To get the Approved Windows Security Product Award, at least 35 points must be reached.
*For some test types, there may be two actual tests conducted in a year; the awards are based on the combined score of both tests.
Product of the Year 2021
AV-Comparatives’ 2021 Product of the Year Award goes to:
McAfee
Outstanding Products 2021
AV-Comparatives’ 2021 Outstanding Product Awards go to (in alphabetical order):
Avast, AVG, Bitdefender
Top-Rated Product 2021
AV-Comparatives’ Top-Rated Award for 2021 goes to:
Security products include various different features to protect systems against malware. Such protection features are taken into account in the Real-World Protection Test, which tests products under realistic Internet usage conditions. Products must provide a high level of protection without producing too many false alarms, and without requiring the user to make a decision as to whether something is harmful or not.
The programs with the best overall results over the course of the year were from: Bitdefender, Kaspersky, McAfee and VIPRE.
The Malware Protection Test evaluates an AV product’s ability to protect against malware coming from removable devices or network shares. Products must provide a high level of protection without producing too many false alarms. In the Malware Protection Test, all samples not detected on-demand or on-access are executed.
McAfee, Bitdefender, VIPRE and Total Defense scored well in both tests.
False positives can cause as much trouble as a real infection. Due to this, it is important that anti-virus products undergo stringent quality assurance testing before release to the public, in order to avoid false positives. AV-Comparatives carry out extensive false-positive testing as part of the Malware Protection Tests. Additionally, also false alarms from the Real-World Protection Test are counted for this category.
The products with the lowest rates of false positives during 2021 were ESET (1), Kaspersky (3) and TotalAV (7). These figures represent the SUM of the false positives from all FP Tests.
ESET
Kaspersky
TotalAV
False Alarm Testing is included in each Protection Test.
Security products must remain turned on under all circumstances, while users are performing their usual computing tasks. Some products may have a higher impact than others on system performance while performing some tasks.
Panda, Kaspersky and ESET demonstrated a lower impact on system performance than other products.
AV-Comparatives’ awards and rankings are based entirely on products’ technical capabilities, not on any other factors such as costs. However, the price of a security product is obviously a factor that users consider. We have listed here some considerations that readers may like to take into account when choosing their security software.
We would not recommend choosing a security product based on price alone. We suggest that you look at protection, performance and ease of use first, and consider the price last.
It is clear that some free programs´ protection and performance are on a par with paid-for programs, and are easy to use. One of the main disadvantages to free programs can be limited technical support, however. Additional features may also be lacking or limited. Finally, some free programs make extensive advertising for their paid-for counterparts, which many users may find irritating.
It is possible to buy security programs from third-party vendors (e.g. online or in electronics stores) more cheaply than the vendor’s list price. We would advise users to check that they are buying the latest version of the product, or that the product purchased can be upgraded to the latest version without additional cost.
When purchasing a product from the vendor’s own website, there are two factors that users might like to consider. The first concerns multi-platform licences. Many vendors now offer a licence for e.g. 5 devices, which you can use for Windows, macOS or Android devices, or a mix. In some cases, the price may vary depending on which section of the website you buy from. For example, a multi-platform licence bought from the “Products for Mac” page may be a different price from an (effectively identical) product bought from the “Products for Windows” page.
The second point to consider is auto-renewal. Some vendors offer or automatically apply auto-renewal of the subscription when you buy from their website. Unless you cancel this, you will be charged again at the end of the initial licence period, and the subscription will be extended accordingly. Clearly this is to the advantage of the vendor, as it makes it easy for them to keep you as a customer. If you buy an AV product from the vendor’s own website, we suggest that you check the auto-renewal situation first. Some vendors do not have auto-renewal at all. Others let you opt in by putting a tick in a checkbox, while others have auto-renewal activated by default, but let you opt out easily by removing the tick from the checkbox. In some cases, auto-renewal is automatically applied, and cannot be deactivated at the time of purchase; you have to message the vendor afterwards to cancel it. This gives the vendor the opportunity to try to keep you as a customer, by offering various incentives. Most vendors offer the first year at about half the price of what they charge for subsequent years with auto-renewal.
Before agreeing to purchase a product with auto-renewal, we suggest that you find out what the renewal price will be when your subscription expires. In some cases, this may be very much higher than the initial purchase price. However, it might also be cheaper. It is also possible that if you opt out of auto-renewal at the time of purchase, the price shown in the basket will increase. Our Security Survey indicates that most users are not happy with mandatory auto-renewal.
In the table below we have listed the (rounded) current discount price, full list price and auto-renewal prices (where applicable), including sales tax, for the paid products in the 2021 Main Test Series. We note that nearly all vendors show prices for consumer products on their websites with taxes included, but this is not guaranteed. You might like to check on this before buying a product. Please also note that changes in currency exchange rates may influence the price in some cases.
Key: Ratio of rounded autorenewal price to rounded discounted first-year price is (green) no more than twice; (yellow) more than twice but no more than three times; (red) more than three times.
Where “Auto-renewal on by default” is shown as “optional”, it means that auto-renewal is activated by default, but can be deactivated at the time of purchase, e.g. by removing a tick/checkmark in the relevant box. Where it is shown as “mandatory”, you cannot deactivate it at the time of purchase, but have to cancel it afterwards. Each vendor has its own procedure for deactivating auto-renewal, so we suggest that readers find out about this in good time before the renewal date. It might be that e.g. uninstalling the product from the computer makes cancelling auto-renew more difficult.
It is possible that some vendors may offer additional discounts at specific times or under specific circumstances. Please note that TotalAV charges a higher price (203€) on subsequent years (after second year).
The aim of this table is to compare each product’s full list price with both its discounted price for the first year and its renewal price for the second year of the subscription. We advise readers NOT to use the data here to compare prices between products. Some products provide just malware protection, whilst others include e.g. parental controls as well, so it would not be a fair comparison. Our 2021 Consumer Main Test Series tested free products by Avast, AVG, Microsoft and Panda. These products are not shown in the table, as pricing does not apply to them.
For two of the products shown in the table, the lowest-price subscription allows you to install the product on more than one device. If you only want to protect one device with these products, you will still have to pay the price shown here.
We have given the prices shown on the respective vendor’s website at the time of writing (December 2021), applicable to users in Austria. This year, the UK’s consumer watchdog published guidelines for AV vendors on acceptable practice for auto-renewal. For further details, please see our blogpost.
Although the majority of vendors make auto-renewal mandatory, we should point that most commendably, Bitdefender, ESET, G Data, K7 and Kaspersky do not impose auto-renewal on users.
Help and support for technical issues
One reason for purchasing an AV product, as opposed to using a free one, is that help and extended support options for technical issues are included in the licence fee. Effective support from the vendor can be hugely valuable in solving any sort of technical issue with the product. Whilst you might not need it that often, when you do need it, it’s really good to have it. If you are using a product, and the vendor does not provide effective support when you need it, you might want to consider using a different product instead.
For clarity, we would define the difference between “help” and “support” as follows. By “help” we mean manuals, online help pages, FAQs and chat bots, where you can access previously-prepared answers and instructions. By “support” we mean communication with a member of the vendor’s staff (via email, chat, phone), where you can ask for assistance with your specific problem. User forums may or may not fall into the category of vendor support. In some cases, you may get a reply from an official representative of the vendor, whereas with others you can only ask other users.
Before buying a security solution, you might like to investigate the help and support options provided by the vendor. Here we have noted some things to consider if you do this.
A downloadable user manual is helpful, as it can be used offline. So, if you were having problems accessing the Internet, you could check the manual to see if the product’s network protection features might be having any effect on this, and reconfigure them if necessary.
Some vendors offer a free malware-removal service with their products. This is likely to be cheaper than going to a computer repair shop. Vendors may also offer a “malware-removal guarantee”, whereby if your computer is infected and the vendor cannot remove the malware, you get back the money you paid for the product.
We note that some help and support options require you to log in to the vendor’s online account before you can use them. In such cases, you might not be able to see what options are available until you actually purchase the product. Some vendors make it quite difficult to find contact options for e.g. phone support; you may have to click your way through a number of other pages to find them. You might also find that a vendor additionally offers a premium support service, but if you have purchased the product, you should be entitled to support as part of the licence fee.
Many vendors have different websites for different countries. In some cases, you may have to contact the support service in the country whose website you purchased the product from. Help and support options available for a product may vary from country to country. You should also consider that for telephone support, you may have to call a number in another country, which could mean higher telephone charges. Also, you might not get support in your native language, and you might have to call at an inconvenient time for you, if the vendor only provides support e.g. during their own office hours.
Sorry, AV-Comparatives does not provide technical support for any product. However, if you need assistance with your AV product, we have listed below some of the English-language help and support options for the products in our Consumer Main Test Series. You can click on the links to go directly to the relevant pages of the respective products’ websites.
The aim of the user-experience review is to give readers an idea of what each tested product is like to use in everyday situations. For each of the tested products, we have looked at the following points (where applicable).
About the program
To start off with, we state whether the program is free or has to be paid for. We don’t list individual protection components (e.g. signatures, heuristics, behavioural protection), for the following reasons. Our protection tests verify how well each program protects the system, whereby it is not important which component(s) are involved. It is not the number of features that is important, but how effectively they work. Also, different vendors may have different names for individual functions, or combine multiple types of functionality under one name. This could make it misleading to compare products using the vendors’ component names. For readers’ convenience, we do note any non-malware-related features, such as parental controls or spam filtering. With the exception of a replacement firewall (see below), we do not check the functionality of these additional features.
Setup
We note any options available, whether you have to make any decisions, and any other points of interest, such as introductory wizards that explain the program’s features. We suggest that there should be a simple installation option for non-expert users. If at any stage the user has to make a decision in order to proceed, the options should be explained simply and clearly.
System Tray icon
Here we state what functionality is available from the program’s System Tray icon. This can be a convenient way of accessing commonly-used functions, such as scans and updates. A System Tray icon is a standard feature for modern security programs for consumers. We regard it as a very useful means of showing that the program is running. However, we note that by default, Windows 10 hides the System Tray icons of third-party programs, so many non-expert users will probably not see the icon for a non-Microsoft AV app.
Security alerts
Here, we disable the program’s real-time protection, and check to see what alerts are shown in the program window or elsewhere. We also look for a quick and easy means of reactivating the protection. An effective status display in the main program window, which shows a clear warning if protection is disabled, is a very standard feature, as is a “Fix-All” button/link with which the user can easily re-enable protection if it is not active. We regard both of these as very important, especially for non-expert users. We suggest that additional pop-up alerts, which the user would see even if the program window were not open, are a desirable bonus.
Malware detection alert
We check what sort of alert each program shows when malware is encountered. To do this, we try to copy some malware samples from a network share to the Windows Desktop of our test PC. If the AV product does not detect the copied malware, we then execute one of the samples (by this stage at the latest, all the tested programs detected the malware samples used).
At whichever point the malware is detected, we look to see what sort of alert is shown, if the user has to take any action, and how long the alert is shown for. If the message box provides a link to more details, we click on this to see what information is provided. We also note whether multiple alerts are shown when multiple malicious files are detected at the same time.
We regard it as ideal if the malware is deleted or quarantined automatically, without the user having to make a decision on what to do with it. We would definitely recommend that any alert box should NOT include an option to instantly whitelist the file (i.e. allow it to be executed there and then). A much safer option is to quarantine the file, after which power users could go into the program’s settings to whitelist and restore it if they wanted.
We suggest that persistent alerts, which are displayed until the user closes them, are ideal, as they ensure the user has time to read them. If a separate alert box is shown for every malicious file discovered, it can be a nuisance to have to close them all when multiple detections are made at once. We would say that a single alert box that lets you browse through detections, but can be closed with a single click, is optimal.
Malware detection scenarios
Here we check how each AV program deals with malware on an external drive. For our functionality check, we copy a few highly prevalent malware samples and a few clean program executable files to a USB flash drive. We then copy the same files into a sub-folder on the same drive. We do this because in the past, we have noticed that some AV programs would deal with malware differently, depending on whether it was mixed with clean files, and whether it was in the drive root or a sub-folder.
The next step involves simply connecting the USB drive to the test system, to see how the security solution reacts. Some products will scan the drive automatically; others will prompt the user to run a scan; others still will take no action.
If the drive is automatically scanned, we check to see whether all the malware has been detected and removed. If this is the case, we do not run a further on-demand scan of the drive, but describe the results of the automatic scan. We also report what happens if malware is copied from a network share, in order to check whether on-access or on-execution protection (terms explained below) is provided.
If the AV program prompts us to run a scan on the USB drive, we decline, and open the drive in Windows File Explorer. If the security solution takes no action when the USB drive is connected, we likewise open it in Explorer. In either case, if the malware is not detected at this point, we attempt to copy the files on the drive to the Windows Desktop. If this is successful, we then execute them. We note at which stage the malware is detected.
Amongst other things, this allows us to see if the AV product has on-access protection (meaning the copied malware will be detected during or shortly after the copy process), or on-execution protection (meaning that malicious files can be copied to the system, but will be detected as soon as they are run). Regarding on-access versus on-execution protection, we suggest that for most people, the former is the better option. Whilst it may have a somewhat higher effect on system performance, it helps ensure that users cannot inadvertently pass on malware to other people, e.g. by copying it to a flash drive or network share. We note that some of the tested programs have very sensitive on-access protection, which detect not only the copied malware, but also the source malware on a network share or USB drive. For most people, this is surely optimal.
For programs that did not automatically scan the USB drive and remove all the malware, we re-copy the mix of malicious and clean files to the drive, reconnect it, and run an on-demand scan. We look at how the scan results are displayed, and whether the user needs to make any decisions. If multiple malicious files are found in a scan, we note if it is easy to carry out a safe action on all of them at once, rather than having to select an action for each one individually.
Scan options
Here we look at the different types of on-demand scan provided by each program, how to access and configure them, set scan exclusions, schedule scans, and what options are provided for PUA detection.
Quarantine
In the program’s quarantine function, we look to see what information it provides about the detection location/time and the malware itself, and what options are available for processing it, e.g. delete, restore or submit to vendor for analysis.
Access control
For users who do not share their computer with anyone, this section is not relevant. However, if you share a computer, e.g. with your family at home, or colleagues in a small business, you might want to read it. We look to see if it possible to prevent other users of the computer from disabling the security program’s protection features, or uninstalling it altogether. There are two ways of doing this. Firstly, access can be limited using Windows User Accounts: users with Administrator Accounts can change settings and thus disable protection, whereas those with Standard User Accounts can’t. Alternatively, a program can provide password protection, so that any user – regardless of account type – can only change settings by entering a password. Some programs provide both methods, which we regard as ideal. When testing access control, we try to find all possible means of disabling protection, to ensure that any restrictions apply to all of them.
Help
In this section, we take a quick look at whatever help features can be directly accessed from the program itself. Some vendors will have additional online resources, such as manuals and FAQ pages, that can be found by visiting their respective websites.
Logs
Here we note what information is provided in the program’s log function.
Firewall
Some of the products in this year’s tests have a replacement firewall. That is to say, they include their own firewall, which is used in place of Windows Firewall. For these products, we perform a very simple functionality test, to check that basic functions of their replacement firewalls work as expected. In essence, this just verifies that network discovery and file sharing are allowed on private networks, but blocked on public ones.
For this check, we use a laptop PC with a wireless network adapter, running a clean installation of Windows 10 Professional. It is initially connected to a wireless network that is defined as Private in Windows’ network status settings. We share the Documents folder, with read and write permissions for “Everyone”, and enable Remote Desktop access.
In the Windows settings, we turn on network discovery, file sharing, and Remote Desktop access for Private networks, but turn them all off for Public networks. We then verify that all three forms of network access are working as expected, i.e. allowed for Private networks but blocked for Public ones.
We then install the security product with default settings, and reboot the computer. If during installation the third-party firewall in the security product were to prompt us to define the current network as public or private, we would designate it as private at that point. After the reboot, we check to see if we can still ping the PC, open and edit a document in its shared folder, and gain Remote Desktop access. We would expect the third-party firewall to allow all these types of access.
We then connect the laptop to a new, unknown wireless network, which we define as Public in Windows’ network status prompt. If the third-party firewall were to display its own network-status prompt, we would also choose the public/untrusted option here. Next, we attempt to ping the test laptop (using IPv4) from another computer on the same network, access its file share, and log in with Remote Desktop. We would expect the third-party firewall to block all these forms of access, as Windows Firewall would do.
We also check what happens if the network status is changed from Private to Public in Windows network settings, i.e. if the third-party firewall in the tested product picks up the new status automatically, or displays its own prompt at that point.
In our opinion, a third-party firewall in a security program should either adopt Windows’ network status settings automatically, or achieve the same result by means of displaying its own prompts. This allows laptop users to share files when at home, but keep intruders out when using public networks. We recognise that some users may like to use Windows Firewall – which is a known standard – rather than the third-party firewall in their security product. For such users, it is ideal if the security product’s own firewall can be cleanly disabled (i.e. permanently disabled, without security alerts being constantly shown), and Windows Firewall can be activated instead. We check to see if this is possible.
Other points of interest
Here we note anything we observe or find out about a product that we think is relevant. This may include privacy-related items, descriptions of the product on the vendor’s website, unusual places to find features, customisation options, prompts to install additional features, upselling, bugs, explanations of functions, and out-of-the-ordinary features and notifications.
Support for Windows 11
All the tests in the 2021 Consumer Main Test Series were performed using Windows 10. We also used Windows 10 for the review functionality checks described in this section. However, earlier this year we ran Windows 11 compatibility checks on all the programs in the Consumer Main Test Series, and found out which of them are supported by their respective vendors on the new OS. Results can be found here: https://www.av-comparatives.org/av-comparatives-releases-list-of-working-consumer-av-programs-for-windows-11/
Avast Free Antivirus is, as its name suggests, a free security program. In addition to anti-malware features, it includes a manual software-updater and a feature that alerts you if the password for a specified online account leaks online. You can find out more about Avast Free Antivirus on the vendor’s website: https://www.avast.com/free-antivirus-download. Avast tell us that the program complies with the WCAG 2.0 AA accessibility standard. You can find out more about this standard here: https://www.w3.org/WAI/WCAG2AA-Conformance
Summary
The interface of Avast Free Antivirus is clean, touch-friendly, and easy to navigate. We liked the informative malware detection alerts, which let you manage multiple detections from a single alert box, and persist until closed by the user. The setup wizard provides the choice of a simple, one-click installation, or a fully customisable installation, making it ideal for both non-experts and power users. There is a good range of scan options, and on-access protection means that files are scanned for malware if you try to copy them to your PC.
Setup
The default installation of Avast Free Antivirus includes the Avast Secure Browser, and sets this as the default browser. You can easily opt out of this by removing the relevant ticks (checkmarks) on the first page of the setup wizard. We chose not to install the Avast browser for our functionality test. Setup lets you change the interface language, after which you can simply click Install. For power users, a custom installation is provided. With this option, you can select individual components to be installed, and change the installation folder. We used the default configuration (all components except Firewall and Passwords are installed). The wizard prompted us to run a Smart Scan when setup completed.
System Tray icon
The System Tray menu lets you open the program window, disable protection for a specified time, use “Silent Mode”, open quarantine, update the program and/or definitions, and see program and registration information.
Security status alert
When we disabled real-time protection in the program’s settings, an alert was shown on the program’s home page (screenshot below). We were able to reactivate the protection easily by clicking Turn On.
We note that if you click the three dots button, you will get the option Ignore. We do not recommend using this, as it permanently disables the warning message normally shown when protection is disabled.
Malware detection alert
When a malicious file was detected in our functionality check, Avast played a warning sound and displayed the alert shown below. We did not need to take any action. The alert persisted until we closed it.
Clicking See details displayed additional information about the threat:
When multiple malicious files were detected at the same time, Avast showed just one alert box. This allowed us to browse through the various threats to see details, and to close all alerts with a single click.
Malware detection scenarios
When we connected a USB drive containing some malware to the system, Avast offered to scan the drive. This prompt can be disabled directly from the alert box. We chose not to run a scan, but instead opened the USB drive in Windows File Explorer. Avast did not initially take any action. However, as soon as we copied the malicious files to the Windows desktop, Avast detected and quarantined the copied files.
When we ran an on-demand scan of malware samples on a USB drive, Avast presented us with a list of threats found. From this, we were able to select all threats with one click, and deal with them by clicking Resolve All.
Scan options
The Smart Scan button on the home page runs a very quick malware scan, and checks for outdated apps and browser threats. It also displays “Advanced issues”, which is a means of promoting features only found in Avast Premium Security. We would suggest that users obtain independent advice on what other types of security/performance-related products are appropriate to their needs before buying any additional products.
The Protection\Virus Scans page additionally provides the options Full\Targeted\Boot-Time\Custom scans. A Custom scan can be scheduled on a daily, weekly or monthly basis. You can also scan a local drive, folder or file, or a network share, by using Windows Explorer’s right-click menu.
Under Menu\Settings\Protection\Virus Scans, you can change the default action to be taken when malware is discovered, and whether to scan for potentially unwanted applications. PUA detection is enabled by default for on-demand scans and real-time protection. Scan exceptions can be configured on the General tab of the settings dialog.
Quarantine
Avast’s quarantine feature can be accessed from the Protection tab. It shows the file names and detection names of quarantined items, along with their location and date/time of detection. You can select individual files, or all of them, and take one of the following actions: Delete, Restore, Restore and add exception, Extract, Send for analysis. The Extract function lets you restore the file to a custom location.
Logs
A basic log of scans completed can be found by clicking Protection/Virus Scans/Scan History. This shows the date of each scan, along with the detection name, file name/path and action taken for each detection.
Help
The help feature can be accessed by clicking Menu\Help\Help. This displays a series of frequently asked questions, such as “How do I scan my PC for potential threats?” and “How do I resolve my protection status?”, grouped together into categories. A simple text-only answer is provided for each question.
Access control
Standard Windows User accounts have full access to the program’s settings by default, and so can disable protection features. However, they cannot uninstall the program. If you share your computer, you might like to use the Password feature (under Menu\Settings\Password). There are two options for doing this. The Require password only to access settings option locks the settings dialog. However, it is still possible to disable protection using the System Tray menu. The second option, Require password to open Avast and access settings, makes it impossible to access settings or disable protection by any means. However, it also locks any form of access to the main program window and the functionality of the System Tray menu. The only thing a user can do then is to run a right-click scan from Windows Explorer, though it will not be possible to see the scan results or take any action on malware found.
Other points of interest
The Rescue Disk feature can be found on the Protection\Virus Scans This allows you to make a bootable CD/DVD/flash drive that you can use to scan and remove malware from an infected PC.
By default, Avast collects user data via 3rd-party analysis services. However, they inform us that this is only used in-house for e.g. product improvement purposes.
AVG AntiVirus Free is a free security program, as its name suggests. In addition to anti-malware features, it includes Data shredder, a secure delete function. You can find out more about the program on the vendor’s website: https://www.avg.com/en-eu/free-antivirus-download
Summary
The interface of AVG AntiVirus Free is modern, touch-friendly, and very straightforward to use. We liked the informative malware detection alerts, which let you manage multiple detections from a single alert box, and persist until closed by the user. The setup wizard provides the choice of a simple, one-click installation for non-experts, or a fully customisable install for power users. There is a good range of scan options, and on-access protection means that files are scanned for malware if you try to copy them to your PC.
Setup
The default installation of AVG AntiVirus Free includes the AVG Secure Browser, and sets this as the default browser. You can easily opt out of this by removing the relevant ticks (checkmarks) on the first page of the setup wizard. We chose not to install the AVG browser for our functionality test. Setup lets you change the interface language, after which you can simply click Install. For power users, a custom installation is provided. With this option, you can select individual components to be installed, and change the installation folder. We used the default configuration (all components except Firewall selected) here. The wizard provides the opportunity to upgrade to AVG’s paid-for Internet Security program. It also prompted us to run a scan when setup completed. At the end of this, the user is prompted to run a Smart Scan once a month. When we first opened our default browser after installing AVG Free, we were prompted to install the AVG Online Security add-on from the Chrome Web Store.
System Tray icon
The System Tray icon menu lets you open the program, scan the computer, and disable protection.
Security status alert
When we disabled real-time file-system protection in the program’s settings, an alert was shown on the status area and Computer tile of the main program window (screenshot below). We were able to reactivate the protection easily by clicking Turn on.
Malware detection alert
When a malicious file was detected in our functionality check, AVG blocked it and displayed the alert shown below. We did not need to take any action. The alert persisted until we closed it.
Clicking See details displayed additional information about the threat:
When multiple malicious files were detected at the same time, AVG showed just one alert box. This allowed us to browse through the various threats to see details, and to close all alerts with a single click.
When we connected a USB drive containing some malware to the system, AVG offered to scan the drive. This prompt can be disabled directly from the alert box. We chose not to run a scan, but instead opened the USB drive in Windows File Explorer. AVG did not initially take any action. However, as soon as we copied the malicious files to the Windows desktop, AVG detected and quarantined the copied files.
When we ran an on-demand scan of malware samples on a USB drive, AVG presented us with a list of the items detected, and noted that they had all been quarantined. We then just had to click Done to close the scan results window.
Scan options
The Run Smart Scan button on the home page runs a very quick malware scan, and checks for browser threats. It also displays “Advanced issues”, which is a means of promoting features only found in AVG Internet Security. When the scan is finished, the program suggests you schedule a monthly scan. Finally, it prompts you to purchase AVG TuneUp, which is a system-optimisation program. We would suggest that users obtain independent advice on what other types of security/performance-related products are appropriate to their needs before buying any additional products.
If you click the three dots icon next to the Run Smart Scan button, a menu with scan options opens. This additionally lets you run a Deep Scan (full scan), USB/DVD scan, file or folder scan, or boot-time scan. You can also set up a scheduled scan from here. It is also possible to scan a local drive, folder or file, or a network share, using Windows Explorer’s right-click menu.
Under Menu\Settings\General\Exceptions you can configure scan exceptions. Basic Protection\Detections lets you change the real-time protection’s default detection behaviour (Fix automatically) and PUA detection (Ask me what to do). Under Basic Protection\Scans you can configure options for on-demand scans, including whether to detect PUAs (on by default).
Quarantine
AVG’s quarantine page can be accessed from the Tools section of the Menu. It shows the file names and detection names of quarantined items, along with their location and date/time of detection. You can select individual files, or all of them, and take one of the following actions: Delete, Restore, Restore and add exception, Extract, Send for analysis. The Extract function lets you restore the file to a custom location.
Logs
AVG AntiVirus FREE doesn’t have a separate log feature. However, the date and time of malware detections can be seen in the Quarantine window.
Help
The help feature can be accessed by clicking Menu\Help. This displays a series of frequently asked questions, such as “How do I scan my PC for potential threats?” and “How do I resolve a red protection status?”, grouped together into categories. A simple text-only answer is provided for each question.
Access control
By default, Standard Windows User accounts are able to change settings and disable protection features, but not uninstall the program. If you share your computer, you might like to use the Password feature (under Settings\General). If you choose the Require password to open AVG and access settings option, nobody will be able change any settings or disable protection without knowing the password. The program window will be completely inaccessible, and the only action unauthorised users can perform is a right-click scan from Windows Explorer. It will not be possible to see the results, however. The Require password only to access settings option locks the settings dialog, but all users can still disable protection from the System Tray menu, or the Computer tile on the home page.
Other points of interest
The manual update function is found under Menu/Settings/General/Update.
By default, AVG collects user data via 3rd-party analysis services. However, they inform us that this is only used in-house for e.g. product improvement purposes.
Avira Antivirus Pro is a paid-for security program. In addition to anti-malware features, it includes a VPN with data/location limitations, a privacy settings manager, password manager, file shredder, and also performance-tuning tools with some limitations. There is no free trial as such. However, Avira Free Antivirus has an identical interface, so you could use this to see what the program looks like. There is also a 60-day trial of the Avira Prime service, which includes Avira Antivirus Pro. You can find out more about Avira Antivirus Pro on the vendor’s website: https://www.avira.com/en/antivirus-pro
Summary
Installation of Avira Antivirus Pro is very straightforward, and the program’s simple, touch-friendly interface is easy to navigate. There is a choice of light and dark modes for this. Safe default settings and sensible alerts are provided. In our functionality check, Avira’s highly sensitive on-access protection proactively deleted malware on an external drive or network share as soon as we opened the drive/share in Windows File Explorer.
Setup
There are two ways to set up Avira Antivirus Pro. Firstly, you can download and install the free version of Avira Antivirus, and log in with your Avira account. This will apply your Avira Antivirus Pro licence to the installed product. Secondly, you can log into your Avira online account, and go to Devices\Protect more devices\Windows to download the installer. You can email a link to yourself from here. Just one click is required to complete the setup wizard. You are prompted to run a Smart Scan when installation completes.
System Tray icon
The System Tray icon menu lets you open the program window, run scans and updates, and enable/disable real-time protection.
Security status alert
When we disabled real-time protection in the program’s settings, an alert was shown on the program’s home page. We were able to reactivate the protection easily by clicking Turn on.
Malware detection alert
When a malicious file was detected in our functionality check, Avira played an audio alert and displayed the message box shown below. We did not need to take any action. The alert persisted until we closed it.
When we clicked on Details, Avira’s main program window opened on the Security\Protection options page, but this did not provide any information about the detected malware. When multiple malicious files were detected at the same time, Avira showed just one alert box.
Malware detection scenarios
When we connected a USB drive containing some malware to our test system, Avira did not initially take any action. However, as soon as we opened the drive in Windows File Explorer, Avira immediately detected and quarantined the malicious files on the drive itself – meaning that we could not even begin to start copying them. When we accessed malware on a network share, Avira also deleted the malware in the shared folder immediately. We regard this highly sensitive on-access protection as outstanding.
When we ran an on-demand scan of malware samples on a USB drive, Avira presented us with a list of the items found, with a suggested action (Clean up) for each one. We just had to click Apply now to deal with all of them. We note that it is possible to change the suggested action to be taken for any threat to Ignore once or Ignore always, by right-clicking its entry.
Scan options
You can run a Smart Scan from the button of the same name on the program’s home page. This takes about a minute, and is supposed to check for security, privacy and performance issues. It serves to advertise Avira Prime, by showing additional actions that could be taken with this service. We would suggest that users obtain independent advice on what other types of security/performance-related products are appropriate to their needs before buying any additional products.
Under Security\Virus Scans you can choose from quick, full and custom scans, all of which can be scheduled. You can also scan a local drive, folder or file, or a network share, by using Windows Explorer’s right-click menu. Aside from setting up scheduled scans, we could not find any scan options in Avira’s program interface.
Quarantine
This is found on the Security page. It displays the threat name, file name and path, plus date and time of detection. You can select individual quarantined files, or all together, and restore or delete them.
Logs
We could not find a log feature as such in Avira Antivirus Pro. The Quarantine page shows the date and time of malware detections.
Help
Clicking Help in the ? menu opens Avira’s online manuals page. Under Windows you will find a searchable FAQ feature. Simple text instructions and explanations are provided for each topic. In some cases, these are illustrated with screenshots or videos.
Access control
Standard Windows User accounts cannot disable protection features, or uninstall the program. This is as it should be, in our opinion.
Other points of interest:
The Firewall feature on the Security page provides controls for the Windows Defender Firewall. Avira does not provide its own firewall.
Subscription information can be found by clicking the ? menu, then About, Manage my licences. This opens the subscriptions page of your online Avira account.
Avira’s Browser Safety, Password Manager and Safe Shopping add-ons are added to Chrome by the setup wizard, although they have to be activated manually.
Whenever malware is detected by on-access protection, Avira runs a quick scan afterwards.
There is a choice of light and dark modes for the program window, so you can choose whichever you find more readable.
Bitdefender Internet Security is a paid-for security program. In addition to anti-malware features, it includes a replacement firewall, vulnerability scanner, antispam, ransomware remediation, Wi-Fi security advisor, parental controls, file shredder (secure deletion), and a limited VPN. You can find out more about the program on the vendor’s website: https://www.bitdefender.com/solutions/internet-security.html
Summary
Bitdefender Internet Security is very straightforward to install and navigate, and has good scan options. We liked the ability to customise the tiles on the home page. Most commendably, malware on a USB drive is automatically detected when the drive is connected, and on-access protection means that files are scanned for malware if you try to copy them to your PC. Help features and access-control options are both excellent. Default options are very safe for non-expert users, while for power users, the Attack Timeline feature provides useful information for understanding threats.
Setup
Installation is extremely simple and completes very quickly. An optional “Device Assessment” is suggested at the end of the setup process; this took 2 minutes in our functionality check. You have to create a Bitdefender account, or log in with an existing one. You can then enter a licence key, or opt to use the 30-day free trial. You are prompted to set up ransomware protection when the wizard finishes. An optional short introductory wizard explains the program’s main features when the program window is first opened.
System Tray icon
The System Tray icon menu lets you open the program window, run updates, and see program information.
Security status alert
When we disabled real-time protection in the program’s settings, an alert was shown on the home page (screenshot below). We were able to reactivate the protection easily by clicking Enable Now.
Malware detection alert
When a malicious file was detected in our functionality check, Bitdefender displayed the alert shown below. We did not need to take any action. The alert persisted until we closed it.
Clicking View attack timeline opened the following message box, showing the Windows processes involved in the detection. For advanced users, this could be a valuable tool for understanding malicious programs and their actions.
When multiple malicious files were detected at the same time, Bitdefender showed just one alert.
Malware detection scenarios
When we connected a USB drive containing some malware to the system, Bitdefender offered to scan the drive. However, before we had time to react to this, Bitdefender had already scanned the drive automatically. It displayed a detection window, listing all the malicious files (shown below). We just had to select an action to take for all items, the options being Take proper actions, Delete, and Take no action (we chose Take proper actions) and click Continue. Bitdefender then quarantined the malware and ran a quick scan. We can only describe this proactive detection of malware on a USB device as exemplary.
When we tried to copy malware samples from a network share to our test PC, Bitdefender immediately detected and quarantined the copied malicious files.
Scan options
The Dashboard page lets you run a Quick Scan or System Scan. Under Protection\Antivirus\Scans you can additionally set up a Custom Scan, which can be scheduled. You are also provided with a wide range of options, including whether to scan for potentially unwanted applications, whether to scan the memory, and if only new and modified files should be scanned. On the Settings tab of the Antivirus page, you can create scan exceptions, open the quarantine, and configure (automatic) scanning of USB drives, optical media, and network drives. You can also scan a local drive, folder or file, or a network share, by using Windows Explorer’s right-click menu.
Quarantine
The Quarantine page (found under Protection\Settings) shows the file name and path, detection name, and time/date that each item was quarantined. From here, you can select one or multiple items, and delete or restore them.
Logs
At the end of a scan, it is possible to see a log of that scan. To find logs of previously-run scans, go to the Notifications page, and look for entries marked Device Scanning Completed. By clicking on the entry for a specific scan, and then View Log, you can see a very detailed record. This includes scan targets, detections, and action taken. Other than this, we could not find a log feature in the program.
Help
The lifebelt icon in the top right-hand corner of the window has links to the User Guide and SupportCenter. The User Guide is a very comprehensive manual of over 200 pages. It covers all aspects of installing, configuring and using the program. There is a glossary of relevant technical terms, and contact details for Bitdefender’s support services. The Support Center is a searchable FAQ. There are detailed instructions and explanations, very well illustrated with screen videos.
Access control
Standard Windows users cannot disable protection features, or uninstall the program. This is as it should be. You can also password protect the settings, meaning that no other users can disable protection without entering the password.
Bitdefender Firewall
In our functionality check, Bitdefender’s firewall co-ordinated with Windows’ public/private network types. So for example, when we joined a new wireless network and designated this as public at the Windows connection prompt, the Bitdefender firewall also adopted the public setting. We did however find that when we changed the network type (e.g. from private to public) in Windows settings, we needed to restart the PC in order to make this change to take effect in the Bitdefender Firewall.
We discovered an unusual characteristic of the Bitdefender firewall in our functionality check. It appears that any Windows devices that had connected to the test PC before Bitdefender was installed are somehow whitelisted as trusted devices. We found that after installing Bitdefender Internet Security, setting the network type to public and restarting the PC, the previously connected devices were all still able to access the file share, and connect via Remote Desktop. We could not determine how the previously connected devices were identified, however. Changing the IP address or MAC address did not affect the other devices’ ability to connect to our test PC.
The program’s Stealth Mode – which works independently of the network type – merely serves to block ping requests; it has no effect on file-sharing or Remote Desktop access. If it is switched on, you will not be able to ping your device, even in a private network. If you disable Stealth Mode so that you can ping your PC in your home network, you will need to remember to switch it on again the next time you join a public network.
If you prefer to use Windows Firewall, you can cleanly disable the Bitdefender Firewall in the program’s settings. This will activate the Windows Firewall.
Other points of interest:
Subscription information can be found on the My Account page (user menu).
You can customise which tiles are shown on the Dashboard (home page).
Setup installs the Bitdefender Wallet extension for Chrome.
ESET Internet Security is a paid-for security program. In addition to anti-malware features, it includes the ESET Firewall, Network Inspector, Anti-Theft, Anti-Spam, Anti-Phishing, and Banking & Payment Protection. You can find out more about the program on the vendor’s website: https://www.eset.com/int/home/internet-security/
Summary
We found ESET Internet Security to be very well designed and easy to use. Non-expert users are provided with safe default settings and a clean, easy-to-navigate interface. All the essential features are very easily accessed. The settings dialog – which has a useful search function – has plenty of advanced options. For power users, a number of system tools are available. Help features and access-control options are both excellent. In our functionality check, sensitive on-access protection detected malware on an external drive as soon as it was opened in File Explorer.
Setup
The first page of the installation wizard lets you choose the interface language, and provides helpful links to the program’s installation guide and user manual. You can activate the product using a purchased licence key or an ESET HOME account, or enter an email address to use the free trial period. You also need to decide whether to enable LiveGrid (data sharing), PUA detection, and the Customer Experience Improvement Program. However, the wizard provides an explanation of what each of these things does. At the end, you are prompted to set up Anti-Theft and Parental Control, though this is optional. The program also invites you to connect the computer to an ESET HOME management account, but again you can opt out of this. After the program window first opens, an initialisation process runs for a couple of minutes before the product becomes fully functional.
System Tray icon
The System Tray icon menu lets you see protection status, pause protection, pause firewall, block all network traffic, open settings, see log files, open the program window, see program information, and check for updates.
Security status alert
When we disabled real-time protection in the program’s settings, an alert was shown on the home page (screenshot below), and as a Windows pop-up alert. We were able to reactivate the protection easily by clicking Enable real-time file system protection.
Malware detection alert
When a malicious file was detected in our functionality check, ESET displayed the alert shown below. We did not need to take any action. The alert closed after 10 seconds.
Clicking the threat name opened the applicable page of ESET’s online malware encyclopaedia, while Learn more about this message links to the product’s online manual. The latter provides general information about threat detections and how to deal with them. When multiple malicious files were detected at the same time, ESET showed just one alert box. This allowed us to see threats one by one, using the X button, or to close all alerts at once using the drop-down menu in the top right-hand corner.
Malware detection scenarios
When we connected a USB drive containing some malware to the system, ESET offered to scan the drive. It’s possible to change the default action here to Automatic device scan or Do not scan, using the program’s settings. We chose not to run a scan, but instead opened the USB drive in Windows File Explorer. ESET immediately detected and quarantined the malware before we were able to copy it to the system.
When we ran an on-demand scan of malware samples on a USB drive, ESET automatically quarantined the malware. The program window displayed the number of detected threats, and noted that these had all been cleaned. By clicking on Show Log, we were able to see the file names, paths and detection names, along with other scan details such as action taken and date/time.
Scan options
The Computer scan page has a number of options. You can run a complete system scan, removable media scan, or custom scan. The latter provides very granular options, including operating memory, boot sectors/UEFI, WMI database and registry. There is also an option to repeat the last scan. You can scan a local drive, folder or file, or a network share, by dragging it to the Computer scan page, or using Windows File Explorer’s right-click menu. Under Advanced Setup\Detection Engine\Real-Time & Machine Learning Protection, you can choose whether to detect potentially unwanted applications, potentially unsafe applications (e.g. hacker tools), and suspicious applications (e.g. those using typical malware obfuscation packing). Scan exceptions can be set in the Exclusions section. Real-time file system protection lets you choose to detect malware on file open, creation, execution or removable media access (all on by default). Overall, ESET provides a very wide range of scanning and other options, letting users fine-tune the program to their requirements.
Quarantine
The Quarantine page can be found under the Tools menu\More tools. It shows the date and time of detection, file name and path, file size, detection name, number of occurrences, the name of the user that was active at the time, and the SHA-1 hash of the file. To delete a quarantined file, you have to right-click it and then click Delete from Quarantine. There is a Restore button, and also a Move to quarantine button. The latter allows you to browse the file system for any suspicious files that have not been detected yet. Once they are in quarantine, you can submit them for analysis, or delete them, using the right-click menu.
Logs
The Logs page is under the Tools menu\More tools. It provides records of detections, events (such as updates), and scan results, along with events relating to the program’s other features, such as anti-spam and parental control.
Help
The Help and support page includes links to Help page and Knowledgebase. The former opens an online manual, with topics such as System requirements, Installation and Beginner’s guide in a menu column on the left-hand side of the page. Each page opens detailed explanations and instructions, very clearly laid out, and well illustrated with annotated screenshots. The Knowledgebase lets you search for specific queries, such as exclusions.
Access control
Standard Windows User accounts cannot disable protection features, or uninstall the program. This is as it should be, in our opinion. Additionally, you can password protect the settings (Setup\Advanced setup\User interface\Access setup). If this is set up, any other users can operate all the features of the program, but not disable protection in any way.
ESET Firewall
In our functionality test, ESET’s firewall co-ordinated with Windows’ public/private network types. So for example, when we joined a new wireless network and designated this as public at the Windows connection prompt, the ESET firewall also adopted the public setting. We did however find that when we changed the network type (e.g. from private to public) in Windows settings, we needed to restart the PC in order to make this change to take effect in the ESET Firewall.
If you prefer to use Windows Firewall, you can cleanly disable the ESET Firewall in the program’s settings. This will activate the Windows Firewall.
Other points of interest
Under Tools\More tools, ESET provides a number of system utilities for advanced users: Running processes, Network connections and Watch activity. All of these could be useful for investigating suspicious behaviour on your system. ESET SysRescue Live lets you create a bootable CD, DVD or flash drive that you can use to scan and remove malware from an infected PC.
G Data Total Security is a paid-for security program that uses two different malware-detection engines. In addition to anti-malware features, it includes anti-spam and anti-phishing components, a replacement firewall, cloud backup function, encryption, a password manager, access control, performance tuner, and parental controls. You can find out more about the program on the vendor’s website: https://www.gdatasoftware.com/total-security
Summary
The interface of G Data Total Security is easily navigated, via a single row of tiles. There is a choice of a default or a customised installation, whereby the latter lets you choose individual components to install. The status display provides details of individual protection components, and access control is excellent. Most commendably, USB devices are proactively scanned for malware on connection. On-access protection means that files are scanned for malware if you try to copy them to your PC. G Data’s replacement firewall is probably better suited to power users than non-experts, although there are options for using Windows Firewall instead.
Setup
The setup wizard starts by asking you which interface language you would like to use. There is then a choice of Standard or User-Defined Installation. The latter lets you choose which optional components, such as anti-spam and parental controls, to install. You can also change the installation folder. At the end of the wizard, you can enter a license key, or opt for the 30-day trial. You need to restart your computer to finish the installation.
System Tray icon
The System Tray icon menu lets you open the program window, disable malware protection, disable the G Data firewall, disable Autopilot, run updates, and see protection statistics.
Security status alert
When we disabled real-time protection in the program’s settings, G Data displayed the alert below in the program window. We were able to reactivate protection by clicking Real time protection\Enable virus monitor.
Malware detection alert
When a malicious file was detected in our functionality check, G Data displayed the alert shown below. We just needed to click OK to quarantine the malware. The alert persisted until we closed it.
When multiple malicious files were detected at the same time, G Data showed one alert box for each of them. However, selecting the Use on all checkbox applied the same action to all malware detections, without showing further alerts.
Malware detection scenarios
When we connected a USB drive containing some malware to the system, G Data offered to scan the drive. This prompt can be disabled directly from the dialog box, if you so choose. We declined to run a scan, but before we could open the drive in Windows File Explorer, G Data started automatically detecting and deleting the malware on it. G Data then presented us with a list of items found. The default action to be taken (this can be changed for individual files) was Disinfect and copy to quarantine. We just had to click Execute actions to deal with all of the samples at once. We would describe this proactive detection as exemplary. Malware samples copied from a network share were detected and quarantined by the program’s on-access protection.
Scan options
The Virus protection page (second icon from left on the top toolbar) provides a number of different scan options. These are: Check computer (all local drives); Scheduled virus checks; Check memory and Autostart; Check directories and files; check removeable media; Check for rootkits. You can also scan a local drive, folder or file, or network share, using Windows File Explorer’s right-click menu. Scan options in the Anti-Virus section of the Settings dialog let you choose which protection components should be used (all are on by default). You can also choose whether to detect potentially unwanted programs (on by default). Exceptions for both real-time protection and on-demand scans can be set here too.
Quarantine
The quarantine function can be opened from the Anti-Virus page. It shows the date and time of detection, threat name, file name and path. You can disinfect, delete or restore files one at a time, or use standard Windows keyboard shortcuts to select multiple items.
Logs
Logs can be opened from the clipboard icon in the top right-hand corner of the window. You can see detections and signature updates. Clicking on any item displays a details pane below with more information, such as program and signature versions, protection components used, and areas scanned.
Help
The question-mark icon in the top right-hand corner of the window opens G Data ’s online help pages. These take the form of a searchable manual, with items listed in categories such as First Steps, Virus Protection and Settings. For each item, there is a very detailed page of instructions and explanations, very well illustrated with screenshots.
Access control
Standard Windows User accounts cannot disable protection features or uninstall the program, which we regard as ideal. You can also password protect the settings, to prevent any other users changing them.
G Data Firewall
The G Data Firewall does not co-ordinate with Windows’ network settings, or display any prompts of its own regarding network type. When you join your PC to a new wireless network, G Data sets this to Trusted (private) by default. To ensure you are protected when using a public Wi-Fi network, you need to proactively go into the settings of G Data Total Security (Firewall tab\Networks\Show networks\WiFi) and set the Rule set (network type) to either Untrusted networks or Direct Internet connection.
As illustrated in the screenshot below, networks are identified in G Data’s firewall settings only by network adapter and IP subnet; the SSID (visible wireless network name) is not shown. This means you may need to reconfigure the firewall settings again when returning to a private network. We would recommend restarting the computer after changing G DATA Firewall’s settings, to ensure that they take effect.
If you would prefer to use the Windows Firewall instead of G Data’s, there are two options. When you install G Data Total Security, choosing the User-Defined Installation will allow you to deselect installation of the G Data Firewall. If you have already installed G Data Total Security, you can selectively uninstall the G Data Firewall, by going to Control Panel\Programs and features, selecting G Data Total Security, clicking Change, then Customize installation, and deselecting Firewall from the list of components. In either case, the G Data Firewall will be neatly removed from the program’s interface, and Windows Firewall will become active.
Other points of interest
After installation, we were prompted to install the G Data add-on for Google Chrome.
A G Data prompt asked whether updates should be installed using the current network connection. We assume that this is to let users avoid updating via a metered connection.
On the Virus protection page, under Boot medium, you can create a bootable CD/DVD/USB drive that you can use to scan an already-infected PC.
K7 Total Security is a paid-for security program. In addition to anti-malware features, it includes a parental control feature, with a blacklist/whitelist web filter and Internet time restrictions. There is also an anti-spam feature, a replacement firewall, tune-up function, device control, and secure delete feature. You can find out more about the product on the vendor’s website: https://k7computing.com/us/home-users/total-security
Summary
We found K7 Total Security to be very simple to install and use. The most important everyday functions can easily be accessed from the home page. The default actions for connecting external drives and malware detection are ideal. In our functionality check, K7’s highly sensitive on-access protection detected and removed malware on an external drive or network share as soon as the drive/share was opened in Windows File Explorer. Access control is very excellent. The K7 Firewall co-ordinates perfectly and instantly with Windows’ network-type settings.
Setup
Installation is extremely quick and simple. Having started the installer file, you just need to click Install, and less than a minute later the program is up and running. At the end of the wizard, you are asked to supply an email address, and enter a licence key or opt for the 30-day trial.
System Tray icon
The System Tray menu lets you open the program, run scans and updates, disable/enable protection, stop network traffic, enable gaming mode, see product information, and access help features.
Security status alert
When we disabled real-time protection in the program’s settings, an alert was shown on the home page (screenshot below). We were able to reactivate the protection easily by clicking Fix Now.
Malware detection alert
When a malicious file was detected in our functionality check, K7 displayed the alert shown below. We did not need to take any action, and the alert closed after a few seconds.
When multiple malicious files were detected at the same time, K7 showed just one alert box. This allowed us to browse through the various threats to see details, and to close all alerts with a single click.
Malware detection scenarios
When we connected a USB drive containing some malware to the system, K7 offered to scan the drive. This prompt can be disabled directly from the dialog box if you wish. We chose not to run a scan, but instead opened the USB drive in Windows File Explorer. K7 immediately detected and quarantined the malicious files on the drive, before we could even start copying them to the system. Likewise, when we opened a network share containing malware samples in Windows File Explorer, K7 immediately detected the malicious files in the shared folder, and deleted them.
When we ran an on-demand scan of malware samples on a USB drive, K7 displayed a list of the threats that had been found, with file name/path and detection name. It informed us that they had all been removed, and so no further action was necessary.
Scan options
The Scan button at the bottom of the program window lets you run quick, complete, custom, rootkit and scheduled scans. You can also scan a local drive, folder or file, or a network share, using Windows Explorer’s right-click menu. Under Settings\Antivirus and Antispyware, you can choose whether to scan for PUA (on by default), and set scan exclusions. It’s also possible to change the default action on detection from here.
Quarantine
The quarantine feature is found under Reports\Quarantine Manager. From here, you can delete or restore detected malware items. The page shows date and time of detection, file name and path, malware type, and file hash.
Logs
You can find the logs feature under Reports\Security History. The Virus Found Events page shows the date and time of detections, current user at the time, application involved, file name and path, malware type, and action taken.
Help
If you click on Help in the top right-hand corner of the window, a local help file opens. This lists a variety of topics, covering the configuration and use of the product. Simple, clear instructions are provided for each topic, some illustrated with screenshots.
Access control
Standard Windows users are not able to disable protection features, or uninstall the program. This is as it should be, in our opinion. You can also set password protection, so that all users must enter a password to disable protection by any means.
K7 Firewall
In our functionality check, the K7 firewall in co-ordinated perfectly and instantly with Windows’ public/private network types. So for example, when we joined a new wireless network and designated this as public at the Windows connection prompt, the K7 firewall also adopted the public setting. When we changed the network type (e.g. from private to public) in Windows settings, this change was immediately adopted by the K7 Firewall, without any need to restart the PC.
Kaspersky Internet Security is a paid-for security program. In addition to anti-malware functions, it includes a vulnerability scanner and software updater, ransomware protection, a password manager (limited version), added protection for banking and financial websites, webcam protection, browser privacy features, and a VPN (limited version). You can find out more about the product on the vendor’s website: https://www.kaspersky.com/internet-security
Summary
Installation of Kaspersky Internet Security is straightforward, with safe default options. The program’s modern, tiled interface makes all essential features easily accessible from the home page. In our functionality check, USB external drives were automatically scanned on connection, and Kaspersky’s highly sensitive on-access protection proactively deleted malware on a network share as soon as we opened it in Windows File Explorer. Advanced users will find a wide range of configuration options in the settings.
Setup
The installer lets you opt out of installing Kaspersky Password Manager (on by default). Then you just have to click Install to start setup. At the end of the wizard, four options are presented (all selected by default). These are: Turn on protection against ads to install only desired software and block additional installations; Delete malicious tools, adware, auto-dialers and suspicious packages; Detect other software that can be used by criminals to damage your computer or personal data; Take a tour through the application features. The introductory tour introduces the banking protection, webcam protection, browser privacy, and parental control features. You can then enter a licence key, or opt to use the 30-day trial. When the program window first opens, it encourages you to create/log in to a My Kaspersky online account. However, you can just click Skip if you don’t want to do this.
System Tray icon
The System Tray icon menu lets you open the program window, pause protection, open settings, view the program’s support page, see program information, and pause protection or shut the program down.
Security status alert
When we disabled real-time protection in the program’s settings, an alert was shown on the home page (screenshot below), and as a Windows pop-up alert. We were able to reactivate the protection easily by clicking Details, then Enable.
Malware detection alert
When a malicious file was detected in our functionality check, Kaspersky played an audio alert, and displayed the message box shown below. We did not need to take any action. The alert closed after 10 seconds.
Clicking on the alert opened the program’s log page. When multiple malicious files were detected at the same time, Kaspersky displayed one alert box for each detection.
Malware detection scenarios
When we connected a USB drive containing some malware to the system, Kaspersky automatically scanned the device and deleted the malware on it. When we opened a network share containing malware in Windows File Explorer, Kaspersky detected and deleted the malware in the shared folder immediately. We regard this highly sensitive on-access protection as outstanding.
When we ran an on-demand scan of malware samples on a USB drive, Kaspersky detected and quarantined all the malicious files. Scan results were shown in an alert box.
Scan options
The Scan button on the program’s home page opens the Scan page. This provides a choice of full, quick, custom, removable media and vulnerability scans. You can also scan a local drive, folder or file, or a network share, from Windows Explorer’s right-click menu. Scan exclusions are available in the program’s settings (cogwheel icon in the bottom left-hand corner of the window), under Threats and Exclusions. You can specify which protection components – e.g. real-time protection, on-demand scans – the exclusion should be applied to. Whilst detection of Adware and Auto-dialers is on by default and cannot be disabled, other forms of PUA detection can be toggled using the Detect other software that can be used by criminals to damage your computer or persona data switch. This is on by default.
Quarantine
The quarantine feature can be found by clicking More Tools on the program’s home page. It shows the file name and path, detection name and date/time of detection, along with action taken, for every item. From here, you can select files individually (or all at once with a keyboard shortcut) and delete or restore them.
Logs
The log function can be opened by clicking the More Tools\Reports. A wide variety of reports is provided, including individual reports for the different protection components, such as File Anti-Virus, Web Anti-Virus and Firewall. There are also reports for additional features, such as Anti-Spam and Software Updater. The File Anti-Virus report shows the date and time of detection, file name and path, and action taken.
Help
The question-mark symbol in the top right-hand corner of the window opens Kaspersky’s online manual for the program. Straightforward text-only instructions for each feature are provided. A left-hand menu column lets you navigate easily to other topics.
Access control
Standard Windows users have full control of the program’s settings, and can disable protection features. However, only administrator accounts can uninstall the program. You can password protect the program. All users then have to enter the password to access settings or disable protection by any means.
Kaspersky Firewall
In our functionality check, Kaspersky’s firewall co-ordinated with Windows’ public/private network types. So for example, when we joined a new wireless network and designated this as public at the Windows connection prompt, the Kaspersky firewall also adopted the public setting. We did however find that when we changed the network type (e.g. from private to public) in Windows settings, we needed to restart the PC in order to make this change to take effect in the Kaspersky Firewall.
If you prefer to use Windows Firewall, you can cleanly disable the Kaspersky Firewall in the program’s settings. This will activate the Windows Firewall.
Other points of interest:
Under More Tool\Kaspersky Rescue Disk you can make a bootable CD/DVD/flash drive that you can use to scan and remove malware from an infected PC.
The program’s home page displays a Protection for kids tile, which is shown in faded colours with a download symbol. If you click on this, an information page informs you that this is an additional download, and that a separate licence is needed to use all the features of Kaspersky Safe Kids. Kaspersky Safe Kids is a separate Kaspersky application that uses a freemium model.
The setup wizard of Kaspersky Internet Security places a shortcut for Kaspersky Password Manager on the Windows Desktop. This is also a separate Kaspersky freemium application.
The Kaspersky Protection add-on for the Google Chrome browser was installed by the setup wizard.
The right-click menu lets you check a file using Kaspersky’s reputation service.
Scan settings can be found by clicking the Scan tile on the program’s homepage, not under Settings.
Malwarebytes Premium is a paid-for security program with a full range of anti-malware features. You can find out more about the program on the vendor’s website: https://www.malwarebytes.com/premium
Summary
Malwarebytes Premium is very easy to install and use. There is a clean, touch-friendly interface, which makes it easy to navigate through the program’s functions. A persistent pop-up alert alerts you in the event that protection is disabled, and the password-protection feature gives you fine-grained control of access allowed by other users. There are both light and dark modes for the program, so you can choose whichever option you find more readable.
Setup
The setup wizard asks you if you are using a personal or work computer (we chose the former for our installation). Under Advanced Options you can change the installation folder and interface language. The wizard also asks you whether you want to install the add-on for the Chrome/Firefox and Edge browsers. Setup is otherwise very simple. After installation, the program prompted us to run a scan (which took about a minute), and turn on Brute force protection. The latter is a Malwarebytes feature that “blocks unauthorized users from accessing your computer remotely over the Internet”.
System Tray icon
The System Tray menu lets you disable/enable protection features, check for updates, and quit the program.
Security status alert
When we disabled real-time protection in the program’s settings, an alert was shown on the program’s home page (screenshot below). We were able to reactivate the protection easily by clicking View details\Turn on.
In addition to the warning in the main program window, Malwarebytes showed a pop-up alert in the bottom right-hand corner of the screen; this persisted until we had reactivated protection.
Malware detection alert
When a malicious file was detected in our functionality check, Malwarebytes displayed the alert shown below. We did not need to take any action, and the alert closed after a few seconds.
Clicking Open Quarantine displayed the detected file on the program’s quarantine page. When multiple malicious files were detected at the same time, Malwarebytes showed a separate alert for each one.
Malware detection scenarios
When we connected a USB drive containing some malware to the system, Malwarebytes did not initially take any action. We were able to open the drive in Windows Explorer, and copy the malware samples to the Windows Desktop. However, as soon as we tried to execute any of them, they were instantly detected and quarantined.
When we ran an on-demand scan of malware samples on a USB drive, Malwarebytes presented us with a list of detected items. We just needed to click Quarantine to deal with them.
Scan options
The Scan button on the program’s home page runs a quick scan. Clicking elsewhere on the Scanner tile, then Advanced scanners, lets you run a custom scan, which could be of the entire system disk. Individual options, such as whether to detect PUA, can be set for each custom scan. Options applicable to all scans can be selected under Settings\Security. These include whether to scan for PUAs, and automatically quarantine detected items (both enabled by default). You can also scan a local drive, folder or file by using Windows Explorer’s right-click menu.
Quarantine
This can be opened by clicking the Detection History tile on the program’s homepage and going to the Quarantined items tab. You can see the threat name, date/time of detection, plus file name and path, for each quarantined item. You can select individual items, or all together, and restore or delete them.
Logs
Logs are found under Detection History\History. Mousing over any entry and clicking the “download” symbol lets you save a detailed report of the event in question as a text file. For a detection event, the information provided includes precise details of the Malwarebytes program, Windows operating system, CPU, user, scan type, and scan options enabled.
Help
Clicking the question-mark icon in the top right-hand corner of the program window displays a link to Malwarebytes‘ online manual. This provides instructions and explanations for the most important everyday tasks and features, including installation/uninstallation, scanning, and real-time protection. These are clear and simple, and illustrated with screenshots.
Access control
Standard Windows User Accounts cannot disable protection or uninstall the program, which we regard as ideal. Under Settings\General\Tamper Protection you can also password protect the settings, to prevent any other users changing them. You can specify in detail exactly which settings are covered by the password protection.
Other points of interest:
You can change the appearance of the program under Settings\Display. Amongst other things, there is a choice of light and dark modes, to match Windows colour settings.
McAfee Total Protection is a paid-for security program. In addition to anti-malware features, it includes a VPN, password manager, software updater for commonly used apps, replacement firewall, performance booster, cookie and tracker remover, and secure file-deletion feature. You can find out more about the product on the vendor’s website: https://www.mcafee.com/en-us/index.html
Summary
McAfee Total Protection is very simple to install, and has a modern, touch-friendly interface. This makes it very straightforward to find essential functions. Malware alerts are clear and persistent, and the McAfee Firewall co-ordinates perfectly with Windows’ network settings.
Setup
Installation could not be simpler. You only have to click Agree and Install, and that’s it. When the program first runs, you need to sign in with a McAfee account, or create a new one.
System Tray icon
The System Tray icon menu lets you open the program window, check for updates, run scans, open settings, and open the help page.
Security status alert
When we disabled real-time protection in the program’s settings, an alert was shown on the home page (screenshot below). We were able to reactivate the protection easily by clicking Turn it on.
Malware detection alert
When a malicious file was detected in our functionality check, McAfee displayed the alert shown below. We did not need to take any action. The alert persisted until we closed it.
Clicking See details displayed the file name and path, detection name, and action taken (Quarantined).
Malware detection scenarios
When we connected a USB drive containing some malware to the system, McAfee did not take any action. We were able to open the drive in Windows Explorer and copy the malicious files to the Windows Desktop. However, as soon as we tried to execute any of them, they were immediately detected and quarantined.
When we ran an on-demand scan of malware samples on a USB drive, McAfee displayed an alert that said “We’ve fixed 10 threats – you’re protected”. We did not need to take any further action. By clicking on See details, we were able to see the file names/paths and detection names of the malicious files.
Scan options
By clicking the Antivirus tile on the home page, you can run quick, full or scheduled scans. You can also scan a local drive, folder or file, or a network share, from Windows Explorer’s right-click menu. By clicking the My Protection icon (below the Home icon on the left-hand side of the program window), we were able to exclude individual files from real-time protection. However, we could not find any means of excluding an entire folder, configuring exclusions for on-demand scans, or configuring PUA detection.
Quarantine
This is found under My Protection\Quarantined items. It shows the file name and path, threat name, and date/time of detection. You can restore or delete individual items, or all items together (by using standard Windows keyboard shortcuts to select multiple items).
Logs
The log feature is found under My Protection\Security History. You can see blocked incoming network connections, scan results, and blocked threats. For the latter, the threat name, plus date and time of detection, are shown.
Help
The help features can be accessed from the question-mark icon on the left-hand side of the program window. The Help link opens an online manual for the product. This provides brief, text-only explanations of the program’s features. The Support Website link opens the McAfee knowledge base, which covers all McAfee consumer products. The search function finds answers relating to all of these, so some sifting through search results may be necessary to find relevant answers. Simple explanations and instructions, illustrated with screenshots, are provided.
Access control
Standard Windows Users cannot disable protection features (the switches are deactivated), or uninstall the program. This is as it should be, in our opinion.
McAfee Firewall
In our functionality check, the McAfee Firewall co-ordinated perfectly and instantly with Windows’ security settings. So for example, when we joined a new wireless network and designated this as public at the Windows connection prompt, the McAfee firewall also adopted the public setting. When we changed the network type (e.g. from private to public) in Windows settings, this change was immediately adopted by the McAfee Firewall, without any need to restart the PC.
Other points of interest:
An add-on for the Chrome browser is installed by the setup wizard.
Microsoft Defender Antivirus is a free security program that is included with Windows 10 (and Windows 11). Similar protection features are built into Windows 8.1, albeit with a different interface. You can find out more about the program on the Microsoft website: https://www.microsoft.com/en-ie/windows/comprehensive-security
Summary
Microsoft Defender Antivirus includes all the essential features of an antivirus program in a clean, touch-friendly interface. No installation is required, and the program is simple to use. In our functionality check, Defender’s highly sensitive on-access protection detected and deleted malware on a USB drive or network share before it could be copied to the system. However, as reported last year, running an on-demand scan of a USB device or network share containing multiple malicious files only detects a small proportion of these.
Setup
No setup is required, as the program is built into Windows.
System Tray icon
The System Tray icon menu lets you run a quick scan, check for updates, view notification options, and open the Windows Security window.
Security status alert
When we disabled real-time protection in the program’s settings, an alert was shown on the program’s home page (screenshot below). We were able to reactivate the protection easily by clicking Turn on.
Malware detection alert
When a malicious file was detected in our functionality check, Microsoft Defender Antivirus displayed the alert shown below. We did not need to take any action, and the alert closed after a few seconds.
Clicking on Get details opened the Virus & threat protection page of Windows Security. When multiple malicious files were detected at the same time, Microsoft Defender Antivirus showed an alert for each one.
Malware detection scenarios
When we connected a USB drive containing some malware to the system, Microsoft Defender Antivirus did not take any immediate action. However, as soon as we opened the drive in Windows File Explorer, Defender detected and quarantined the malware on it, without giving us any chance to copy it. When we tried to copy malware from a network share, Defender similarly prevented the malicious files being copied, and deleted them from the shared folder.
When we ran on-demand scans of a USB drive containing ten malware samples, the Scan options page was displayed. This listed the malware found, and displayed the Start actions button, which by default removes the malware. We found that of the ten malware samples on the drive, Microsoft Defender Antivirus would consistently only detect and delete one or two. The remaining malicious files were left intact and unchanged on the external drive. The same applied when scanning a network share containing malicious files.
Scan options
If you click on Virus and threat protection\Scan options, you can run a quick, full or custom scan. Additionally, you can run a Windows Defender Offline Scan, to deal with hard-to-remove malware. The program informs you that this will restart the device and take about 15 minutes. You can also scan a local drive, folder or file, or a network share, by using Windows Explorer’s right-click menu. Exclusions can be set under Virus and threat protection settings\Exclusions. We could not find any means of configuring PUA detection.
Quarantine
The quarantine function is found under Virus and threat protection\Protection history. It lists detected items by date and time detected. By clicking on any item, you can see more details of the threat, including the file name and path. There is also a generic description of the type of threat, e.g. “This program is dangerous and executes commands from an attacker. Even a description of the quarantine function itself is helpfully provided: “Quarantined files are in a restricted area where they can’t harm your device”. You can restore items from this page if you want. Clicking on Learn more in the threat details section opens Microsoft’s online threat encyclopaedia, with details of that threat.
Logs
The log feature is effectively combined with quarantine under Protection history.
Help
Clicking Get help on the Virus and threat protection page opens the Microsoft Virtual Agent, which is an automated chat service. You can type in a query, and search. We found that we needed to formulate our query very precisely to get the result we wanted. For example, “Set scan exclusion” (singular) brought up a relevant answer, but “Set scan exclusions” (plural) did not. With the correct query, a brief but helpful answer was provided. However, clicking the associated Read the article did not provide any further information on the subject.
Access control
Standard Windows User accounts cannot disable protection features, which is as it should be, in our opinion.
Norton 360 Standard is a paid-for security program. In addition to anti-malware features, it includes a replacement firewall, VPN, backup feature, password manager, parental controls, anti-spam and performance tune-up features. There is no free trial. You can find out more about the product on the vendor’s website: https://us.norton.com/products/norton-360-deluxe
Summary
Norton 360 is very simple to set up, and has a very modern, touch-friendly interface. Essential features are easy to find, and safe default settings are provided. On-access protection means that files are scanned when you try to copy them to your PC. You can conveniently check a file using Norton’s reputation service. Access control options are excellent.
Setup
You need to log in to your Norton online account to download the installer file. Having run this, you can opt in to Norton’s data sharing scheme, and change the installation folder if you want. Otherwise you only need to click on Install. When you first open the program window after installation, a short introductory wizard explains the most important features of the program.
System Tray icon
The System Tray menu lets you open the program, run scans and updates, access support, enable gaming mode, and disable antivirus and firewall features.
Security status alert
When we disabled real-time protection in the program’s settings, an alert was shown on the home page (screenshot below). We were able to reactivate the protection easily by clicking Fix Now.
Malware detection alert
When a malicious file was detected in our functionality check, Norton displayed the alert shown below. We did not need to take any action. The alert persisted until we closed it.
Malware detection scenarios
When we connected a USB drive containing some malware to the system, Norton prompted us to scan it. We declined to scan the drive, and instead opened it in Windows Explorer. Norton’s real-time protection detected the malware and quarantined it before we were able to copy it to our test PC. A quick scan was automatically run afterwards.
When we ran an on-demand scan of malware samples on a USB drive, Norton quarantined the malicious files, and displayed a list of the threats found and action taken.
Scan options
The Scans button on the Security page lets you run quick, full and custom scans, whereby a custom scan can be scheduled. You can also scan a local drive, folder or file, or a network share, using Windows Explorer’s right-click menu. The same menu can be used to check a file with Norton’s reputation service. Under Settings\Antivirus\Scans and Risks you can set exclusions and specify treatment of Low Risks, which we assume means PUAs.
Quarantine
This is found under Security\History. Resolved Security Risks shows you risk level, detection name, action taken, plus date and time of detection. Any individual file can be restored, restored and excluded, or submitted to the vendor for analysis.
Logs
This is combined with the quarantine function.
Help
Clicking Help in the top right-hand corner of the window displays a number of help options, including Video Tutorials. These provide detailed instructions for various aspects of using the program, such as installing, scanning, and threat removal.
Access control
Standard Windows users cannot disable protection features, or uninstall the program. This is as it should be. Protection settings are greyed out when the program is used by a non-administrator account. There is also a password protection feature. This makes it impossible for other users to change settings or disable protection without knowing the password.
Firewall
In our functionality check, Norton’s firewall co-ordinated with Windows’ public/private network types. So for example, when we joined a new wireless network and designated this as public at the Windows connection prompt, the Norton Firewall also adopted the public setting. We did however find that when we changed the network type (e.g. from private to public) in Windows settings, we needed to restart the PC in order to make this change to take effect in the Norton Firewall.
Other points of interest
An extension for Chromium-based browsers is installed by the setup wizard.
We found Panda Free Antivirus to be very straightforward to install and use. The program interface is simple to navigate, and safe default options are provided. On-access protection means that files are scanned for malware when you copy them to your PC. The program window displays a “news ticker” with security news headlines, linked to Panda’s security blog.
Setup
Installation is very straightforward. You can change the installation folder and interface language. By default, the Opera browser is installed. We chose not to install this for our functionality test. When setup is complete, you are prompted to sign in with a Panda account, or create a new one. It is not essential to do this in order to use the program, but if you don’t, you will be prompted to sign in every time you open the program window.
System Tray icon
The System Tray icon menu lets you open the program window, enable gaming mode, reach help and support services, disable/enable protection, and use Panda’s VPN feature (which has limitations on servers and data).
Security status alert
When we disabled real-time protection in the program’s settings, an alert was shown on the home page (screenshot below). We were able to reactivate the protection easily by clicking Fix, and then Enable.
Malware detection alert
When a malicious file was detected in our functionality check, Panda displayed the alert below. We did not have to take any action, and the alert closed after a few seconds.
Clicking on the alert opened the Event report page in the Panda program window, showing detection name, file name and path, date and time of detection, and action taken (deleted). When multiple malicious files were detected at the same time, Panda displayed just one alert.
Malware detection scenarios
When we connected a USB drive containing some malware to the system, Panda offered to scan the drive. This prompt can be disabled directly from the alert dialog box, if you want. We chose not to scan the drive, but instead opened it in Windows File Explorer. Panda did not initially take any action. However, when we tried to copy the malicious files to the Windows Desktop, Panda immediately detected and quarantined the copied files.
When we ran an on-demand scan of malware samples on a USB drive, Panda displayed the number of files scanned and detected. By clicking on Show details, we could see the file name and path, plus detection time and action taken, for the detected files. We did not have to take any action.
Scan options
The Scan button on the home page (magnifying-glass symbol) lets you run Full, Custom and Critical areas scans. The Antivirus page enables you to set a scheduled scan. You can scan a local drive, folder or file using Windows Explorer’s right-click menu. Although the interface also appears to let you scan a network share, we found that doing so did not detect any malware on this. Under Settings\Antivirus, you can set exclusions and choose whether to detect PUAs (on by default).
Quarantine
This feature is found on the Antivirus page. It shows you the detection name, file name and path, plus date and time of detection. You can recover or delete quarantined items one by one.
Logs
You can find the log feature on the Antivirus page, by clicking View report. It shows the same information as the quarantine page, plus the action taken (e.g. “Deleted”).
Help
The help feature is located in the “hamburger” menu in the top left-hand corner of the window. Clicking on this opens an online manual for the product. A menu column on the left-hand side of the page shows various topics. Selecting one of these displays simple, text-only answers in the main pane.
Access control
Standard Windows users can disable protection features, but not uninstall the program. You can however password protect the program. In this case, access to the main program window will be blocked unless the password is entered. However, it will still be possible to run scans from Windows File Explorer’s right-click menu, and see the results of this.
Other points of interest
The download link for Panda Free Antivirus on the Panda website redirects to cnet.com.
The setup wizard states that free support is included for “any PC or Internet related problems”. UK, USA and Canadian telephone numbers are provided (in the English version of the program); Panda tell us that the calls are free of charge.
The “Aa” symbol in the bottom right-hand corner of the window lets you show or hide the names of the symbols on the home page.
The program’s settings are found in the “hamburger” menu in the top left-had corner of the program window.
A strip along the bottom of the windows displays headlines from Panda’s Media Center. You can click on this to read the full story, and others. There are articles on various IT-security related topics.
Although Panda Free Antivirus promotes other, paid-for Panda products, this is done in a very subtle, non-intrusive way, by means of a thin strip along the top of the window.
Total Defense Essential Anti-Virus is a paid-for security program, which offers phishing protection in addition to anti-malware features. You can find out more about the product on the vendor’s website: https://www.totaldefense.com/shop/anti-virus
Summary
Total Defense Essential Anti-Virus is easy to install, and presents a very simple program interface that makes the most important functions easy to find. In our functionality check, external USB drives were automatically scanned on connection, and highly sensitive on-access protection proactively deleted malware on a network share as soon as we opened it in Windows File Explorer. Help articles are clear and well illustrated.
Setup
There is a custom installation option, which just lets you change the installation folder. Other than this, there are no options or decisions to make. Setup completes very quickly once you click Install. An update runs when you first open the program window; this takes a few minutes. A banner in the main program window prompts you to register the product by signing in to your Total Defense online account. This connects the product to your licence, and allows you to password protect the program’s settings.
System Tray icon
The System Tray icon menu lets you open the main program window, check for updates, and pause real-time protection.
Security status alert
When we disabled real-time protection in the program’s settings, an alert was shown on the home page (screenshot below). We were able to reactivate the protection easily by clicking Fix all.
Malware detection alert
When a malicious file was detected in our functionality check, Total Defense displayed the alert shown below. We did not need to take any action, and the alert closed after a few seconds.
When multiple malicious files were detected at the same time, Total Defense displayed one alert for each of these.
Malware detection scenarios
When we connected a USB drive containing some malware to the system, Total Defense immediately scanned the drive automatically, and notified us that it was doing so. When the scan completed, a summary of the results was shown in the main program window. We find this proactive scanning of external drives to be exemplary.
When we tried to copy malware from a network share to our test PC, Total Defense detected and deleted the malicious files from the network share before we were able to copy them.
Scan options
You can run a full scan from the Home page of the program. Full, system and custom scans can be run by clicking the Security tile and going to the Overview page. The Suspend Scans button on the same page temporarily deactivates real-time protection for a specified number of minutes. You can scan a local drive, folder or file, or a network share, using Windows Explorer’s right-click menu. Very conveniently, you can also use the right-click menu to exclude a drive, folder or file from scans.
On the Security\Settings\Scanner tab you can set the scan security level to Low, Recommended (default), High or Custom. The latter lets you decide whether to scan network, archive and hidden files, and whether suspicious files should be treated as infected. There is also an Application Control section here; Total Defense tell us that the default setting (Medium) enables PUA detection. Exclusions can be set on the tab of the same name. The Web Protection tab includes the options Scan visited websites for Malware, Phishing and Fraud, and Scan Secured Websites. These are both on by default.
Quarantine
This feature is found on the Security page, Quarantine tab. It shows the date and time of detections, file name, threat severity, threat name, and threat type. You can select individual quarantined files, or all together, and restore or delete them from here.
Logs
The Reports tab of the Security page displays a list of threats found, along with the detection date/time, and scan type that detected them. This can be displayed as a summary, showing how many of each threat type has been blocked.
Help
Clicking the question-mark icon in the top right-hand corner of the window opens the About page. Here you can click Support Info\Online Support. This opens the support page of the vendor’s website. If you click Product Support, a searchable FAQs page opens. Each article provides simple, step-by-step instructions for the task in question, generously illustrated with annotated screenshots and videos.
Access control
On the Console tab of the Settings page, you can prevent other users disabling protection or changing other security settings. If you enable the Restrict access to antimalware configuration option, all users will have to enter the password for the Total Defense account in order to change the AV settings. The same tab also allows you to control access to the Devices page, via the Restrict access to devices configuration option.
Other points of interest:
The cogwheel icon in the vertical menu bar handles updates, notifications and proxy settings; scan settings are found on the Security page.
The Devices page shows all the devices you have installed using the same account. For each device, you can see device type (e.g. PC); installed product (e.g. AntiVirus); security status; dates of last update and last scan; number of threats resolved; currently-running scans. You can also change a device’s name here, change the avatar representing its user, or delete the device to free up its licence.
To find subscription information, log in to your Total Defense online account.
TotalAV Total Security is a paid-for security program. In addition to anti-malware features, it includes a VPN, data-breach checker, ad blocker, password manager, and system performance tuner. You can find out more about TotalAV Total Security on the vendor’s website: https://www.totalav.com/product/total-security
Summary
We found TotalAV Total Security to be very simple to install and use. The program’s features are easily found in a single menu panel, and default settings and alerts are sensible. On-access protection means that files are scanned for malware if you try to copy them to your PC. Informative malware detection alerts let you manage multiple detections from a single alert box.
Setup
Installation is extremely quick and simple. You just need to run the installer, then click Install. You have to log in to your TotalAV account when the program first starts.
System Tray icon
This lets you open the program window, open the settings dialog box, check for updates, and see program and definitions version information.
Security status alert
When we disabled real-time protection in the program’s settings, an alert was shown on the home page (screenshot below). We were able to reactivate the protection easily by clicking Enable Protection.
Malware detection alert
When a malicious file was detected in our functionality check, TotalAV displayed the alert shown below. We did not need to take any action. The alert persisted until we closed it. By clicking on 4 Threats Blocked, we were able to see the file and detection names of the malware samples.
When multiple malicious files were detected at the same time, TotalAV showed just one alert box.
Malware detection scenarios
When we connected a USB drive containing some malware to the system, TotalAV did not initially take any action. However, as soon as we opened the drive in Windows Explorer, TotalAV immediately detected and quarantined the malware, before we had had a chance to copy it to the system.
When we ran an on-demand scan of malware samples on a USB drive, TotalAV presented us with a list of malicious files found. We just had to click Quarantine All to deal with them.
Scan options
You can run a Smart Scan from the button of the same name on the home page. The description states that this also checks for performance and privacy issues, and removes duplicate files. More scan options can be found by clicking the shield icon in the top left-hand corner, and then Malware scan. There is a choice of Quick Scan, System Scan, and Custom Scan. You can also scan a drive, folder or file using the right-click menu in Windows File Explorer. Although the interface also appears to let you scan a network share, we found that doing so did not detect any malware on this.
In the program’s settings, you can change a number of options, such as whether to scan removeable drives, type and time of scheduled scans, and action to be taken when malware is discovered. Exclusions can also be set here. We could not find any settings relating to potentially unwanted programs.
Quarantine
The quarantine function is opened by clicking the shield icon, then Quarantine. For each item, it displays the file name, threat name and date/time the threat was encountered, in chronological order. You can easily select individual or multiple items, and delete or restore these.
Logs
There is no separate logs feature, though you can see the day and time threats were encountered in Quarantine.
Help
The help feature is accessible from the General tab of the Settings page. We feel this is a far-from-obvious place to put the help feature. Clicking Visit the help centre opens the support page of the vendor’s website. This shows 8 different topics, such as Install and Uninstall, Configuration, and Troubleshooting. For each topic, there are simple explanations, generously illustrated with annotated screenshots.
Access control
Standard Windows users cannot disable protection features, or uninstall the program. This is as it should be, in our opinion.
Other points of interest
TotalAV’s online account lets you easily share your licences with family, friends or colleagues. On the Share Licenses page, you can send invitations by email. When the recipient installs the software, their device will show up on the Dashboard page of the console, and can be managed from there.
We note that if you wish to cancel your TotalAV subscription, TotalAV advises you to contact their support service before uninstalling the product. They also ask customers to contact them regarding any questions about autorenewal charges.
Trend Micro Internet Security is a paid-for security program. In addition to anti-malware features, it includes ransomware protection, a password manager, parental controls, secure erase feature, and a secure browser mode for financial transactions. You can find out more about the product on the vendor’s website: https://www.trendmicro.com/en_us/forHome/products/internet-security.html
Summary
The program is very easy to install, and the simple user interface makes important features easy to find. Safe default settings are provided. On-access protection means that files are scanned for malware if you try to copy them to your PC. We liked the persistent malware and status alerts, and the online manual is simple and clear.
Setup
The free trial can be downloaded by clicking Free Tools on the Trend Micro consumer-products home page. The setup wizard asks you to enter a licence key or opt for the free trial. Other than this, there are no decisions to make. At the end of the wizard, you are invited to set up the ransomware shield. By default, this covers Windows’ Documents, OneDrive and Pictures folders, but you can add further folders if you want.
System Tray icon
The System Tray icon menu lets you open the main window, run a scan, check for updates, disable/enable protection, enter silent mode, check your Trend Micro account and subscription, run a troubleshooting tool, and quit the program.
Security status alert
When we disabled real-time protection in the program’s settings, an alert was shown on the home page (screenshot below). We were able to reactivate the protection easily by clicking Enable Now.
An additional pop-up alert (screenshot below) was shown above the System Tray. This persisted until we closed it.
Malware detection alert
When a malicious file was detected in our functionality check, Trend Micro displayed the alert shown below. We did not need to take any action. The alert persisted until we closed it.
Clicking More details opened the program’s scan log page, showing date and time of detection, file name and path, detection name and action taken, for each item. When multiple malicious files were detected at the same time, Trend Micro showed just one alert box.
Malware detection scenarios
When we connected a USB drive containing some malware to the system, Trend Micro did not initially take any action. However, as soon as we opened the drive in Windows File Explorer, Trend Micro detected and quarantined the malicious files.
When we ran an on-demand scan of malware samples on a USB drive, Trend Micro showed a notification of the number of files scanned and threats resolved. Clicking Show details in the dialog box displayed a list of file names and paths, and action taken, for each malicious file detected.
Scan options
The Scan button in the main program window runs a quick scan by default. If you click the small down arrow symbol to its right, the choice of quick, full or custom scans is shown. The program’s settings dialog lets you schedule scans. You can also scan a local drive, folder or file, or a network share, from Windows Explorer’s right-click menu. When we scanned a network share containing malware, Trend Micro detected the malicious files, but was not able to remove them automatically.
Under Settings\Scan Preferences, you can configure detection of PUAs (enabled by default). The Exception Lists page of the settings dialog lets you set scan exclusions.
Quarantine and logs
The pie-chart symbol to the right of the settings icon opens the Security Report page, which shows a summary of threats found, grouped by type (such as ransomware, web threats, computer threats). Under computer threats, by clicking See more details, you can see individual security-related events. These are divided into different categories, including Viruses (which in fact includes many Trojans), Spyware, Unauthorized Changes and Ransomware. Logs show the date and time of detection, file name and path, threat name, and action taken. Clicking on an individual quarantined item displays a details panel, which includes a Restore button.
Help
Clicking the ? menu, Product Support opens the program’s online manual. The first page has an overview of the program’s main functions. There are simple explanations and instructions, some being well illustrated with screenshots.
Access control
Standard Windows users can disable protection features, but not uninstall the program. Under Other Settings\Password, you can password protect the program to prevent other users changing the settings. You need to enter an email address when doing this, so that you can reset the password if you forget it. Trend Micro Internet Security requires you to set up password protection before allowing you to disable protection.
Other points of interest:
A pop-up alert prompted us to install the Trend Micro add-on for the Chrome browser.
A free trial of Trend Micro’s Password Manager is offered on the Data page.
VIPRE Advanced Security is a paid-for security program. In addition to anti-malware features, it includes a replacement firewall, anti-spam, phishing protection, patch-management feature, and a secure file eraser. You can find out more about the product on the vendor’s website: https://www.vipre.com/products/vipre-advanced-security/
Summary
VIPRE Advanced Security is very easy to install, and has a very modern, touch-friendly interface, with light and dark modes. Default settings provide safe options for non-expert users. In our functionality check, VIPRE’s sensitive on-access protection proactively deleted malware on an external drive as soon as we opened it in Windows File Explorer. We liked the online help feature and the ability to search it directly from the program. The ability to set scanning exclusions using Windows File Explorer’s right-click menu is also very convenient.
Setup
You can change the installation folder if you want. Otherwise installation completes very easily with a single click. You have the option of entering a licence key or opting for a 30-day free trial.
System Tray icon
The System Tray icon menu lets you open the program window, check for updates, shut the program down, enable/disable real-time malware protection and the VIPRE Firewall, run quick or full scans and enable/disable the gaming mode.
Security status alert
When we disabled real-time protection in the program’s settings a (rather subtle) alert was shown in the main program window. We were able to reactivate the protection easily by clicking Turn On.
Malware detection alert
When a malicious file was detected in our functionality check, VIPRE displayed the alert shown below. We did not need to take any action, and the alert closed after 30 seconds.
Clicking Learn More opened a page on VIPRE’s website, which provided a generic description of malware. When multiple malicious files were detected at the same time, VIPRE displayed just one alert.
Malware detection scenarios
When we connected a USB drive containing some malware to the system, VIPRE prompted us to scan the drive. We declined to do this, but instead opened the drive in Windows Explorer. VIPRE immediately detected and quarantined the malware, before we had a chance to copy it to our PC.
We found that if we accepted the prompt to scan the USB drive when it was inserted, the scan ran and removed the malware, but the program window did not open automatically, and no other indication of scan progress or completion was shown. However, when we started a scan of the drive using Windows Explorer’s right-click menu, the VIPRE program window opened and showed the scan progress. When the scan was complete, a summary of files scanned and cleaned was shown. No further action was necessary.
Scan options
If you mouse over the Scan button on the homepage, a dropdown menu appears, with the options of full, quick and custom scans. The Schedule Scan button to its right lets you do precisely that. You can scan a local drive, folder or file, or a network share, using Windows Explorer’s right-click menu. Very conveniently, the same menu also lets you exclude a drive/folder/file from VIPRE scans. You can reverse this by right-clicking again and clicking Remove from VIPRE exclusion. Exclusions can also be set under Manage\Antivirus. You can set detection of PUAs here too (on by default), under Include Low-Risk Programs.
Quarantine
The quarantine function is found under Manage\Antivirus. It shows the name, threat level and type of the detected threats, number of traces (e.g. files or registry entries) for each one, and allows you to delete, restore, or always allow the selected items.
Logs
These are found under Manage\Antivirus\Antivirus History. There are separate logs for on-demand scans, real-time protection, blocked websites, and Edge Protection. The latter describes itself thus: “Stops exploits and other online threats from being downloaded by most web browsers”. The scan log shows the date, time, duration and type of scan, along with the number of files detected and cleaned. The i icon at the end of each entry opens a panel showing threat name, level and type, number of traces, and action taken.
Help
The help features are found on the Account page. VIPRE Help opens a Windows Help window, which lists various topics. Simple text instructions are provided for each topic. You can also type a search term into the program’s search box, which will search the online FAQs/forum questions and open the results in a browser window. These include all products made by VIPRE, including beta versions, so you may have to browse through a number of irrelevant results before finding the applicable answer.
Access control
Standard Windows users can disable protection features, but not uninstall the program. We could not find a means of password protecting the settings.
Firewall
In our functionality test, VIPRE’s firewall co-ordinated with Windows’ public/private network types. So for example, when we joined a new wireless network and designated this as public at the Windows connection prompt, the VIPRE firewall also adopted the public setting. We did however find that when we changed the network type (e.g. from private to public) in Windows settings, we needed to restart the PC in order to make this change to take effect in the VIPRE Firewall.
We found that even in a private network (set to Trusted in the settings of VIPRE Firewall, and Private in Windows settings), VIPRE blocked Remote Desktop connections to our test PC. Despite setting Trusted Inbound connection to Allow for mstsc.exe, and restarting the PC, we were not able to gain Remote Desktop access to our test computer.
It is possible to disable the VIPRE Firewall completely in the program’s settings, which immediately activates Windows Firewall. A (subtle) warning will be shown on the home page of VIPRE Advanced Security if you do this.
Other points of interest
If you don’t like the default dark mode of the interface, you can easily change it to another colour scheme under Account. There are 7 different colour schemes to choose from.
The secure file eraser is operated by right-clicking the target file(s) or folder(s) in Windows File Explorer, then clicking Securely erase selected files and folders.
The patch management feature is found on the Manage page, Updates tab.


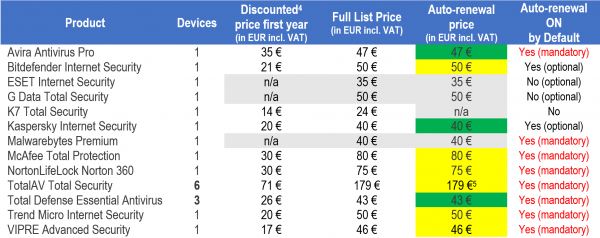


")