


Archives
Business Security Test 2020 (August – November)

About the product
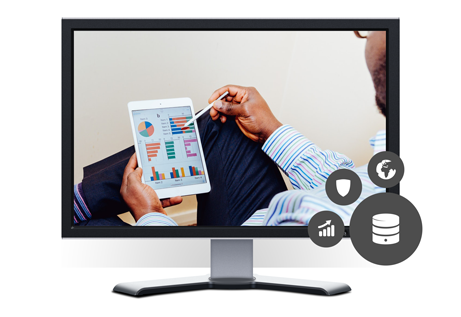
The Acronis Cyber Cloud platform provides endpoint protection software for Windows and macOS workstations, plus Windows servers. This is managed from a cloud-based console. The product contains a variety of other cloud-based services, including backup, disaster recovery, and secure file-synchronisation. This review considers only the malware protection features, however. The product can manage networks with thousands of seats. We feel it would also be suitable for small businesses without dedicated IT support staff.
Advantages
• Has backup, disaster recovery, vulnerability assessment, patch management, and secure file-synch
• Well suited to smaller businesses
• Console is easy to navigate
• Pages of the console can be customised
• Geographically aware threat-feed feature
Management console
The console is navigated from a single menu panel on the left-hand side. There are entries for Dashboard, Devices, Plans, Anti-Malware Protection, Software Management, Backup Storage, Reports, and Settings.
Dashboard\Overview page
This is the page you see when you first log on to the console. It’s shown in the screenshot above. It provides a graphical overview of the security and backup status of the network, using coloured doughnut and bar charts. There are panels for Protection status, Active alerts summary, Activities, Patch installation status, Missing updates by categories, and Disk health status . A panel across the top displays the items Backed up today, Malware blocked, Malicious URLs blocked, Existing vulnerabilities, and Patches ready to install. Details of recent alerts and other items are displayed in further panels at the bottom. You can customise the page by changing data settings for each panel, or adding/removing panels.
Dashboard\Alerts page

Here you can see alerts relating to malware detection, blocked URLs, and also the backup functions. These can be shown as a list, or as big tiles with details (as shown above). Information for malware detections includes the device, protection policy, file name and path, file hashes, threat name and action taken (e.g. quarantined). Clicking Clear removes the item from the Alerts page, but not the system logs.
Dashboard\Threat feed page

The Threat feed page displays warnings of current attacks and vulnerabilities to watch out for. Acronis tell us that this list is tailored to your geographic location, so that it only displays warnings that are relevant to you. The page may even warn you of natural disasters, where applicable. Clicking on the arrow symbol at the end of a threat entry opens a list of recommended actions to counteract that particular threat. These might be to run a malware scan, patch a program, or make a backup of your PCs or data.
Devices page

The Devices page lists the computers on the network. Sub-pages allow you to filter the view, e.g. by managed and unmanaged machines. You can see device type and name, user account, and security status, amongst other things. The columns shown can be customised, so you can remove any you don’t need, and add e.g. IP address and operating system. Devices can be displayed as a list, or large tiles with additional details. Selecting a device or devices opens up a menu panel on the right, from which you can see the applied protection policy, apply patches, see machine details/logs/alerts, change group membership, or delete the device from the console.
Plans page
Under Plans/Protection, you can see, create and edit the policies that control the anti-malware features of the platform. Again, an uncluttered menu pane slides out from the right with the appropriate details and controls. Amongst the functions that can be configured are real-time protection, network folder protection, action to be taken on malware discovery, ransomware, crypto-mining process detection, scheduled scanning, exclusions, URL filtering, and how long to keep items in quarantine. You can configure vulnerability assessments and patch management, and there are even controls for scanning with Microsoft Windows Defender/Security Essentials too.
Anti-Malware Protection\Whitelist page
The Whitelist page displays any applications that have been found during backup scanning and categorised as safe. A backup scanning plan has to be created in order to enable automatic whitelist generation.
Anti-Malware Protection\Quarantine page
Under Anti-Malware Protection, the Quarantine page lists the names of malicious files that have been detected, along with the date quarantined and device name. You can add columns for the threat name and applicable protection plan from the page settings. A mini menu at the end of each entry lets you restore or delete the selected items.
Software Management pages
The Patches and Vulnerabilities pages under Software Management are populated if a vulnerability assessment has been created in a protection plan and run at least once.
Reports page
The Reports page lists a number of topics for which reports can be generated, including Alerts, Detected threats, Discovered machines, Existing vulnerabilities and Patch management summary. Clicking on a report name opens up a details page for that item. The Alerts report page, for example, contains panels showing 5 latest alerts, Active alerts summary, Historical alerts summary, Active alerts details, and Alerts history. Coloured alert icons and doughnut charts serve to subtly highlight the most important items. As with other pages of the console, the columns in these panels can be customised.
Settings pages
Under Settings/Protection, you can set the schedule for protection definitions updates, and enable the Remote Connection function. The Agents page allows you to see the version of the endpoint agent installed on each client, and update this if necessary. If any devices are running outdated agents, an alert will be shown in the Settings entry in the menu panel of the console. This makes clear that you need to take action.
Windows Endpoint Protection Client
Deployment
Installation files in .exe format can be downloaded by going to the Devices page and clicking the Add button. There are separate installers for Windows clients and Windows servers. The installer file can be run manually, via a systems management product, or using an AD script. Remote push installation is also possible if you set up a relay device in your LAN. By manually executing the .exe installer, you can also create .mst and .msi files for unattended installation. After performing a local installation on a client PC, you have to click Register the machine in the client window. You then need to log on to the management console from the client PC, find the device’s entry, and click Enable Protection.
Functionality check
The user interface on protected endpoints consists of a System Tray icon and a small information window. Here you can see the status of the real-time malware protection, and date/time of the next scheduled backup. You can also see the program version. No other functionality is made available to users.
When we connected a flash drive containing malware samples to our test PC, and opened the drive in Windows Explorer, Acronis immediately detected and quarantined the malicious files. No alert was shown.

About the product
Avast Business Antivirus Plus provides endpoint protection software for Windows and macOS workstations, plus Windows servers. This is managed using a cloud-based console. Additional features for Windows clients include anti-spam, data shredding, a VPN, and data & identity protection. Exchange and SharePoint security are provided for Windows Server. A patch management feature is included for all Windows computers. However, automatic installation of patches requires a separate licence for Avast Business Patch Management. This review considers only the malware protection features. The product can manage networks with tens of thousands of devices. We feel it would also be suitable for small businesses without dedicated IT support staff. Avast tell us that a new console user-interface design will be released next year.
Advantages
• Includes anti-spam, data shredding, a VPN, and data & identity protection
• Well suited to smaller businesses
• Console is easy to navigate
• Option for real-time synchronisation between clients and console
• Notifications link to details page/remediation functions
Management console
Dashboard page
This is what you will see when you first log in to the console (screenshot above). It provides an overview of the current security status. You can see alerts on your devices, OS distribution, and threat detection statistics.
Notifications page

This shows important alerts such as malware detections, and devices that are out of date or need rebooting. You can click on any alert to be taken to the relevant details page. Additional links are provided, such as the Virus Chest (quarantine) for malware detections, or Update Now! for out-of-date devices. Clicking the Notifications Settings button takes you to a configuration page, where you can choose which notifications to show in the console, and whether/how frequently to send email reminders if these have not been read.
Devices page

The Devices tab shows each device’s security status, group membership and policy, along with recent threats and other events. Helpful links are provided, for example Restart & scan for unresolved threats. You can group devices into groups, and apply settings and policy through that group.
Policies page
Here you can configure the protection settings for your devices. You can set scanning schedules for all platforms. For other settings, there are separate policies for Windows clients, Windows Servers, and macOS devices. You can configure program and definition update frequency, protection components to be used, and scan exclusions, amongst other things.
Reports page

There are five different report categories: Executive Summary, Antivirus Threats Report, Patch Report, Device Report, and Tasks Report. You can click on any of these headings to see a graphical representation of recent activity. For example, Antivirus Threats Report shows a graph of malware items detected, quarantined, blocked, deleted or repaired over the last month. You can create reports on a weekly or monthly schedule, and view scheduled reports already created.
Subscriptions page
As you would expect, this shows you the product licences you currently have, how many of them you have used, and when they expire. There are also links that let you try or buy other versions of Avast Business Antivirus, Avast’s Premium Support Service, and the Patch Management component.
Help & Support provides links to various support and documentation items, including a user guide for the console. This is clear, comprehensive and well indexed, though lacking in screenshots.
General settings page
General Settings lets you change the system time zone, and enable Labs features. The latter is a preview of upcoming features that are “not entirely ready yet”. You can also create a local server for deployments and updates (Master Agent), and import the database of another Avast console.
Windows Endpoint Protection Client
Deployment
Installer files can be downloaded in either .exe or .msi format from the Devices\Download Installer page. You can specify the group and policy to be used, proxy server settings, and online or offline installer versions. The installer file can be run manually, via a systems management product, or using an AD script. Remote push installation is also possible in an Active Directory environment, by installing a utility on a relay computer in the LAN. On the download page, you can create a download link that you can copy and email to users. The setup wizard is very quick and easy, so even non-expert users would have no difficulty with it. You can prevent users with Windows Administrator Accounts from uninstalling the software by enabling the Password Protection option in the relevant policy.
Functionality check
The user interface on protected endpoints consists of a System Tray icon and a program window. You can hide the System Tray icon via policy if you choose. Users can see the protection status and detection logs, run updates, and run quick, full and custom scans. They can also scan a file, folder or drive using Windows Explorer’s right-click menu. If you wish, users with Windows Administrator Accounts can be allowed to restore quarantined items, disable protection components, or uninstall the program.
When we connected a flash drive containing malware samples to our test PC, and opened the drive in Windows Explorer, Avast did not initially take any action. However, when we tried to execute the malware, or copy it to the Windows Desktop, Avast immediately detected and quarantined it. A pop-up alert was shown, which persisted until manually closed. No user action was required. Options to scan the PC, and see details of the detected threat, were shown. You can disable alerts via policy if you want.

About the product
Bitdefender GravityZone Elite Security provides endpoint protection software for Windows and macOS workstations, plus Windows servers. This is managed using a cloud-based console. The product can manage networks with thousands of devices. We feel it would also be suitable for smaller businesses with tens of seats.
Advantages
• Highly customisable pages
• Clickable graphics let you easily access details pages
• Detailed malware analysis
• Risk-management feature
• Easy-to-access notification details
Management console
The console is navigated from a single menu panel down the left-hand side. The items are Dashboard, Incidents, Network, Risk Management, Policies, Reports, Quarantine, Accounts, Sandbox Analyzer and Configuration.
Dashboard page
Dashboard gives you an overview of the installation and the performance of the clients. It is divided up into information panels called Portlets. These provide information such as computer malware status, endpoint protection status, update status, and top 10 malware recipients. Each Portlet is clickable, so if you click on e.g. the Clients with no detections area of the Malware Status chart, you will be taken to a page listing all of the devices in that category. The Dashboard page is highly customisable. You can move Portlets around, hide some and add others.
Incidents page

Incidents allows you to review and investigate threats detected on the network. By default, it displays a chronological list of detected threats. There are columns for threat score (risk level), date and time, status of investigation, affected device, and attack type (e.g. malware). Panels at the top show the number of open alerts by severity, alerts by type, and most-affected devices. You can click on the numbers shown to go to the appropriate details page. The boxes at the top of each list column let you filter by that category, so you could specify the threat severity, time period or endpoint to narrow the list down.
By clicking on the network symbol at the right-hand end of a threat’s entry, you can see a graphical representation of the threat event, along with further details and recommended steps to take:

Network page

The main Network page shows you all the managed devices on your network, ordered into groups which you can create yourself (screenshot above). A navigation pane on the left-hand side of the page shows your group structure, and lets you assign devices to groups by drag-and-drop. The Tasks menu lets you carry out various actions on selected devices, such as scans, updates, repairs and restarts.
The Packages sub-page lets you configure deployment packages. You can specify the components to be installed, use as a relay to enable push installation, and removal of existing AV products, amongst other things. On the Tasks sub-page you can see the status of tasks such as scans and updates.
Risk Management Dashboard page
Here you can see a wide range of data that you can use to proactively protect your network. Various different panels use coloured charts to display relevant items of information. The Company Risk Score gives you a rating from 1 to 100, based on Misconfigurations, Vulnerable Apps, and Human Risks (unsafe behaviour by users). For each of these items, there is a separate details panel. There is also a timeline of Risk Score over the past 7 days, along with panels for the most vulnerable individual servers, workstations and users. The Security Risks sub-page shows complete lists of the devices, users and vulnerable apps that are summarised on the main page.
Policies page
Here you can change the configuration of groups of client devices. A menu column down the left-hand side of the page lets you navigate the different areas of each policy, such as antimalware, firewall and device control.
Reports page
This lets you build information summaries on a wide variety of aspects, including blocked websites, device control activity, endpoint protection status, policy compliance and update status. The reporting interval can be set to this month, previous month, this year or previous year. You can also select device groups to be included.
Quarantine page
Quarantine gives you an overview of all the malware that has been quarantined on the network, and the ability to delete or restore selected files.
Accounts page
Accounts lets you add, remove and edit console users. There are three default permissions levels, from full control to read only. You can also create custom permission levels. On the User Activity sub-page you can monitor the activities of the user accounts.
Sandox Analyzer page
Sandbox Analyzer provides a breakdown of unknown files that have been analysed by the sandbox feature, with a severity score from 0 (completely harmless) to 100 (clearly malicious).
Configuration page
The Configuration page lets you make configuration changes for the console itself. Amongst other things, you can set up 2-factor authentication here.
Notifications panel
Clicking the bell icon in the top right-hand corner opens the Notifications panel. This displays a list of events such as logins and detections. Clicking on an item displays a paragraph of information within the panel. For example, for Login From New Device you can see the device IP address, device operating system, browser used, and date and time. To get even more information, click on Show more, and you will be taken to the full details page in the main pane of the console.
Windows Endpoint Protection Client
Deployment
Under Network\Packages you can create and download installation files in .exe format. For Windows installers, there is a choice of light, full 32-bit and full 64-bit installers. The installer file can be run manually, via a systems management product, or using an AD script. Remote push installation is also possible, by installing the endpoint client on a relay computer in the LAN. Alternatively, you can email an installer to users directly from the Packages page. The setup wizard is very quick and easy, so even non-expert users would have no difficulty with it. You can prevent users with Windows Administrator Accounts from uninstalling the software by using the Set uninstall password option in the settings of the applicable policy.
Functionality check
The user interface on protected endpoints consists of a System Tray icon and a program window. Users can see the protection status and detection logs, run updates, and run quick, full and custom scans. They can also scan a file, folder or drive using Windows Explorer’s right-click menu. By changing the policy, you could hide the user interface completely.
When we connected a flash drive containing malware samples to our test PC, and opened the drive in Windows Explorer, Bitdefender automatically started a scan of the external drive. We cancelled this, and opened the drive in Windows Explorer. We were unable to copy any of the malware samples to the Windows Desktop. A pop-up alert is shown when malware is detected, which closes after a few seconds. No user action is required or possible. You can disable detection alerts by policy if you want.

About the product
Cisco AMP provides endpoint protection software for Windows and macOS workstations, plus Windows servers. These are managed from a cloud-based console. In addition to malware protection, the product provides features for monitoring, investigating and blocking security threats. It can manage networks with hundreds of thousands of devices.
Advantages
• Investigative features
• Suitable for medium to large-sized enterprises
• Detailed timeline of attacks is shown
• Attack response can be automated
• Well-designed interface allows straightforward access to a wide range of functionality
Management console
Dashboard tab
The Dashboard page of the Dashboard tab is shown in the screenshot above. There are a number of panels with coloured bar charts. These show Compromises, Quarantined Detections, Vulnerabilities, Significant Compromise Artifacts, and Compromise Event Types. The Inbox page shows a compact, summarised version of the same thing. The Overview page provides the most graphical overview of the state of the network, with coloured bar and doughnut charts showing Compromises, Threats, Vulnerabilities, Computers, Network Threats, AV Definition Status and File Analysis. These provide a very clear summary of the most important information. The Events page lists recent detections.
Analysis menu
In the Analysis menu you can find features for investigating attacks.
Events shows a list of events, such as endpoint client installation, deinstallation, and threats encountered by protected devices. These include access to risky websites, malicious file downloads, and attempts to quarantine suspected malware. Clicking on an item displays more details, such as the IP address and port of the threat website, and the hash of the malicious file.
You can drill down into a file’s details on the File Analysis page. This shows you the specific behavioural indicators for detecting a file as malicious.
To see which legitimate programs have been involved in malware encounters, take a look at the Threat Root Cause page. A coloured pie chart shows you the distribution of malware encountered by specific applications, such as chrome.exe or explorer.exe.
On the Prevalence page, the number of devices affected by a particular threat is shown.
Under Vulnerable Software, programs with known vulnerabilities are listed. There is also CVE-ID and CVSS info to help identify and resolve the problem.
Reports provides a very detailed report by week and/or month and/or quarter. This covers numerous items such as threats, compromises and vulnerabilities. These are illustrated with coloured bar and doughnut charts.
Orbital Advanced Search is a capability that lets you query endpoints for detailed information. When enabled in AMP policy, it automatically installs an additional module (not used on our Main Test systems). Orbital can execute queries immediately, or you can schedule them using the Orbital Job feature. It includes a catalogue of queries with associated MITRE ATT&CK Tactics, Techniques or Procedure (TTP) mappings.
The Indicators page displays indicators of compromise (IOCs) that trigger AMP events. These act as a notification of suspicious or malicious activity on an endpoint, which can then be investigated. You can access the page from the Analysis menu. Each indicator includes a brief description of the nature of the attack. There is also information about the tactics and techniques employed, based on the MITRE ATT&CK knowledge base.
Outbreak Control menu
The Outbreak Control menu provides options for blocking or allowing specific applications and IP addresses. There are also custom detection options. These let you block the installation of any program you consider to be harmful or unwanted anywhere on the network. You can also run IOC (indicator of compromise) scans.
The Automated Actions feature (shown below) lets you set actions that automatically trigger when a specified event occurs on a computer. For example, if the computer is compromised, you can take a forensic snapshot, isolate it, move it to a specified group (or any combination of these). You can also submit suspicious files for analysis on detection. In each case, the minimum threat level (Critical, High, Medium or Low) required to trigger the action can be specified.

Management menu
The Management menu contains a number of other standard features. There are Groups, Policies, Exclusions, and deployment options.
The Computers page, shown above, provides a row of statistics along the top, such as computers with faults or in need of updates. Below this is a list of individual devices, with a status summary for each one. You can mark a computer for further attention by clicking its flag icon here. Clicking on the arrowhead icon for a device displays a detailed information panel. This shows information such as OS version, connector version, definitions version, internal and external IP addresses, and date and time last seen. The computer list can be filtered by any of the above parameters.
Within the details of any individual computer is a link to Device Trajectory (shown in the screenshot below). This displays detection events by date (the row of red dots along the top of the page). The page provides a very detailed view of each event, using a timeline to show the order of the stages. There is a wealth of information here to assist with the investigation of an attack, including system processes involved, hashes of suspicious files, IP addresses accessed, and much more. Right-clicking on a process name in the System column opens a context menu with numerous options, including a summary of detections or a complete report from VirusTotal. There is also the option Investigate in Cisco Threat Response. This opens a separate console, which lets you explore the nature of the threat and the impact it has had on your network.

The Endpoint Isolation feature has to enabled in the relevant policy before it can be used. It allows you to block all incoming and outgoing network traffic on a computer (with the exception of management-console communications). This allows you to investigate a potential threat safely.
Windows Endpoint Protection Client
Deployment
Installers in .exe format can be found by clicking Management\Download Connector. You need to select a device group, which defines which policy will be applied. The installer file can be run manually, via a systems management product, or using an AD script. The page also provides a download link that you can copy and email to users. The setup wizard is very quick and easy, so even non-expert users would have no difficulty with it. You can prevent users with Windows Administrator Accounts from uninstalling the software, using the Enable Connector Protection option in the applicable policy.
Functionality check
The endpoint protection software allows users to run scans and updates, and view the logs. There is a choice of scans that users can run. These are Flash Scan (running processes), Custom Scan, Full Scan or Rootkit Scan. Users can also scan a file/folder/drive from Windows Explorer’s right-click menu. You can hide the user interface completely if you want, by editing the policy.
When we connected a flash drive containing malware samples to our test PC, and opened the drive in Windows Explorer, Cisco AMP immediately detected and quarantined the malicious files. No alert was shown to the end user. However, the endpoint software can be configured by policy to show detection notifications.

About the product
CrowdStrike Falcon Pro provides endpoint protection software for Windows and macOS workstations, plus Windows servers. This is managed using a cloud-based console. As well as malware protection, the product includes investigative functions for analysing and remediating attacks. It can manage networks with thousands of devices. We note that CrowdStrike Falcon Pro is available as a fully managed service for organisations that desire a more hands-off solution to endpoint protection. CrowdStrike tell us that they have datacentres in the USA and EU, in order to comply with the respective data protection regulations.
Advantages
• Investigative functions
• Comprehensive search facilities
• Clickable interface provides easy access to details pages
• Encyclopaedia of known cybercriminal groups
• Suitable for medium- to large-sized enterprises
Management console
The console is navigated from the Falcon menu in the top left-hand corner of the console. This lists individual pages under headings such as Activity, Investigate, Hosts, Configuration, Dashboards and Users. You can easily bookmark any page of the console, and then go directly to that page using the Bookmarks section of the menu.
Activity\Dashboard page
This is the page you see when you first log on to the console. It shows various status items in large panels. There is a list of most recent detections, with a graphical severity rating. You can also see a graph of detections by tactic (e.g. Machine learning, Defense Evasion) over the past month. Terms from the MITRE ATT&CK Framework are used to show attack stages here. Some of the panels are linked to details pages. Thus, you can click on the New detections panel to open up the Detections details page.
Activity\Detections page
Here you can search a list of threat detections using a wide range of criteria. These include severity, tactics, detection technique, time, status and triggering file. For each detection, you can see full details, including a process tree view. You can contain network a host from here, and assign a console user for remediation.
Activity\Quarantined Files page
As you would expect, this page lets you see files that have been quarantined by the system. You can see the filename, device name, number of detections counted on the network, user involved, and of course date and time of detection. Quarantined files can be released or deleted. Clicking on a quarantined file opens a details panel with additional information. This includes file path for the location where it was detected, file hashes, file size, file version, detection method and severity. You can also start a sandbox analysis from here. There is a search function and a variety of filters you can use to find specific files within the quarantine repository.
Configuration\Prevention Policies page
Here you can create and edit the protection policies for endpoints. You can define behaviour for a number of different types of attack-related behaviour, such as ransomware, exploitation, and lateral movement. Some sensor components, such as Cloud Machine Learning and Sensor Machine Learning have separate configurable levels for detection and prevention. 5 different levels of sensitivity can be set, ranging from Disabled to Extra Aggressive. Custom Indicators of Attack (IOA) can also be created and assigned here.
The sensor version to be used on endpoint clients can be defined in the policy. This is done using a simple formula, whereby “n” is the latest version, “n-1” the second most recent, and so on. Policies can be assigned to devices automatically by means of a naming system. For example, any device with “Win” in its name can be automatically put into a specific group of Windows computers, to which a particular policy is assigned. Devices/groups can be assigned more than one policy, whereby a policy hierarchy determines which one takes precedence.
Hosts\Host Management page

The Hosts/Host Management page lists all the installed devices. You can immediately see which ones are online. Additional information includes operating system, policy, security status and sensor version. Clicking on a device’s entry opens up a details panel for that device. Here you can find additional information, such as device manufacturer, MAC address, IP addresses and serial number.
Intelligence\Actors page
This page provides details of known cybercriminal groups. You can see the nations and industries that each one has targeted, along with technical details of the attack methods used. CrowdStrike tell us that this information is also available in Detection details when a detection is associated with a specific actor.
Investigate\Host Search page
The Investigate menu provides an extremely comprehensive search facility. It lets you search for devices, hashes, users, IP addresses, domains and events. On the Host Search page, you can look for specific devices. A separate menu bar allows you to look for specific aspects, such as Activity (including detections), Vulnerabilities and Installed Applications.
Windows endpoint protection software
Deployment
Installer files for the sensor (endpoint protection client) can be downloaded in .exe format from Hosts\Sensor Downloads page. Older versions of the sensor are available if you want. The installer file can be run manually, via a systems management product, or using an AD script.
Functionality check
There is no interface at all to the endpoint client. It is completely invisible to the user, with the exception of malware alerts.
When we connected a flash drive containing malware samples to our test PC, and opened the drive in Windows Explorer, CrowdStrike Falcon did not take any action. We were able to copy the malicious files to the Windows Desktop. However, as soon as we tried to execute any of them, they were immediately detected and quarantined. A Windows pop-up alert was shown, which closed after a few seconds. No user action was required or possible. You can disable protection alerts by policy if you want.

About the product
Cybereason Defense Platform Enterprise provides endpoint protection software for Windows and macOS workstations, plus Windows servers. This is managed using a cloud-based console. As well as malware protection, the product includes functions for analysing and remediating attacks. It can manage networks with hundreds of thousands of devices.
Advantages
• Investigative functions
• Ultra-simple and fast client deployment process
• Management console is easily navigated from a single menu
• Clear graphical representations of malicious activities
• Clickable interface provides easy access to details pages
Management console
The console is navigated from the menu in the top left-hand corner.
Discovery board page
The Discovery board (shown in the screenshot above) is that page you will see when you first log on. It shows “Malops” (malicious operations) in columns, according to type. The blue dots represent a malicious or suspicious activity. The size of the dot represents the number of the affected machines, and the shade of colour refers to the activity time (as explained in the panel on the right-hand side of the page). If you click on a dot, a pop-up box displays the name of the file/process, and the nature of the threat (e.g. malicious code injection), along with the date and time of the action, and the affected device. Clicking on the pop-up opens the details page for that Malop. We are pleased to see that Cybereason have brought a touch of humour to the serious world of IT security. If all is well, the Discovery Board will state “No Malops found today. How about a cup of tea?”.
Malops management page

The Malops management page shows a list of detected malicious operations in chronological order. Information for each item includes an identifier (file/process name), detection module, and affected devices, along with date and time. This is laid out in spacious rows, making it easy to read the information. Different view options let you sort the Malops by activity type, root cause, or affected device. You can also choose a grid view, showing more items with fewer details. Clicking on one of the Malops opens its details page.
Malop details page

The Malop details page has an abundance of information about the Malop in question. This includes the device, SHA1 file hash, incoming and outgoing connections to and from the process, and a timeline. This information is laid out in very clear diagrams, which provide an at-a-glance summary of the threat. This strikes us a remarkably effective way of communicating the important information quickly and easily. Big buttons at the top of the page let you carry out various actions to remediate the problem. These are Respond, Kill Process, Prevent Files Execution, Quarantine, Isolate and Exclude.
Malware alerts page
This shows items that “need your attention”. They are given names like “vaultfile12009845677446252183.vol”, based on the system’s internal quarantine naming process. Items marked as Failed to disinfect are shown prominently in big tiles along the top of the page. For each of these items, there are Investigate and Exclude buttons.
Investigation page
The Investigation page allows you to create customised hunts, using criteria such as machine, user, process, connection, network interface and registry entry. There are also pre-built queries, such as Files downloaded from Chrome and Child processes of Explorer.
Security profile page
Here you can adjust reputation criteria, create custom rules for detection and behavioural whitelisting, and manage machine isolation exceptions.
System section
The main System page has a number of sub-pages. These are Overview, Sensors, Policies management and Detection servers.
System\Overview page
The default Overview page is divided into 4 panels. The Sensors panel provides a doughnut chart of the status of installed devices, with a traffic-light colour-coding system for Enabled, Suspended and Service Error states. A simple bar graph completes the picture by showing the proportion of up-to-date clients. The other panels show details of the management server, alerts, and services.
System\Sensors page

The System\Sensors page displays a list of protected devices, with details such as sensor version, OS type, IP address and component status. The details columns can be customised, letting you add a variety of items like CPU usage, memory usage and OS version. You can select a device or devices and perform tasks from the Actions menu, such as update, restart, set policy, set anti-ransomware mode, and start a system scan. A panel at the top of the page allows you to filter a long list of devices by sensor status, data collection, OS, update status, app control status and ransomware-protection status.
System\Policies management page
The System\Policies management page lets you create and edit policies for the endpoint software. For each policy, there is a configuration page with a left-hand menu column. This allows you to go to specific sections of the policy. These are Anti-Malware, Exploit protection, PowerShell and .NET, Anti-Ransomware, App Control, Endpoint controls, Collection features, and Endpoint UI Settings. Each item opens the relevant configuration page, with neatly laid-out controls for the individual sub-components.
System\Detection servers page
Here you can add and edit details of the sites and servers that manage the protection software.
Settings page
On this page you can configure system items such as notifications, authentication, and password policy.
Support page
The product’s support services can be accessed by clicking Support, as you would expect.
Windows endpoint protection software
Deployment
Installer files in .exe format can be downloaded from the System\Overview page of the console. There are 32- and 64-bit installers for Windows. The installer file can be run manually, via a systems management product, or using an AD script. Manual installation can be completed with a single click, and finishes in seconds.
Functionality test
The user interface on protected endpoints consists of a System Tray icon, which displays protection status, date and time of last update, signature version and program version. Other than this, no functionality is provided to users. You can hide the interface completely by means of policy, if you so choose.
When we connected a flash drive containing malware samples to our test PC, and opened the drive in Windows Explorer, Cybereason immediately detected and quarantined the malicious files. A pop-up alert was shown, which closed after a few seconds. No user action was required or possible.

About the product
Elastic Endpoint Security provides endpoint protection software for Windows and macOS workstations, plus Windows servers. This is managed from a cloud-based console. As well as malware protection, the product includes investigative functions for analysing and remediating attacks. appropriate IT resources. The product can manage networks with tens of thousands of devices.
Advanatages
• Investigation functionality
• Clean and simple console design
• Graphical representation of attacks
• Console users can be assigned granular permissions
• Suitable for medium- to large-sized enterprises
Management console
Dashboard page
This is the page you will see when you first open the console (screenshot above). It gives you an overview of the status of client device status, operating system distribution, and alerts. Separate panels show you 4 different alert categories, with the top three devices in each category listed. You can see total alerts, exploit alerts, malware alerts and fileless alerts. You can click on a device name in one of the panels to go directly to the details page of that device and alert type.
Endpoints page

The Endpoints page gives a view of all the managed clients. You can sort and select by name, IP address, OS version, policy applied, sensor version, alerts and groups. You can choose a range of endpoints and then run tasks on them. These include applying a new policy, upgrading, uninstalling or deleting endpoints.
Alerts page

This provides you with a summary of total alerts and total adversary behaviours. By default, the page is kept very clean and simple, with just the five most recent alerts listed. However, you can see all alerts or adversary behaviours at the click of a link. The top five most infected endpoints are also listed here. As you would expect, you can click on links to go to the respective details page for the item in question. For example, clicking on an Alert Type link takes you to the Alert Details page for that event.
Alert details page

Here you can see much more detail about the event, where it started, what it has done and the analysis of the malware, if appropriate. You can see the alert type, severity, file hash, probability that the file is malicious, and action that has already been taken. You can also assign an analyst to deal with it. Relevant information, including processes, network connections and registry writes, is shown clearly in graphical form (screenshot above). You can choose Take Action, whereby the options include Download Alert, Resolve, Dismiss, Start Investigation, Isolate Host, Download File, Delete File and Whitelist Items.
Investigations page
The Investigations menu item shows a list of ongoing investigations, who is assigned to them, which endpoints are involved, and so forth. The How to start an investigation link at the top of the page displays a brief summary of the necessary steps. These are as follows. First, you have to select an OS and specific endpoints from the Endpoints page. You then click Create Investigation, enter a name and who it is assigned to, and select a Hunt Type. A Hunt can cover multiple information sources, e.g. firewall rules, drivers, network, persistence, process, registry, media, indicators of compromise, or system configuration. It allows you to search the network for information relevant to your enquiry. Having created your investigation, you can return to the Investigations page to see the results.
Reporting page
This page provides a simple overview of alert types and endpoints in graphical form.
Administration page
Finally, the Administration menu item gives access to various settings. The include Policy, Users, Sensors, Alerts, Whitelist, Blacklist, Trusted Applications and Platform. The Policy tab\Threats sub-tab lets you define the action to be taken by the endpoint client when encountering specific threats. These include credential access, exploits, malware privilege escalation, process injection and ransomware. Each threat type has its own detailed configuration. For example, with process injection, you can choose whether to detect or prevent it, allow or block self-injection, and collect injected code. Policy has another sub-tab for Adversary Behaviors. As with Threats, you can decide on the course of action to be taken when encountering specific items. Here, the options are for command and control behaviour, credential access, lateral movement, privilege escalation and others. Finally, the Policy\Settings sub-tab lets you configure events to be monitored and recorded, such as network connections, running processes and registry writes. You can also manage allowable network connections for isolated hosts here. Under Register as Anti-Virus, you can decide whether the Elastic endpoint client should register as the antivirus program in Windows Security and disable Microsoft Defender.
On the Administration page\User tab, you can manage console users and assign them one of four permission levels. Admin level has full control, and there are levels 3, 2 and 1 below this. You can download an audit log of what each console user has done.
Windows Endpoint Protection Client
Deployment
Deployment of the endpoint protection client (sensor) can be performed via remote push installation (in-band) or manual installation on the endpoint (out-of-band). The product can also be deployed using a systems management product or Active Directory. An installation package, comprising an installer in .exe format and a configuration file, can be downloaded from the Settings page\Sensor tab. To perform a manual installation, you have to use specific command-line syntax (provided in the documentation) to do this.
Functionality check
The endpoint protection software is completely invisible to the user, with the exception of malware detection alerts (see below). It does not appear in Windows’ Programs and Features or Apps lists. This means that even users with Windows Administrator Accounts would find it difficult to disable.
When we connected a flash drive containing malware samples to our test PC, and opened the drive in Windows Explorer, Endgame did not initially take any action. However, as soon as we tried to copy the malicious files to the Windows Desktop, the endpoint software immediately detected and quarantined them. A banner alert was shown, which persisted until manually closed. No user action was required or possible.

About the product
ESET Endpoint Protection Advanced Cloud provides endpoint protection software for Windows and macOS workstations, plus Windows servers. These are managed by the ESET Cloud Administrator (ECA) cloud console. We feel it would also be suitable for smaller businesses with tens of seats, but it can also cope with larger networks.
Please note that there is a choice of endpoint protection software for Windows clients. ESET Endpoint Antivirus is a full-featured antimalware program; ESET Endpoint Security (which was used in our tests) additionally includes a web control feature and ESET’s Network Protection module. The package includes ESET File Security for Windows Servers.
We note that ESET have now changed the name of the package to “ESET PROTECT Entry”, and that of the management console to “ESET PROTECT Cloud”.
Advantages
• Modern interface design
• Functionality easily accessed from a single menu column
• Clickable, interconnected console makes it easy to go to details pages
• Interface can be customised
• Choice of endpoint protection software
Management console
Dashboard page
The console opens on the Dashboard/Computers page, shown in the screenshot above. This provides an at-a-glance overview of the network, in the form of colour-coded doughnut charts. You can see the security status of the network, along with details of any problems and rogue computers. Last connection/update times and OS distribution are shown. You can easily get more details for any item just by clicking on its graphic. Similar links to details and solutions are provided throughout the console. The panels of the dashboard are very customisable. You can move them around, resize them, and change the chart type, among other things. Other tabs on the Dashboard page let you view antivirus or firewall threats, ESET applications, and incidents.
Computers page

The Computers page (shown above) gives you an overview of all the managed devices, and device groups, on the network. There are some pre-configured dynamic groups, for example Computers with outdated operating system. These make it easy to find all the devices that need your attention. You can also organise computers into your own custom groups, and carry out tasks on individual or multiple devices from the Actions menu. Examples include Scan, Update, Reboot, Shut Down, Manage Policies, Deactivate Products, and Remove. If you click on an individual computer’s entry, a detailed information page for that device opens (screenshot below). Please note that ESET Full Disk Encryption is a separate product, not included in ESET Endpoint Protection Advanced Cloud.

Detections page
The Detections page shows information about all threats encountered by all managed devices on the network. Details include status, detection name, malware type, action taken, device name, user, file path, and date and time. You can click on the entry for any threat to get details such as file hash, source URL and detection mechanism. It’s also possible to whitelist files this page.
Reports page
Reports allows you to collect data from a variety of categories, including Antivirus detections, Automation, Dynamic Threat Defense, Firewall detections, Hardware inventory and quarantine. For each category, a wide range of preconfigured scenarios is provided, displayed as tiles. Running a report on one of these items is as simple as clicking its tile. Example reports in the Antivirus detection category are Active detections, Blocked files in last 30 days, High severity detection events in last 7 days, and Last Scan. You can also create and schedule your own report scenarios if you want.
Tasks page
Tasks allows you to take a wide variety of actions on individual devices or device groups. These include running scans, product installations and updates. You can also run OS-related tasks, such as installing Windows Updates and restarting the operating system.
Policies page
This has a convenient list of preconfigured policies that you can apply. These include different security levels, device control options, and how much of the user interface to show to users. There are separate policies for Windows servers, Windows clients, and macOS/Linux clients. You can also create your own custom policies if you want. Machine-learning mechanisms can be set to either Reporting or Protection.
Computer Users page
Computer Users allows you to create users, add contact details, and link them to devices.
Installers page
Here you can create installation packages to be used to deploy the endpoint protection software. When you log on to the console for the first time, an introductory wizard lets you do this straight away. To create an installer, select the appropriate product and configure setup options.
Submitted files page
This page shows a list of possibly suspicious files on protected endpoints that have been submitted to ESET’s LiveGrid service for analysis. Files may have been submitted automatically by the system, manually by the user, or by another ESET admin or system.
Quarantine page
Here you can see all quarantined files, along with useful details such as the hash, detection type (Trojan, PUA, test file), and number of computers affected. You can restore or delete any quarantined files.
Exclusions page
The Exclusions page shows files/paths that have been excluded from detection/scanning, and provides instructions for creating such exclusions.
Notifications page
Notifications lets you receive email notifications for a number of different scenarios. These include threats being detected, and out-of-date endpoint software. These are very simple to set up and edit. You just have to select the scenario(s), enter an email address, and enable the notification.
Status overview page
Finally, the Status Overview page provides a brief overview of important status items, divided into the categories Licences, Computers, Products, Invalid Objects and Questions. The Invalid Objects section advises of e.g. policies that refer to out-of-date installers. Questions points out “decisions that cannot be handled automatically and need the attention of the administrator”.
Windows Endpoint Protection Client
Deployment
Installer files in .exe or GPO/SCCM script format can be downloaded from the Installers page. The installer file can be run manually, via a systems management product, or using Active Directory. You can also email an installer to users directly from the Installers page. The installer can be configured so that no decisions have to be made, making it easy for non-expert users to install. You can prevent users with Windows Administrator Accounts from uninstalling the software or changing settings, by enabling the Password protect settings option in the policy.
Functionality check
The user interface on protected endpoints consists of a System Tray icon and a program window, which is shown below. Both ESET Endpoint Antivirus and ESET File Security for Windows Servers use a virtually identical interface to ESET Endpoint Security.

The user can see the protection status and detection logs, run updates, and run full or custom scans. Users can also scan a file, folder or drive using Windows Explorer’s right-click menu. If you wish, users with Windows Administrator Accounts can be given full control of the program. Alternatively, you could hide the user interface for all users.
When we connected a flash drive containing malware samples to our test PC, ESET Endpoint Security prompted us to scan the drive. We declined, and then opened the drive in Windows Explorer. ESET immediately detected and quarantined the malicious files. A pop-up alert was shown, which closed after a few seconds. No user action was required or possible. However, a link showing further details of the threat is provided. You can disable detection alerts via policy if you want.

About the product
FireEye Endpoint Security provides endpoint protection software for Windows and macOS workstations, plus Windows servers. A variety of console types is available. These include cloud-based, hardware appliance, virtual appliance, and Amazon-hosted. We describe the cloud-based console in this review. As well as malware protection, the product includes investigative functions for analysing and remediating attacks. The product is designed to handle very large organizations, with support for up to 100,000 endpoints per appliance.
Advantages
• Attack investigation features
• Variety of console types available
• Suitable for medium- to large-sized enterprises
• Comprehensive search feature
• Containment feature lets you isolated infected devices
Management console
Dashboard
When you open the console, you will see an overview of key status items (screenshot above). These include the total number of hosts with alerts, with a breakdown by exploits and malware. Clicking on the Total hosts with alerts button opens the Hosts with Alerts page, shown below.
Hosts with alerts

As the name suggests, this page displays details of protected devices with alerts that have not yet been dealt with. If you click on the plus sign for a device, you can see a list of alerts for that device, in chronological order. With malware alerts, a wealth of detail is provided for each one. This includes status (e.g. quarantined), detection method (e.g. signature), file path, MD5 and SHA1 hashes (but not SHA256), file size, last modified and last accessed times, process path, username of logged-on user, detection name, threat type, and times of first and last alerts for the item. Each threat can be acknowledged (marked as “read”), or marked as a false positive. You can also add comments to the threat details, for future investigation.
The Hosts pages also allow you to contain a device. This cuts all network connections to and from the device, with the exception of the management console. You can then investigate a threat without any risk of it spreading.
Alerts

For a threat-centric rather than a device-centric view, you can go to the Alerts page. Here you can sort threats by name, file path, first or last detections, and hostname or IP address of the respective device. The options Acknowledge, Mark False Positive and Add Comment are provided here too.
Acquisitions
From the Hosts page, you can acquire a file or various items of diagnostic data from an individual device. The Acquisitions menu lets you download files that have been acquired from hosts, in order to analyse them.
Enterprise Search

This feature allows you to search the network for a very wide variety of items. These include application name, browser version, hostname, various executables, file names/hashes/paths, IP address, port, process name, registry key, service name/status/type/mode, timestamp, URL, username and Windows Event Message.
Policies
This feature is found in the Admin menu. Here you can configure numerous different aspects of the client protection policy. Examples are scans, whether to show the endpoint GUI on the client, logging, malware scan settings, polling frequency, tamper protection, scan exclusions, management server address and malware detection settings. Scans can be set to run on a schedule, or after a signature update or device boot.
Host Sets
These are simply groups of computers. They can be defined according to a wide variety of criteria, or simply by dragging and dropping from the list of all devices. These groups are used to apply different protection policies. The feature is found in the Admin menu.
Agent Versions
This is found in the Admin menu, and lets you download current and older versions of the endpoint agent for Windows and Mac systems. This allows the admin to e.g. avoid compatibility problems with a particular agent version on specific systems.
Appliance Settings
This page allows you to change settings for the management console itself, and is found in the Admin menu. There are controls for date and time, user accounts, notifications, network settings and licences, and more.
Windows Endpoint Protection Client
Deployment
Installer files in .msi format can be downloaded from the Admin menu, Agent Versions. As the name suggests, the current and earlier versions of the client (about 10 for each platform) are provided. The installer file can be run manually, via a systems management product, or using an AD script. You can use the automated update feature to keep installed devices on the latest version of the endpoint agent.
Functionality check
For our functionality test, we used the same settings as employed in the Main Test Series, where the option Allow users the ability to restore files from quarantine was enabled.
The user interface on protected endpoints consisted of a System Tray icon and program window. The window allowed users to see detection logs and quarantine, and to delete or restore quarantined items. No other controls were provided. We found that any Windows User Account (whether Standard or Administrator) could restore detected files from quarantine and run them. This effectively allowed all users to bypass the malware protection. We would thus recommend deselecting Allow users the ability to restore files from quarantine in the applicable policy.
If you wish, you can hide the user interface completely by deactivating the Enable the Endpoint Agent Console on the host policy option.
When we connected a flash drive containing malware samples to our test PC, and opened the drive in Windows Explorer, FireEye immediately detected and quarantined the malicious files. A pop-up notification was shown, but no user action was required or possible.

About the products
The package used in AV-Comparatives’ Main Test Series consists of the server-based console FortiClient Endpoint Management Server (EMS), the cloud-based FortiEDR console, the FortiSandbox, and the FortiClient endpoint protection software. The EMS console has to be installed on a Windows Server operating system (2008 R2 or later). There is endpoint protection software for Windows clients and servers, plus macOS devices. As well as malware protection and threat investigation, the package includes other features such as telemetry and secure remote access. These are not covered by this review, however. The FortiClient endpoint protection software and EMS could be used by smaller businesses with tens of seats, but we feel the entire package as reviewed here is probably more suited to larger organisations.
Advantages
• Investigative features
• Telemetry feature
• Secure remote-access feature
• Detailed malware analysis
• Clickable graphics provide easy access to details pages
EMS Server Installation
EMS is a local server-based product. Installing the management console on a Windows Server system is very simple and requires almost no user interaction. You will need to restart the server to complete the installation, however. The console functionality can be accessed as a dedicated window, or via a web browser using the server’s IP address.
EMS Management console
The Enterprise Management Server console is navigated using a single menu column down the left-hand side. Clicking an item here populates the right-hand side of the window.
Dashboard\FortiClient Status page
This page is what you see when you first log on to the console, and is shown in the screenshot above. It provides a graphical overview of the licensing, platform and client connection/management status. You can click on either of the two endpoint-related panels to access the devices page. A row of buttons along the top of the page show you vulnerable, infected and quarantined devices. Clicking on one of these will take you to a pre-filtered devices page, showing you just the specific devices in that category.
Dashboard\Vulnerability Scan page
The Vulnerability Scan page shows you software vulnerabilities that have been discovered. A “traffic light” graphic is used to show the severity. Colours go from green (low) through yellow (medium) to orange (high) and red (critical). Underneath this is a set of buttons indicate where the vulnerabilities lie. For example, operating system, browser, Microsoft Office and services are shown. Other panels list vulnerability-scan status, the top ten vulnerabilities, and the top ten endpoints with high-risk vulnerabilities.
Endpoints\All Endpoints page

The Endpoints\All Endpoints page lists all the endpoints on your network. Other sub-pages allow you to filter the list by group, domain or workgroup. Details provided for each device are group, user account, IP address, policy used, server connection status and recent events/alerts. Graphical buttons along the top of the page show the number of endpoints that are not protected, not connected, out of sync, at risk, and quarantined. This lets you see how many devices need your attention. Clicking on an endpoint’s entry opens the details page for that device. Here you can see a more detailed information, including hardware details, external IP address, MAC address, FortiClient version information and components installed.
Quarantine Management\Files page
As you would expect, this page shows you files that have been quarantined on protected endpoints. Details include device name, file name and hash, threat name, date and time quarantined, and number of endpoints affected. You can whitelist selected files by clicking Allowlist & Restore, after which they will be shown in the Allowlist page.
Endpoint Profiles\Manage Profiles page
Endpoint Profiles are standard client configuration policies that let you centrally change endpoint anti-malware settings. These include action on malware discovery, whether to show alerts, scheduled scans, and exclusions. There is a Basic view, which shows you the most popular settings, and an Advanced view, which gives you further configuration options.
Endpoint Policy\Manage Policies page
Policies in EMS might best be described as “super-policies” which include the Profile of client settings and allow for further configuration options on top of these.
Administration section
Under Administration\Administrators you can create user accounts for EMS analysts. On the Admin Roles page, you can manage the permissions that are assigned to different administrator levels. By default, there are five different levels, ranging from Read-Only Administrator to Super Administrator.
System Settings section
Here you can configure system-wide options. For example, on the Server page, you can configure security certificates and communications ports, and enable management of Chromebooks.
FortiEDR
FortiEDR is a separate endpoint detection and response platform, which has its own management console. This can be installed in the cloud, on-premise or as a hybrid solution.
FortiEDR Management console
Dashboard page

The Dashboard page, shown above, uses bar and doughnut charts to provide a graphical overview of threats and suspicious processes. You can see numbers of malicious, potentially unwanted and likely safe processes that have been encountered on the network. There’s also a chart of malicious processes that have targeted the greatest number of endpoints. A map of the world shows you the destinations of the most common network connections. If you mouse over the pin indicating a particular country, you can see the IP addresses to which the connections were made. Many of the Dashboard panels are clickable. For example, clicking on the Security Events chart takes the user to the Events page.
Events page

Event Viewer, shown below, gives details of security events. You can see the file name, date and time of notification, and a threat category, such as Malicious, Suspicious, PUP or Inconclusive. The Advanced Data panel shows you a graphical representation of the process execution and other processes involved. By selecting an event, the user can start an investigation by clicking on Forensics.
Other pages include Threat Hunting; Communication Control (applications and policies); Security Settings (security policies and automated incident response); Inventory (collectors, IoT and system components) and Administration (licensing, organizations, users etc.).
Windows Endpoint Protection Client
Deployment
Before deploying the client software, you will need to activate AntiVirus Protection in the applicable profile under Endpoint Profiles\Manage Profiles in the management console. This enables the anti-malware features. Under Manage Installers\Deployment Packages you can then create an installer in .exe format with a specific program version and patch version. A URL to the server’s repository is then displayed, which you can use to download the installer to client machines. The installer file can be run manually, via a systems management product, or using an AD script.
Functionality check
The user interface on protected endpoints consists of a System Tray icon and a program window. Users can see the protection status and detection logs, and run quick, full custom and removeable-media scans. They can also scan a file, folder or drive using Windows Explorer’s right-click menu.
When we connected a flash drive containing malware samples to our test PC, and opened the drive in Windows Explorer, Fortinet immediately detected and quarantined the malicious files. A pop-up alert was shown, which persisted until manually closed. No user action was required or possible. You can disable detection alerts via policy if you want.

About the product
G Data AntiVirus Business provides endpoint protection software for Windows and macOS workstations, plus Windows servers. This is managed using a server-based console, which can be installed on any current Windows Server or Windows client operating system. Multiple management servers can be used within an organisation, and managed from a single console. An option is available for protecting virtual machines, which uses a “light” agent and a virtual scan server. The product can manage networks with thousands of devices. We also feel it would be suitable for smaller businesses with tens of devices.
Advantages
• Familiar, MMC-like management console
• Groups can be synchronised with Active Directory
• Easy management of computer groups
• High degree of control over GUI of endpoint software
• Single installer file for management server and Windows endpoint protection client
Server Installation
G Data provide a single installer package which you can use to set up both the management console and the endpoint protection software. The console installation wizard lets you use an existing SQL Server installation if you have one. Alternatively, it can install SQL Server 2014 Express along with the management software. Installation is very quick and simple, and you can log on to the console with your Windows credentials. G Data’s own integrated authentication is available as an option.
Management console
The Management Server and Clients buttons in the top left-hand corner allow you to switch between the respective computer types. Under Management Server, you can configure items for your administration server(s). These include console users, synchronisation with clients/subnet servers/Active Directory, distribution of software updates, and licence management. The remainder of the console description refers to the client management pages.
Clients pane
Here you can see and navigate the device group structure for each management server. By default, there are separate groups for computers (Windows, macOS and Linux) and Android mobile devices. You can easily make your own sub-groups within these, and they can be synchronised with Organisational Units if you use Active Directory. You could automatically install the G Data endpoint security client on computers just by adding them to a specific synchronised group. The group structure in the Clients pane also allows you to monitor, manage and configure devices based on group membership. If you click on the top-level group in the Clients pane, the configuration changes applied in the main pane (e.g. Client Settings) will apply to all computers. If you click on a sub-group, then the changes made will affect only the devices in that group. You can change the configuration of a device simply by moving it to a group with a different policy.
Dashboard page
For the selected server or group, the default Dashboard page of the console, shown above, provides a graphical display of 4 important status items. The first is the status of individual components, indicating what proportion of devices are correctly configured. Then there is the share of devices that have connected to the console recently. You can also see which clients have had the most detected threats. Finally, there is a timeline of important events.
Clients page

The Overview tab of the Clients page, shown above, displays a list of managed devices. You can see information such as status, definitions used, client version and operating system. The columns are customisable. Thus, you could also display the last active user, and various network items such as IP address and DNS server. You can group computers by the data in any of the columns, just by dragging the column header to the grey bar immediately above it. From the row of buttons along the top, you can run various tasks on computers. These include installing or uninstalling client software, updating the definitions and software, and deleting devices. So, you could e.g. group computers by Virus signature update/time, and then run an update task on any that are out of date. The Software button on the top toolbar provides a detailed inventory of programs installed on the client device(s). Hardware shows basic system details such as CPU, RAM, and free storage space.
Client settings page
The Client settings pages lets you configure some options such as automatic signature and program updates. You can also allow users a degree of interaction with the endpoint software on their PCs. For example, you could let them run scans and/or display the local quarantine.
As you would expect, the Tasks page lets you see the status of any tasks, such as installation, that you have set up. Logs provides a detailed list of relevant events. These include malware detections, updates, and settings changes. Statistics lists the status of individual protection components, such as Email Protection and Anti-Ransomware.
In the bottom left-hand corner of the console are a number of shortcuts to specific pages. The Security page, shown below, lists malware detections. Details provided are client name, status (action taken), date and time, detection component, threat name, file name, location and user. By selecting one or multiple items, you can take action, such as deleting or restoring quarantined items.

Info displays event information such as software installation and client reboots. The Signatures page shows configuration options for definition updates. You can also run an update with a single click here. Program checks whether the management console itself is the latest available version.
Windows Endpoint Protection Client
Deployment
Before deploying endpoint protection software to clients, you may need to adjust Windows Firewall settings on both server and clients to enable communication between them. When the console is first used, a deployment wizard runs, allowing you to push the endpoint software to clients over the network. This allows you to set up email notifications for e.g. malware detection or out-of-date clients. There is also the option to activate “DeepRay”, which is intended to detect disguised malware, and “BEAST”, G Data’s newest behaviour-blocking technology. This wizard can be re-run at any time from the Admin menu. Alternatively, you can run the installer manually on individual client devices, or use a systems management product or Active Directory integration. To connect the client to a management server, you just need to enter the hostname or IP address of the server in the setup wizard.
Functionality check
The user interface on protected endpoints consists simply of a System Tray icon. This can be used to run definition updates and display program information. By default, no other functionality is provided. However, by changing the policy, you could allow users to run scans (quick, full, custom and right-click); see quarantine; configure protection components. These can be selected individually. You can password protect the entire program, so that only authorised users have access to the functionality. It is also possible to hide the System Tray icon, thus leaving the product invisible.
When we connected a flash drive containing malware samples to our test PC, and opened the drive in Windows Explorer, G Data immediately detected and quarantined the malicious files. A pop-up alert (screenshot below) was shown, which persisted until manually closed. No user action was required or possible.


About the product
K7 Cloud Endpoint Security provides endpoint protection software for Windows clients and servers. This is managed from a cloud-based console. The product is designed for enterprises of all sizes. We feel it is particularly suitable for smaller businesses and less-experienced administrators.
Advantages
• Suitable for micro-businesses upwards
• Easy-to-navigate console
• Help page shown at first logon provides a guide to the console
• Easy-to-use application control feature
• Granular control of functionality shown in endpoint protection client
Management console
When you log on for the first time, a help page is displayed, with concise explanations of the features and how to use them. All the console’s functionality can be accessed from a single menu strip at the top of the window.
Dashboard page
After login, the console opens on the Dashboard page, which shows an overview of the system status. There are various detail panels, showing detected threats, blocked websites, violations of hardware policy, vulnerabilities detected, device security status, numbers of devices running specific Windows versions, and a timeline of threats discovered. There is a link from the Device Security Status panel to the Protected Devices page, so you can get more details just by clicking on it.
Groups page
The Groups page of the console lists device groups you have created. There are links to the policy applied to each group, and a list of tasks (such as scans and updates) that you can apply to all group members.
Devices page

The Devices page\All Devices tab, shown in the screenshot above, lists individual computers on the network. The links in the Actions column let you view a computer’s details, uninstall Endpoint Security, or change its group. Other tabs of the Devices page sort computers into the categories Protected, Unprotected and At Risk. This lets you see at a glance which devices need your attention
Application control page

From the Application Control page, you can regulate which applications are allowed to run or access the LAN/Internet. This can be done very simply by selecting an application from the list, and clicking Block from Running, Block Internet Access or Block Network Access in the drop-down list. You can add an application not already on the list using its MD5 hash value. We note that a file’s MD5 hash could potentially be spoofed, and suggest that SHA256 would be more secure.
Policies page

The Policies page lets you control settings for the endpoint software. These are conveniently ordered into groups such as Antivirus, Behaviour Protection, Firewall, Web Filtering and Device Control. The Antivirus configuration tab is shown above.
Actions page
Under Actions you can create tasks to run on individual computers or groups. Available tasks include a variety of scans and a client update.
Settings page
The Settings page lets you download installation packages for the endpoint protection software, and configure email notifications.
Reports page
Reports page provides a very simple means of running reports on items such as detected threats, and vulnerabilities, websites blocked, and scan results.
Windows Endpoint Protection Client
Deployment
On the Settings page you can download an installation package (full or light) in .exe format. You can specify the group that the computer should be added to. The installer file can be run manually, via a systems management product, or using an AD script. You can also email it to users directly from the download page. The setup wizard is very quick and easy, so even non-expert users would have no difficulty with it. Users with Windows Administrator Accounts can be prevented from uninstalling the software, by ensuring the Uninstall Endpoint Security setting in the applicable policy is disabled.
Functionality check
The user interface on protected endpoints consists of a System Tray icon and a program window. Users can see the protection status, run updates, and run quick, full, custom and rootkit scans. They can also scan a file, folder or drive using Windows Explorer’s right-click menu. By changing policy, you can give users full control of the program, or lock it down completely.
When we connected a flash drive containing malware samples to our test PC, and opened the drive in Windows Explorer, K7 immediately detected and quarantined the malicious files. A pop-up alert was shown, which closed after a few seconds. No user action was required or possible. You can disable alerts by policy if you wish.
Note
While testing K7 Endpoint Security, we found a serious security issue with it, which also applied to its consumer product. We immediately reported this to K7, who have now fixed the problem in all its products. We recommend users of K7 to ensure that their products are up to date.

About the product
Kaspersky Endpoint Security for Business (KESB) Select is a tier of Kaspersky’s Endpoint Security for Business product line. It is aimed at medium-sized businesses and larger enterprises. The product provides endpoint protection software for Windows and macOS workstations, plus Windows servers. The product is managed by a server-based console. Administrators can choose between a modern web-based interface and a legacy MMC-based GUI. We have looked at the web-based console (shown in the screenshot above) in this review.
Advantages
• Choice of web-based or MMC console
• Straightforward console installation with quick-start guide
• Deployment wizard for simplified client installation
• Web console pages can be customised
• Granular role-based control permissions for console administrators
Server installation
Installing the management console is a straightforward process for an experienced administrator. A preinstalled SQL database is required, which could be the free Microsoft SQL Server Express. You can use Windows credentials to log in to the console if you want. When you first run the web-based console, an optional brief tutorial is shown. This highlights the most important functions, and provides a brief description of each. Next, the Quick Start Wizard takes you through initial configuration. This includes defining the type of computers to be protected (server/workstation) and operating systems. It also allows you to set up notifications.
Management console
The console functions are arranged in a single menu column on the left-hand side. The main menu items are Monitoring & Reporting, Devices, Users & Roles, Operations, and Discovery & Deployment. Each of these items expands to show sub-pages.
Monitoring and Reporting section
The Dashboard page (shown above) provides a graphical overview of key information. This includes protection status, new devices, plus details of threats and infected devices. The page is customisable, and you can add/remove various panels (Web Widgets) as you please.
The Reports page lets you run a wide variety of reports, on topics such as protection status, deployment, updates and threats. These can be easily accessed from a preconfigured list.
Under Event Selections, you can run reports on categories like user requests, critical events, functional failures and warnings.
On the Notifications page, there is a list of recent alerts. You can filter these by topic, such as deployment, devices or protection.
Devices section
The Policies and Profiles page lets you create and apply new configuration policies. On the Tasks page you can carry out everyday maintenance and backup tasks, such as updates.

The Managed Devices page, shown above, lists managed computers, along with the status of major components. You can filter the list using criteria such as status, real-time protection or last connection time. The list is customisable, and so you can add additional criteria like operating system or network details. By selecting individual devices, you can run tasks on them. These include installation, deinstallation, or changing group membership.
You can click on an individual computer’s name to see its details page. Here you can see various details of the device, shown in different tabs. These include operating system, network information, protection status, installed Kaspersky applications, active policies, plus running protection components and tasks. On the Events page, you can see detailed information on malware detection and remediation. The screenshot below illustrates three separate stages of one malware, namely detection, backup copy being made, and deletion:

The Device Selections page lets you find devices in pre-configured groups. Examples include Databases are outdated and Devices with Critical Status.
Users & Roles section
Under Users, you can see a list of predefined console users, along with Windows local and domain accounts for the Windows computers on the network. On the Roles page, users can be assigned one of 16 different management roles for the console, allowing very granular access.
Discovery & Deployment section
This includes various features for discovering unmanaged devices on the network, and deploying software to them. Discovery lets you look for devices on the network by e.g. IP address ranges or workgroup/domain membership. Unassigned Devices shows computers that have been found on the network but are as yet unmanaged.
Operations section
Amongst other things, the Operations tab contains Licensing and Repositories. The latter includes the quarantine functions, and details of the hardware on managed devices. Under Patch Management\Software Vulnerabilities you can see missing Windows Updates (amongst other things):

Windows Endpoint Protection Client
Deployment
Before deploying Kaspersky Endpoint Security to clients, you may need to adjust Windows Firewall settings on both server and clients to enable communication between them. When the console is first used, a deployment wizard runs, allowing you to push the endpoint software to clients over the network. This can be (re)run later from Discover & Deployment\Deployment & Assignment\Quick Start Wizard. It is a very neat and simple process. The endpoint protection software could also be deployed using a systems management product or Active Directory. Alternatively, you can create a standalone, single-file installation package from Discovery & Deployment\Deployment & Assignment\Installation Packages. This will be automatically placed in a shared folder on the server. You can also email an installation link to users directly from the same page of the console. The setup wizard has some options, but a default installation would be simple enough for non-technical users. You can prevent users with Windows User Accounts from uninstalling the software using the Password protection setting in the applicable policy.
Functionality check
The Windows desktop protection application consists of a System Tray icon and program window. Users can run manual scans of both local and remote drives, folders or files by means of Windows Explorer’ right-click menu. They can also check files for reputation in the Kaspersky Security Network, again using the Explorer context menu. You can hide the interface completely using the applicable policy, if you so choose.
When we connected a flash drive containing malware samples to our test PC, and opened the drive in Windows Explorer, Kaspersky immediately detected and quarantined the malicious files. No alert was shown. However, you can enable alerts by means of policy if you want.

About the product
Microsoft Endpoint Manager allows administrators to centrally manage and monitor features and settings on all types of devices. In this report, we have only covered the management-console functions relating to endpoint security for Microsoft Defender Antivirus, Microsoft’s own antivirus program, which is built into the Windows 10 operating system.
Microsoft Endpoint Manager is available to customers of Microsoft’s cloud services for business; licensing varies based on the type of subscription. It can be used to administer a wide range of Microsoft functionality and services including Microsoft Intune, Configuration Manager, Endpoint Analytics, endpoint security, tenant-attach, co-management, and Windows Autopilot.
Advantages
• Controls all Windows security settings
• Console is customisable
• Exceptionally simple client deployment
• Suitable for businesses of all sizes using Microsoft cloud services for business
• Granular control of security options
Management console
Endpoint Security | Overview page
This is shown in the screenshot above. It is the main dashboard for the endpoint security features of the platform. Here you can see an overview of the individual protection components that can be configured. Examples are Antivirus, Disk Encryption, and Firewall. You can also view Security Baselines. These are policies with recommended settings for all security-related features in Windows. As well as Microsoft Defender Antivirus, the baselines also cover Microsoft browsers, Windows Firewall, BitLocker, SmartScreen, Wi-Fi settings, Remote Desktop and Windows Hello for Business, amongst other things.
Endpoint Security | Antivirus page

The Summary tab provides an overview of the security status of your network, by showing the number of unhealthy endpoints, i.e. devices with some kind of security-related problem.
Below this, under AV policies, you can create and edit your own antivirus policies. AV Configuration policies let you define settings for malware protection features. These are divided into categories: Cloud Protection, Microsoft Defender Antivirus Exclusions, Real-Time Protection, Remediation, Scan, Updates and User Experience.
Configuration options for each category are neatly laid out in a list, with each item having its own drop-down menu for its settings. A little information button next to each item displays a succinct explanation of the component and its settings. Examples of options found in the Real-Time Protection section are Enable on-access protection, Turn on behaviour monitoring, Turn on network protection, and Scan scripts that are used in Microsoft browsers.
The User Experience category has just one setting: Allow user access to Microsoft Defender app. Deselecting this hides the Microsoft Defender Antivirus (Windows Security) interface and suppresses malware alerts on client devices. However, a much more granular approach is also possible. Security Experience policies allow you to hide specific interface areas of the Windows Security app, such as Firewall and Network Protection or App & Browser Control.
The Windows 10 unhealthy endpoints tab of the Endpoint Security\Antivirus page displays a report of devices that require attention. Details include the status of malware protection, real-time protection, and network protection. As with other pages, you can modify the layout using the column picker to modify fields, change to a grid view for better searching, sort by any column, and export the list of records to a .csv file to save locally.
On the Windows 10 detected malware tab you can see devices and users with active malware. This view includes details such as malware state, active malware, category and severity. You can take remote actions here including restart, quick scan, full scan, or update signatures, to help resolve the problem.
Devices | All devices page

Here you can see a complete list of the devices on your network. Default columns show device name, ownership, platform, operating system version and date/time of last contact. You can customise the page by removing columns you don’t need and adding other ones. Possibilities include device state, enrolment date, security patch level, manufacturer, model, serial number and Wi-Fi MAC address. The Filter button at the top of the page lets you filter the list using various criteria. Examples are ownership, compliance and OS. Bulk Device Actions lets you carry out tasks, such as rename, restart or delete, on the selected devices. Clicking on an individual device opens the Device details page, shown below.
Device details page

Here you can see the status of recent tasks, along with device-specific information such as manufacturer, model, serial number and primary user. The menu bar along the top of the page provides a number of management options. You can you run updates and quick or full scans, and lock or restart the device. It’s also possible to wipe or delete the device, or give it a Fresh Start. The latter is the equivalent of the Reset this PC function found in the settings of Windows 10. It essentially resets the software to factory settings, with options to keep or delete user data.
Windows Endpoint Protection Client
Deployment
This is extremely simple, as Microsoft Defender Antivirus is already integrated into the Windows 10 operating system. For a domain-joined machine, connecting a client device to Microsoft Endpoint Manager is as simple as signing in with an appropriate business account in the Accounts\Access work or school section of Windows Settings. Users that don’t have a domain, or who purchase a machine that is not yet configured on a domain, users can manually add their work account under Windows 10 device | Accounts | Add Work or school Account. When they log in with that work or school account, the security or device settings configured in Microsoft Endpoint Manager will automatically be applied.
Functionality check
The Windows Security app on the client PC allows access to the Microsoft Defender Antivirus functionality. By default, users can see security status and detection logs, and run scans. There is choice of Quick, Full, Custom and Offline Scans. Users can also start a scan on a drive, folder or file using Windows Explorer’s right-click menu. If you prefer, you can hide the Windows Defender interface by policy. In this case, no interface or alerts will be shown on the client PC (the administrator will still see the alerts in the console).
When we connected a flash drive containing malware samples to our test PC, and opened the drive in Windows Explorer, Microsoft Defender immediately detected and quarantined the malicious files. A pop-up alert was shown, which closed after a few seconds. No user action was required or possible. However, clicking on the alert opened the Microsoft Defender window with further information about the threat. This is also displayed in Microsoft Endpoint Manager.

About the product
Panda Endpoint Protection Plus on Aether provides endpoint protection software for Windows and macOS workstations, plus Windows servers. This is managed using a cloud-based console. The product can manage networks with tens of thousands of devices. We feel it would also be suitable for smaller businesses with tens of seats.
Advantages
• Easy-to-navigate console
• Clickable access gives easy access to details pages
• Network discovery process ensures all devices are protected
• Detailed information for individual devices
• Customisable menu panel
Management console
Status tab
A status overview is provided on the Status tab/<em<Security page (screenshot above), which opens by default. There are pie and bar charts for the items shown, which include Protection Status, Offline Computers, Outdated Protection, and Programs Allowed by the Administrator. You can click through for more detailed information. For example, clicking on the main Protection Status graphic takes you to the Computers page. The console’s detection log/quarantine function is accessed by clicking on Threats detected by the antivirus. Here you can see affected computers and their IP addresses and groups, threat type and path, action taken (e.g. blocked/quarantined/deleted), and date and time.
The Status tab includes a left-hand menu column, from which you can open additional status pages.
Web access and spam shows categories of website, such webmail, games and business, which users have accessed. Licenses is self-explanatory. A section called My Lists provides simple but useful overviews of different aspects of the network. There are links for Hardware and Software of managed computers, plus Unprotected Workstations and Unprotected Servers. Scheduled reports lets you customise details to be sent out and when to send them.
The My Lists section is customisable, and a number of other categories can be added. These include Computers with protection issues, Unprotected endpoints, Intrusion attempts blocked, and Threats detected by the antivirus. These all help you to see quickly if there are any security issues that need to be addressed. The envelope icon in the top right-hand corner of the page lets you email scheduled alerts relating to the currently viewed list.
Computers tab
The Computers tab, shown below, lists computers on the network. You can filter by various criteria, including OS, hardware and installed software. You can also display computers by management group. This page shows all the protected computers and mobile devices. It is very clearly laid out, and shows essential information. A Windows-like folder tree on the left lets you filter devices by OS, device type, or hardware/software criteria.

From the computers page, you can also create and manage computer groups, which can be synchronised with Active Directory. We would say that this functionality is not very easy to find, as we had to explore the interface for a while before locating it.
Clicking on the name of a computer opens the details page for that device, shown below. Here you can find network and domain information, OS details, Panda agent and endpoint client versions, and more. The status of individual protection components is also shown. The Hardware tab provides details of the CPU, RAM, system disk and BIOS, along with their usage statistics. Clicking on Software allows you to see information on installed programs, while Settings shows the policy and network configurations. A menu bar at the top of the page lets you move or delete the device, run one-off or scheduled scans, reinstall software, and reboot the computer

Settings tab
On the Users page, you can create console users and assign them full control or read-only access. The Settings/Security page lets you define separate security policies for computers and Android mobile devices. Under My Alerts you can set up email notifications for various items. These include malware and phishing detections, unlicensed/unmanaged/unprotected computers, and installation errors. The Network settings page lets you manage Panda proxy and cache servers, both of which provide updates to other computers on the LAN. The former is for use in isolated LANs, and the latter for e.g. branch offices with low-bandwidth Internet connections. In the Proxy section, you will also find Enable real-time communication. This allows for almost instantaneous communications between clients and management console. The description in the console notes that it can generate high volumes of network traffic.
Tasks tab
The Tasks tab can be used to set up scheduled scans.
Settings menu
The settings menu is accessed from the cogwheel icon in the top right-hand corner of the console. It includes help and support links, licence and product information, and also lets you change the console language in real time.
Windows Endpoint Protection Client
Deployment
Deployment options can be found by clicking Add Computers on the Computers page. You can create an installer in .msi format, which can be preconfigured. You can specify a Panda or Active Directory computer group, and select settings. The installer can then be downloaded or sent to users by email directly from the console. Manual installation is extremely quick and simple, and would pose no problems for non-expert users. You can password-protect the software, meaning that even users with Windows Administrator Accounts cannot uninstall it.
You could also deploy the software via a systems management product, or Active Directory script. The Discovery and Remote Installation option additionally allows you to install the software using remote push. The discovery process locates all the computers on the network, so you can be sure that none have been left unprotected.
Functionality check
The user interface on protected endpoints consists of a System Tray icon and a program window. Users can see the protection status and detection logs, run updates, and run quick, full and custom scans. They can also scan a file, folder or drive using Windows Explorer’s right-click menu. If you prefer, you can hide the user interface completely in the policy settings. Alerts will still be shown, however.

When we connected a flash drive containing malware samples to our test PC, and opened the drive in Windows Explorer, Panda did not initially take any action. However, as soon as we tried to copy the malicious files to the Windows Desktop, they were detected and deleted. A pop-up alert was shown, which closed after a few seconds. No user action was required or possible.

About the product
Sophos Intercept X Advanced provides endpoint protection software for Windows and macOS workstations, plus Windows servers. This is managed using a cloud-based console. As well as malware protection, the product includes investigative functions for analysing and remediating attacks. It can cope with networks that have hundreds of thousands of seats. We feel it would also be suitable for smaller businesses with tens of seats.
Advantages
• Investigative functions
• Modern, easy-to-navigate console design
• Comprehensive search feature
• Detailed alert information
• Early-access program lets you try out new features in advance
Management console
The console is navigated using a single menu column on the left-hand side. Some of the items, such as Threat Analysis Center and Endpoint Protection open in a sort of sub-console with their own menu panel. The console layout and graphic design remain the same, and you can easily get back to the main console by clicking Back to Overview at the top of the applicable menu column. Some pages, such as People, can be accessed from either the main or the sub-console. The UI language can be changed in real time from the user menu in the top right-hand corner. The same menu also lets you join Sophos’ early-access program, so you can try upcoming features before general release.
Dashboard page
The Sophos Central Dashboard (shown in the screenshot above) is the default landing page when you log on to the console. It shows an overview of threats and device/user status, with colour-coded graphics to make things stand out. You can see the number of total alerts, and this is also broken down into high, medium and low-level alerts. The most recent individual alerts are listed, and threat name and path, plus device and user, are shown. The Dashboard panels are linked to details pages, so clicking on the High Alerts panel displays a list of these on the Alerts page. The Global Security News panel at the bottom is linked to Sophos’ Naked Security blog, and shows security-related news items.
Alerts page

The Alerts page shows you numbers of threat detections, both as a total and by severity category. You can sort by Description, Count and Actions. Clicking on an entry opens up a details panel, with additional information and links to take action. Possible actions (depending on context) include Mark As Resolved, Clean Up PUA, and Authorize PUA.
Logs and Reports page
This shows a wide variety of default reports that can be run. A notable item here is Policy Violators. This shows those users who have tried to access blocked websites most often.
Threat Analysis Center section
This is a sub-console, with the pages Dashboard, Threat Cases, Live Discover, Threat Searches and Threat Indicators. The Dashboard provides a summary of content from the other pages.
The Live Discover page lets you run queries on selected devices. In the Device Selector panel, you can choose from Available devices or Selected devices. With the latter, various different filtering categories are provided, so you can refine your device list precisely. These are online status, name, type (server/workstation), OS, last user, group, IP address, and health status. The Query panel (screenshot below) provides a number of pre-built queries for you, or lets you create your own.

Threat Searches enables you to look for file names, file hashes, IP addresses, domains and command-prompt commands that may have been used in attacks. The feature is intended to find applications and network destinations with bad reputations, and malicious use of administrative tools.
Endpoint Protection section
The Endpoint Protection sub-console has menu entries for Dashboard, Logs & Reports, People, Computers, Policies, Settings, and Protect Devices. The Dashboard page is similar in design to that of its counterpart in the main console. It shows many of the same panels, including Most recent threat cases, Devices and users: summary, Web control and Global Security News.
The People page lets you manage users and groups. These include Windows device users (which are added automatically) and also console users. In the details page for each user, you can see devices that the user has signed into, and run scans and updates on these.
On the Policies page, you can edit the configuration to be applied to endpoints. There are separate policies for Threat Protection, Peripheral Control, Application Control, Data Loss Prevention, Web Control, Update Management and Windows Firewall. You can apply policies to computers, users, or groups of either.
The Settings page lets you configure options to be applied to the whole network. Examples include AD Sync, Role Management (standard and custom permissions for console users), Tamper Protection, Admin Isolated Devices, Live Response (remote management feature) and Data Loss Prevention Rules. You can download installers for the endpoint protection client from the Protect Devices page.
Under Computers (screenshot below), you can see a list of your devices with name, IP address, OS version, installed Sophos products, last user, and date/time of last use. Mousing over the little button to the right of the IPv4 address will display IPv6 addresses. Clicking Manage Endpoint Software shows you which computers are eligible for which Sophos software, and which of these actually have it installed. You can remove devices from the console with the Delete button.

Windows Endpoint Protection Client
Deployment
You can download installer files in .exe format from the Protect Devices page. These can be run manually, via a systems management product, or using an AD script. You can also email an installer to users directly from the download page. The setup wizard is very quick and easy, so even non-expert users would have no difficulty with it. You can prevent users with Windows Administrator Accounts from uninstalling the software or changing settings, using the Enable Tamper Protection setting under Global Settings.
Functionality check
The user interface on protected endpoints consists of a System Tray icon and a program window. Users can see the protection status and detection logs, and run default scans. They can also scan a file, folder or drive using Windows Explorer’s right-click menu.
When we connected a flash drive containing malware samples to our test PC, and opened the drive in Windows Explorer, Sophos immediately detected and quarantined the malicious files. A pop-up alert was shown, which closed after a few seconds. No user action was required or possible. You can disable detection alerts via policy if you want.

About the product
SparkCognition DeepArmor provides endpoint protection software for Windows and macOS workstations, plus Windows servers. This is managed from either a cloud-based or premises-based console. As well as malware protection, the product includes investigative functions for analysing and remediating attacks, and can scale to manage networks with tens of thousands of endpoints.
Advantages
• Easy-to-use investigative features
• Interactive, clickable charts
• Easily navigated console
• Alert details can be easily browsed
• VirusTotal integration
Management console
The console is navigated from a single menu panel on the left-hand side. The main entries are Dashboard, Alerts, Devices, Administration, Deployment and Subscription.
Dashboard\Alerts page
This is the page you will see when you first log in to the console (shown in the screenshot above). It provides a graphical summary of recent threats. These are displayed as several different panels, illustrated with coloured bar and doughnut charts. They show additional details when you mouse over them. The bar charts are clickable, so you if you click on the Threats Prevented column for a particular day in Activity Timeline, you will be taken to a page listing the threats blocked that day. You can see Activity Timeline (past 7 days), Most Active Devices (devices with most threats), Alert Priority, Threat Category (e.g. Trojan, Ransomware) and Threat File Type (e.g. .exe). The page is completed by a strip of clickable buttons along the top, showing licences used, total alerts, and total threats.
Dashboard\Devices page
Here you can get an overview of the status of your devices, also illustrated with dynamic coloured charts. You can see numbers of Active, Inactive and Recycled devices, devices by platform (OS), at-risk devices, and devices by endpoint protection agent version.
Alerts page
The Alerts page shows important notifications, along with details. These include Alert Priority, Alert Type (e.g. Threat Prevented, New Device Registered), Device Name | Group Name, Username, plus date and time. Clicking on an entry slides out a details panel on the right-hand side. This is shown below (content rearranged to fit on page). The up/down arrows in the details panel let you browse to the next or previous alert details pane with a single click.

For a malware detection, information provided in the details pane includes the file name, detection mechanism, SHA1 hash, threat category (e.g. Trojan), “confidence score” (probability that the file is malicious), and action taken. You can restore any erroneously quarantined files by clicking Restore. The button to the left of Copy (file hash line) lets you see the file’s analysis page on VirusTotal.
If you click on View Alert Details, a complete page opens, with more details and options:

Here you can see the applications that were running at the time of the alert, plus the status of the network connection and DeepArmor console connection. The Behavioural Analysis button runs the suspected malware in a sandbox and investigates its actions. You can download the file to the local PC to analyse it yourself, or take action. The Take Action button provides the options Remote Remediate, Remote Restore, External Remediate, and Remote Activity.
Devices page

On the Devices page, you can see individual computers on your network. You can display these as tiles, as shown above, or as a simple list. For each device, you can see the OS type, current user, number of alerts, and connection status. By selecting a device or devices, you can run scans, change group membership, or remove from the console. It is possible to filter the devices displayed by using drop-down lists at the top of the page. You can filter by device group, device status, device risk, device platform or agent version.
Administration menu
This includes the pages Users, Security Policies, Device Groups, Global Lists, Audit Logs and Reporting. Users lets you add, edit and remove console administrators, who can be assigned varying levels of access (Admin, Manager or Auditor). Under Security Policies you can assign preconfigured settings to device groups. There are 4 default policies: Detection Only; Detection and Protection; Essential Protection; Maximum Protection. For each policy, there are separate settings for detection and protection. Thus, you could have e.g. a high level of protection, but a low level of detection, keeping systems safe without numerous alerts. For each category there are the standard levels Disabled, Cautious, Moderate and Aggressive. Each policy also has a detailed configuration section, where you can set items like real-time file monitoring, application control and USB control.
You can manage the groups to which policies are applied from the Device Groups page. You can create whitelists of files and certificates, and file blacklists, under Global Lists. A list of admin logins and logouts can be found under Audit Logs. The Reporting page lets you create reports for specific groups or all devices. You can choose the time period covered by the report, and who will receive it.
Deployment page
Here you can find installers for Window, macOS, and various different Linux distributions.
Subscription page
This shows you the total number of device licences available and used, and the validity period.
Windows Endpoint Protection Client
Deployment
Installer files in .exe and .msi format can be downloaded from the Deployment page of the console. You have to specify a group to add the device to when downloading. The installer file can be run manually, via a systems management product, or using an AD script. You can also email users with installation links so that they can install the endpoint agent themselves. The setup wizard is very quick and easy, so even non-expert users would have no difficulty with it. You can prevent users with Windows Administrator Accounts from uninstalling the software, using the Agent Administrator Password setting in the applicable policy. For manual installations, you have to copy a web-service URL and registration key from the console, to prevent unauthorised use. Once the endpoint agent has been installed and the GUI is opened, a brief introductory wizard optionally explains the key points of the program window.
Functionality check
The user interface on protected endpoints consists of a System Tray icon and a program window. Users can see the protection status and detection logs, and run updates. No other functionality is provided. You can hide the interface completely via policy if you so choose.
When we connected a flash drive containing malware samples to our test PC, and opened the drive in Windows Explorer, DeepArmor did not initially take any action. However, when we tried to copy the malicious files to the Windows Desktop, they were detected and quarantined. A pop-up alert was shown, which closed after a few seconds. No user action was required or possible. Alerts can be deactivated in the policy if you prefer.

About the product
VIPRE Endpoint Security provides endpoint protection software for Windows and macOS workstations, plus Windows servers. This is managed using a cloud-based console. The product can manage networks with thousands of devices. We feel it would also be very suitable for very small businesses with just a few seats.
Advantages
• Well-suited to micro-businesses and upwards
• Minimal technical knowledge required
• Console is very easily navigated from a single menu panel
• Very clickable, interconnected interface
• Timeline feature provides detailed threat-history information
Management console
Dashboard page
This is what you will see when you first log in to the console (screenshot above). It provides an overview of the current security status, using various different panels. It is designed to be very clickable. For example, if you click on the number of Outdated Definitions, you will be taken to a page that shows you the specific devices in question. The main Threat Trend panel displays a graph of threats encountered over the past week. This can be shown as either total detections (including multiple occurrences of any individual threat), or unique threats. Separate panels illustrate the top ten detections by threat and by device, respectively.
Other Dashboard panels are: Quarantine Status, Devices Needing Attention, Detection Sources, Web/DNS Blocks, Severity Breakdown, Protection Summary, Agent Version Spread, Research (blog), and licensing information. Every item is clickable, and links to the respective details page.
Quarantine page
Here you can see a list of all threats that have been quarantined on any device. It displays the date and time of detection, threat name, platform, threat category, severity, source (detection module), and number of devices affected. The list can be filtered by severity, malware category, or source. Clicking on the threat name opens the details page for that threat, where you can delete or restore the quarantined file.
Reports page
This shows tiles for a variety of different preconfigured reports: Threat Detection, Threat Summary, Device Registration, Scan, Web Activity Summary, and License Summary. Threat Summary uses a timeline, bar and pie charts to visualise threats found in the last week.
Devices page

The Devices page, shown above, lists network computers, and displays useful information. Items include status, policy, OS, and agent version. The information columns can be customised. You can add additional items such as the user, last scan, IP address or last update, as well as/instead of the standard ones. You can also filter the list of devices shown by platform, OS version, status, policy, type (workstation/laptop/server), or endpoint agent version number. Alternatively, a search box lets you find devices by name. This makes it easy to find specific devices or device categories.
Having found the computers you were looking for, you can then carry out tasks on them from the Actions menu. Available actions are: Assign Windows Policy, Full Scan, Quick Scan, Update Definitions, Schedule Agent Update, Reboot Devices, Stop Agent, Uninstall Agent, and Delete Device. Uninstall Agent removes the endpoint software, but keeps associated data. This might be useful if you want to reinstall or change the agent version. Delete Device removes associated data and deactivates the licence.
Each individual device has its own details page, with various different tabs. These are: Summary (status etc.); Scans (what was scanned, what was found, what was done); Quarantine; Threats (source, severity, and action taken); Web Activity (pages visited by user); Timeline (scans and detections).
The Timeline feature is shown below. It lists important system events such as scans, blocked web pages and malware detections in chronological order. There is an information panel for each one.

Clicking on the name of a threat opens up the respective Threat Information page, shown below. This displays incidences of the threat in the last week, the protection component involved, action taken, and the devices affected by the threat.

Policies page
Here you can configure the protection settings for your devices. There are separate pages/policies for Windows and macOS devices, and separate default policies for Windows clients and Windows servers. For each policy you can configure: Agent (user interface and system integration); Scanning (what to scan, schedule, USB devices); Active Protection (sensitivity of real-time protection); Web/DNS Protection; Email Protection; Threat Handling, Firewall, IDS (Intrusion Detection System). On the Agent page is the option to remove any incompatible software, i.e. existing endpoint protection software from another vendor, when the agent is installed. A very wide range of different products and versions in included. This is listed, so you can see if a particular product/version can be removed automatically.
Exclusions page
Here you can configure scanning exclusions. These are linked to specific policies.
System page
On this page you can configure notifications, console users, system-wide settings, and the site name (sub-domain of “myvipre.com”). We note that VIPRE has a separate EU datacentre, to comply with EU data protection regulations.
Notifications lets you set up alerts for detected threats (amongst other things). You can specify the source (real-time protection, scan or email), and the minimum threat severity needed to trigger the notification. You then add email addresses to be notified, and you can even customise the format of the email subject. The resultant email will contain links going directly to the relevant pages of the management console.
Deploy Agents page
This page lets you manage, download and email installers for the endpoint protection agent. The console lets you decide whether to auto-update all clients with the latest build of the software, or try it out on specific devices first. You can create a custom installer linked to a specific policy if you want.
Profile page
Here you can enter the contact details of the current console user, and activate 2-factor authentication.
Windows Endpoint Protection Client
Deployment
Installer files in .msi format for Windows can be downloaded from the Deploy Agents page. The installer file can be run manually, via a systems management product, or using an AD script. Remote push installation is also possible, by installing a utility on a relay computer in the LAN. You can also email an installer to users directly from the Deploy Agents page. The setup wizard is very quick and easy, so even non-expert users would have no difficulty with it. You can prevent users with Windows Administrator Accounts from uninstalling the software, using the Enable Uninstall Protection setting in the applicable policy. You will be able to see in the console who has installed the software on a particular device.
Functionality check
The user interface on protected endpoints consists of a System Tray icon and a program window. Users can see the protection status and detection logs, run updates, and run quick, full and custom scans. They can also scan a file, folder or drive using Windows Explorer’s right-click menu. By changing the policy, you could hide the user interface completely, or give specified users more control, such as managing scan schedules or quarantine.
When we connected a flash drive containing malware samples to our test PC, and opened the drive in Windows Explorer, VIPRE immediately detected and quarantined the malicious files. A pop-up alert was shown, which persisted until manually closed. No user action was required or possible. However, clicking Show Details opened a window with further information about the threat. You can disable detection alerts via policy if you want.

About the product
Carbon Black Cloud provides endpoint protection software for Windows and macOS workstations, plus Windows servers. As the name implies, this is managed from a cloud-based console. As well as malware protection, the product includes investigative functions for analysing and remediating attacks. The product can manage networks with hundreds of thousands of devices. We feel it would also be suitable for smaller businesses with tens of seats.
Advantages
• Attack investigation features
• Remote-remediation feature
• Integration with VMware vSphere
• Simple, uncluttered user interface
• Console pages can be customised to your requirements
Management console
All the main functionality of the console is found in a single menu column on the left-hand side of the page. This makes it very easy to navigate.
Dashboard page
The Dashboard page shows you an overview of threat-related items, displayed in panels. These are Attacks stopped, Potentially Suspicious Activity, Attack Stages, Attacks by Vector, Top Alerted Devices, Top Alerted Applications and Threat Reports. There is also an Endpoint Health panel, which lets you see if you need to take action on any devices. The Getting Started panel shows links for common tasks, such as adding console administrators. You can customise the dashboard by moving panels around and removing any you don’t need.
Alerts page

The Alerts page shows you a list of threats encountered on all devices, in chronological order. You can filter the list using a wide variety of criteria, using the menu panel on the left-hand side of the page. You can filter by device, process, file reputation, sensor action and more. The main panel shows the date and time of the alert, reason (e.g. malware detection), severity, plus device and user. Buttons on the right-hand end of each entry let you open the respective Alert Triage or Investigate pages, or take action. Available actions include dismissing the alert, deleting or whitelisting (Enable bypass) the file that caused the alert, or opening the applicable VirusTotal page for the file.
Alert Triage page
Here you can see the system processes that were involved in the encounter with the malware. This is to assist you in understanding the nature of the threat and how to deal with it.
Investigate page

On the Investigate page, you can see a chronological list of events for any individual device. You can filter the events by the country the device connected to, application involved, or malware alert. This allows you to monitor network connections and program executions, and build up a detailed picture of security-related events.
Enforce\Policies page
Here you can configure the settings to be applied to your devices. There are settings for malware detection, on-access detection, frequency of updates and the servers to use, scans, and the interface of the endpoint protection client. A single policy can be used for all platforms, i.e. Windows, macOS and Linux. The Windows, Apple and penguin symbols are used to show which platforms a configuration item can be applied to. Administrators can create policies to be applied to portable devices when they are outside the company LAN.
Enforce\Malware Removal page
Here you can see a list of quarantined malicious items, which you can e.g. investigate, search for in VirusTotal, delete, or whitelist. Malware can be deleted from a single device or multiple devices.
Enforce\Cloud Analysis page
This page shows you the results of analysis of suspicious files.
Endpoints page

The Endpoints page, shown above, provides an overview of devices on the network. A search box lets you search for a specific client in a larger network. For each device, details are kept to a very manageable level (status, user, details of the OS and sensor version, policies and last check-in time). However, you can easily get more information about an individual device just by clicking on the arrow symbol to the left of its name. This will show items such as the scan engine version, external IP address, and last active user. Clicking on a device’s name will open the Investigate page for that individual device. The Go Live button at the end of each device’s entry establishes a remote administration session with the device. You can customise the columns shown on the Endpoints page if you like, and use the filter drop-downs to narrow the search for specific devices. By selecting a device or devices, you can carry out actions, such as scans, updates, policy changes and sensor updates. You can also quarantine a device. This cuts all network connections to and from it, with the exception of those to and from the management console.
Settings menu
The Settings menu item lets you configure options for the console/system as a whole. Under Users you can manage console users. There are 5 levels of permissions that can be assigned to a user, from Level 1 Analyst up to System Admin. Related to this is the Roles page, where you can edit what each permission level can actually do. Under Notifications you can a threat severity at which an alert should be sent, and an email address to send it to. Audit Log records console-user logins and policy modifications/assignments.
Windows Endpoint Protection Client
Deployment
You can download installer files in .msi format from the Sensor Options menu on the Endpoints page. There is a choice of 32 and 64-bit packages. You need to enter an installation code, which can be found in the same menu. The installer file can be run manually, via a systems management product, or using an AD script. Using the Send installation request menu item, you can email users an installation link and code. The installation wizard is simple, and would present no problems even to non-technical users. You can prevent users with Windows Administrator Accounts from uninstalling the software, using the Require code to uninstall sensor setting in the applicable policy. Carbon Black Cloud integrates with VMware vSphere for deployment and upgrade purposes.
Functionality check
The user interface on protected endpoints consists of a System Tray icon and a small information window. Users can see product version information and a list of the most recent blocked threats. The latter includes the detection name and file path, along with date and time of detection. No other functionality is provided. The interface can be completely hidden by policy if you prefer. Integration with Windows Security Center can be enabled or disabled from the console.
When we connected a flash drive containing malware samples to our test PC, and opened the drive in Windows Explorer, Carbon Black immediately detected the malicious files and quarantined them in situ. A pop-up alert was shown, which closed after a few seconds. No user action was required or possible, though clicking on Details opened the program’s detection-list window.

Enhanced Real-World Test 2020 – Enterprise
Superna Eyeglass 2.5.7
Business Security Test August-September 2020 – Factsheet
Malware Protection Test Enterprise September 2020 – Testresult
Real-World Protection Test Enterprise August-September 2020 – Testresult
Real-World Protection Test Enterprise March-June 2020 – Testresult
Business Security Test 2020 (March – June)

Verdict
Acronis’ cloud-based management console stands out for its very clear and clean modern interface. All the management functionality is easily accessible via a single menu column on the left-hand side of the window. Individual pages have a simple, uncluttered view, which makes it easy to find the details. In many ways the console resembles a well-designed smartphone app, and would doubtless scale very well when used on the smaller screen of, say, a tablet. The product’s simplicity and clarity mean that it would be particularly well suited to smaller businesses and less-experienced administrators.
About the product
The Acronis Cyber Cloud platform provides a combined cybersecurity and data protection service. There is a variety of cloud-based services included, including backup, disaster recovery, and secure file-synchronisation, in addition to endpoint protection. This review considers only the malware protection features. There are clients for Windows and macOS workstations, Windows and Linux servers, plus Android and iOS mobile devices.
Getting up and running
Installing the client software is very simple. Just go to the Devices page and click the Add button, and select the appropriate installer from the list that then opens. This can be downloaded and run on the client device. You can also create .mst and .msi files for unattended installation. When the endpoint software has been installed, you have to assign a Protection Plan to the newly installed machine, in order to activate the antimalware service. We note that Windows Defender is not disabled by the setup wizard, so administrators may wish to do this manually or by policy.
Everyday management

The Devices page lists the devices on the network. Sub-pages allow you to filter the view, e.g. by managed and unmanaged machines. You can see device type and name, user account, and security status, amongst other things. The columns shown can be customised, so you can remove any you don’t need, and add e.g. IP address and operating system. Selecting a device or devices opens up a menu panel on the right, from which you can see the applied protection policy, apply patches, see machine details/logs/alerts, change group membership, or delete the device from the console.
Under Plans/Protection, you can see, create and edit the policies that control the anti-malware features of the platform. Again, an uncluttered menu pane slides out from the right with the appropriate details and controls. Amongst the functions that can be configured are real-time protection, network folder protection, action to be taken on malware discovery, ransomware, cryptomining process detection, scheduled scanning, exclusions, URL filtering, and how long to keep items in quarantine. You can configure vulnerability assessments and patch management, and there are even controls for scanning with Microsoft Windows Defender/Security Essentials too.
Under Anti-Malware Protection, the Quarantine page lists the names of malicious files that have been detected, along with the date quarantined and device name. You can add columns for the threat name and applicable protection plan from the page settings. A mini menu at the end of each entry lets you restore or delete the selected items. The Whitelist page displays any applications that have been found during backup scanning and categorised as safe. A backup scanning plan has to be created in order to enable automatic whitelist generation.
The Patches and Vulnerabilities pages under Software Management are populated if a vulnerability assessment has been created in a protection plan and run at least once.
The Reports page lists a number of topics for which reports can be generated, including Alerts, Detected threats, Discovered machines, Existing vulnerabilities and Patch management summary. Clicking on a report name opens up a details page for that item. The Alerts page, for example, contains panels showing 5 latest alerts, Active alerts summary, historical alerts summary, Active alerts details, and Alerts history. Coloured alert icons and doughnut charts serve to subtly highlight the most important items. As with other pages of the console, the columns in these panels can be customised.
Under Settings/Protection, you can set the schedule for protection definitions updates, and enable the remote connection function. The Agents page allows you to see the version of the endpoint agent installed on each client, and update this if necessary.
Windows endpoint protection software

The client software has a minimalist interface, which does not allow any users to interact with the malware protection service. The Stop all link in the screenshot above refers to the backup service – the protection service cannot be disabled here. If the user should inadvertently copy a malicious file to the system, Acronis will detect and quarantine it on access. Malware detections are silent, i.e. no alerts are shown. Exactly the same interface is used for client and server protection software.

Verdict
Avast Business Antivirus Pro Plus is a strong cloud-based product ideal for small to medium-sized businesses. The UI is intuitive and clean, and the defaults are sensible for the smaller organisation. A non-technical user should not have any problems deploying this and keeping track of events. However, it still has grouping and profile capabilities to protect the larger estates. We liked the straightforward nature of the platform.
About the product
Avast Business Antivirus Pro Plus uses a cloud-based console to deploy, manage, and monitor the endpoint protection software on all devices. The product protects Windows clients, Windows servers and macOS devices. Windows client features include anti-spam, data shredding, a VPN, and data & identity protection. Exchange and SharePoint security are provided for Windows Server. A patch management feature is included for all Windows computers. However, automatic installation of patches requires a separate licence for Avast Business Patch Management.
Getting up and running
There is no server component to install because it is run from a cloud-based console. You create the account, apply appropriate licensing, and then add devices. Deployment can be carried out via remote push, downloading an installer package, or by sending a download link via email. The installer is offered in two sizes, both being very simple to use. There is a Light version, around 6MB in size, which is just a downloader. The full version is around 300 MB and can be run offline. The former is ideal for smaller networks, the latter is better for larger deployments to minimise internet traffic. The wizard offers to remove existing competitive AV products.
Everyday management
On the server console, there is a clear set of main menus down the left-hand side. These are: Dashboard, Notifications, Devices, Tasks, Patches, Policies, Reports, and Subscriptions. Help & Support and General Settings are found at the bottom. The default Dashboard page gives an overview of the installation and how it is running. You can see alerts on your devices, OS distribution, threat detection statistics, and patch management summaries.
Notifications collates all the main event information into one place. Malware detection notifications link through to the Virus Chest (quarantine) on the affected computer. The Notifications Settings panel is comprehensive. It allows you to set up how notifications will be handled across a wide range of scenarios. We particularly liked the “if not read then send email notification” which can be set to “instantly”, “batched end of week” or “never” for each setting. This offers a lot of control of how you are notified when an event occurs. You can ensure that you are not swamped with information that is not immediately relevant.

The Devices tab (screenshot above) shows each device’s security status, group membership and policy, along with recent threats and other events. Helpful links are provided, for example Restart & scan for unresolved threats. You can group devices into groups, and apply settings and policy through that group.
Tasks is a powerful scheduler area. Here the administrator can create tasks to run particular events. For example, do a quick scan every day at 2pm. You can also use it to send a short message to your devices, to update the device and to shut it down too. It is a simple task management tool, but has useful capabilities for the small office and organisation.
The Patches page provides a very brief description of the feature, which is available to purchase as a separate component, along with a button marked Start Trial.
Policies allows you to create a settings template which is then applied to a group of devices. In here, you have access to all the control functionality for the device. So, you can determine that file scanning is on, the antispam service is running, the firewall must be applied, and so forth. From these templates, you can apply policies to devices. Separate policies can be configured for Windows workstations, Windows servers, and macOS devices.
At the time of writing (May 2020), Reports was marked as a “new” feature in the console menu column, though in fact it is an update of an existing feature. There are five different report categories: Executive Summary, Antivirus Threats Report, Patch Report, Device Report, and Tasks Report. You can click on any of these headings to see a graphical representation of recent activity. For example, Antivirus Threats Report shows a graph of malware items detected, quarantined, blocked, deleted or repaired over the last month. You can create reports on a weekly or monthly schedule, and view scheduled reports already created.
As you would expect, Subscriptions shows you the product licences you currently have, and how many of them you have used. There are also links that let you try or buy other versions of Avast Business Antivirus, and the Patch Management component.
Help & Support provides links to various support and documentation items, including a user guide for the console. This is clear, comprehensive and well indexed, though lacking in screenshots.
General Settings lets you change the system time zone, and enable Labs features. The latter is a preview of upcoming features that are “not entirely ready yet”. You can also create a local server for deployments and updates, and import the database of another Avast console.
Windows endpoint protection software
The Windows desktop protection software offers a wide range of capabilities, much like a normal end-user desktop solution. Users can run scans and updates. The central policies determine what they can change or adjust. By default, Windows Standard User Accounts can disable all protection features, and supress further warnings by clicking Ignore. This results in a misleading message, stating “You’re protected”, even though all protection components have been switched off. Protection will be automatically re-enabled when the computer is restarted. However, admins may want to prevent Standard Users from changing the settings, which can be done by enabling the password protection feature in the console.

If the user should inadvertently copy a malicious file to the system, Avast will detect and quarantine it on access. An example alert is shown below. The user can start a scan of the PC, and see details of the threat.

The GUI of the server protection software is identical to that of its desktop counterpart.

Verdict
There is much to like in Bitdefender GravityZone Elite Security. The design of the management console is very clear. Relevant tasks are grouped together, and the initial walkthrough wizard makes deployment easy. We particularly liked the Dashboard functionality. The Policies feature gives a clear understanding of the rules applied to endpoints. One minor suggestion for improvement would be to clarify the process for setting scan exclusions.
About the product
Bitdefender GravityZone Elite Security uses a cloud-based console to manage endpoint protection software. Desktops and servers running Windows, macOS and Linux are all supported.
Getting up and running
Getting the main cloud console up and running is very simple: create the cloud account, log in and you have a working environment.
The first thing you see on login is the Essential Steps wizard. This is a four-step process to guide you on getting up and running as quickly as possible. Each panel has copious explanations to help explain what that step is achieving.
Step 1 is Install Protection, which allows you to install directly onto the computer you are working on. You can also email an installation link to remote users. Alternatively, you can use the Remote Installation capability to remotely install the endpoint client on network computers. To enable this, you need to install a “relay” computer, to act as the bridgehead.
Step 2 is to create the Security Policies to be used in your organisation. This allows you to define a pre-cooked set of operational requirements onto each target device, or group of devices.
Step 3 is to create appropriate User Accounts. These are administrative accounts for the management of the platform. The roles here can be Partner, Company Administrator, Network Administrator, Reporter and Custom. A Reporter might be e.g. a help-desk role, and can see reports of activity without being able to change users or the company structure.
Step 4 is Reporting, where it shows you how to create appropriate reports of activity on your network.
Having gone through these steps, you should have a deployed and managed network.
Everyday management
The console is particularly clear and clean. This helps make the product suitable for a smaller companies with limited IT support, as well as larger organisations. The main console has a menu structure down the left-hand side. The items are Dashboard, Incidents, Network, Risk Management, Policies, Reports, Quarantine, Accounts, Sandbox Analyzer and Configuration.
Dashboard gives you an instant overview of the installation and the performance of the clients. Each panel here is called a “Portlet”, and can be clicked on to drill into more information. There are three pages of Portlets in total. We particularly liked the way that the Portlets can be rearranged, added to, and laid out to your preferences. The strong capabilities of Dashboard mean that you can quickly and easily find the information you need.
Incidents allows you to review and investigate threats detected on the network.

The main Network page shows you all the managed devices on your network, ordered into groups which you can create yourself (screenshot above). The Packages sub-page lets you configure deployment packages. On the Tasks sub-page you can create tasks such as scans and updates, which can be run once or multiple times on specified devices or groups.
The Risk Management page displays a breakdown of risks according to factors such as date, severity, and number of endpoints affected.
Policies is where you define the operational groups within your organisation, and then apply policies to them. There is a wealth of capability here. You can control the firewall functionality, application operation, and device access (e.g. blocking USB drives). You can set rules for Exchange Server too. We found that the process of setting scan exclusions here took a little getting used to. It would be helpful to separate the entry boxes for new exclusions from the table of existing exclusions, and to make clearer that the former are also drop-down lists.
Reports lets you build views of what is happening, by functional group or by task area.
Quarantine gives you an overview of all the malware that has been quarantined on the network, and the ability to choose what to do with those files.
Accounts lets you add and remove console users, and monitor the activities of the user accounts that have been set up.
Sandbox Analyzer provides a breakdown of unknown files that have been analysed by the sandbox feature, with a severity score from 0 (completely harmless) to 30 (clearly malicious).
The Configuration page lets you change settings for the console itself.
Clicking the bell icon in the top right-hand corner opens the Notifications panel. This displays a list of events such as logins and detections. Drilling into an item gives a clear description of what happened. We particularly liked the reporting of a malware outbreak. This informed us that “at least 28% from a total number of X endpoints were found infected with Y malware”. This makes it easy to separate out isolated incidents from a network-wide pandemic.
Windows endpoint protection software
The Windows desktop protection software is a simple application with a clean interface. It clearly shows what is going on, with details of updates carried out, modules enabled, and programs allowed through the firewall. The user interface allows the user to check for updates, and initiate quick, full or custom scans. Users can also view the program’s settings, but the default policy prevents any changes being made. You can easily change the user interface language from the System Tray menu.

If the user should inadvertently copy a malicious file to the system, Bitdefender will detect and quarantine it on access. An example alert is shown below. The user cannot take any action, and the alert closes after a few seconds.

The GUI of the server protection software is identical to that of its desktop counterpart.

Verdict
Getting started with Cisco Advanced Malware Protection for Endpoints (AMP) is very straightforward. The console requires no setup, and deploying the client software is quick and easy. Clear and colourful charts summarise the most important information. Regarding more advanced monitoring and management, there is a lot of functionality available here. The console’s design makes the different features easy to access. However, unlocking the product’s full potential may take some time, depending on various factors like size and complexity of your environment, use cases and so on. For organisations with appropriate IT staff resources, it provides a wealth of features for monitoring, investigating and blocking security threats.
About the product
Cisco AMP provides malware protection for Windows, macOS, Linux, Android and Apple iOS devices. These are all managed from a cloud-based console.
Getting up and running
As the console is cloud-based, no installation is necessary. You just browse to the URL and log in. Installers for desktop systems can be found by clicking Management\Download Connector. You need to select Protect from the Group menu. The setup process is very quick and simple, and only takes a couple of clicks. We note that Windows Defender is not disabled automatically on Windows desktop systems when the Cisco endpoint software is installed. Administrators might like to do this themselves, either manually or by policy.
Everyday management
The cloud console is navigated from a single menu bar at the top of the page. The Dashboard page has a number of sub-pages accessible from a row of tabs at the top. Analysis, Outbreak Control, Management and Accounts are drop-down menus. Each has about 10 individual items.
The Dashboard sub-page of the Dashboard is shown in the screenshot above. There are a number of panels with coloured bar charts. These show Compromises, Quarantined Detections, Vulnerabilities, Significant Compromise Artifacts, and Compromise Event Types. The Inbox sub-page shows a compact, summarised version of the same thing. The Overview sub-page provides the most graphical overview of the state of the network, with coloured bar and doughnut charts showing compromises, threats, vulnerabilities, computers, network threats and file analysis. These provide a very clear summary of the most important information, and we wonder whether this might not be made the default page of the console. The Events sub-page lists recent detections.

The Computers page, shown above, is accessed from the Management menu. It provides a row of statistics along the top, such as computers with faults or in need of updates. Below this is a list of individual devices, with a status summary for each one. You can mark a device for further attention by clicking its flag icon here. Clicking on the arrowhead icon for a device displays a detailed information panel. This shows information such as OS version, connector version, definitions version, internal and external IP addresses, and date and time last seen. The device list can be narrowed by OS type, using the tabs at the top. You can also filter the device list using various details. These include specific OS version, group, or definitions status, by clicking on Filters at the top.
The Management menu contains a number of other standard features. There are Groups, Policies, Exclusions, and deployment options. There is also a Quick Start guide, in the form of a video explaining the product’s features and usage. In the Analysis menu you can find features for investigating attacks. Events shows a list of threats encountered by protected devices. These include access to risky websites, malicious file downloads, and attempts to quarantine suspected malware. Clicking on an item displays more details, such as the IP address and port of the threat website, and the hash of the malicious file. If you right-click a file’s hash here, you can take action against the threat. Options include blacklisting the file, and Investigate in Cisco Threat Response. This opens a separate console, which provides additional analysis data. Cisco tell us that this includes information from third-party security services as well as their own.
You can drill down into a file’s details on the File Analysis page. This shows you the specific behavioural indicators for detecting a file as malicious. To see which legitimate programs have been involved in malware encounters, take a look at the Threat Root Cause page. A coloured pie chart shows you the distribution of malware encountered by specific applications, such as chrome.exe or explorer.exe. On the Prevalence page, the number of devices affected by a particular threat is shown. Under Vulnerable Software, programs with known vulnerabilities are listed. There is also CVE-ID and CVSS info to help identify and resolve the problem. Reports provides a very detailed weekly report. This covers numerous items such as threats, compromises and vulnerabilities. These are illustrated with coloured bar and doughnut charts. Finally, the Indicators page lets you search for Cloud IOCs. You can access the page from Analysis\Indicators on the main menu. Each indicator includes a brief description along with information about the tactics and techniques employed based on the Mitre ATT&CK knowledge base. Tactics represent the objective of an attack, such as executing malware or exfiltrating confidential information. Techniques are the methods attackers use to achieve the objectives or what they gain.
The Outbreak Control menu provides options for blocking or whitelisting specific applications and IP addresses. There are also custom detection options. These let you block the installation of any program you consider to be harmful or unwanted anywhere on the network. You can also run IOC (indicator of compromise) scans.
Windows endpoint protection software
The Windows desktop protection software has a very simple GUI, which allows users to run scans and view the logs. Both of these functions open in separate, larger windows. Users can also view settings, but by default these are locked down. Users have a choice of scans they can run. Options are Flash Scan (running processes), Custom Scan, Full Scan and Rootkit Scan.

If the user should inadvertently copy a malicious file to the system, Cisco will detect and quarantine it on access. By default, detection is silent, i.e. no alert is shown to the user. However, the endpoint software can be configured by policy to show notifications.
The GUI of the server protection software is identical to that of its desktop counterpart.

About the product
CrowdStrike Falcon Pro is a security package for business networks. Details of the management console described here are applicable to all supported operating systems (macOS, Windows and Linux). Falcon allows you to proactively look for malicious activities and adversaries (nation state, eCrime, or hacktivist actors). The cloud-based management console can be run from the cloud on any modern browser.
Verdict
CrowdStrike Falcon Pro is a very comprehensive platform. It provides not only AV services within an organisation, but also a comprehensive set of detection and analysis services. We note that CrowdStrike Falcon is available as a fully managed service for organisations that desire a more hands-off solution to endpoint protection. Otherwise, it is aimed at the larger organisation, and is not really a “fit and forget” product. Basic everyday monitoring and management tasks are simple enough, even with minimal understanding of its operations. However, the product’s capabilities are sufficiently deep that making some investment of time for learning is worthwhile to realize maximum value. CrowdStrike tell us that learning modules are available on-line or via external consultancy.
Getting up and running
The management infrastructure comes pre-packaged for you in a cloud console and requires no on-premises equipment – only a modern browser. Deployment of the client “sensor” (agent) is quite simple here. It relies on the download of the installation package appropriate to the target platform. On Windows, you can use an automatic sensor deployment like Windows System Center Configuration Manager. Once installed, the Falcon Sensor is almost invisible to the end user. Docker support allows the installation of the Falcon agent on hosts running Docker.
Deployment across an organisation will take planning and appropriate tools. This includes preparation for the appropriate layers of policy to be applied to users. Once this work has been done, deployment should be quite straightforward.
Everyday management
The management console is based in a web browser, as you would expect from a cloud-based solution. Two-factor authentication is required to log in, and support for single sign-on solutions is available. There is a menu of buttons down the left-hand side, and this menu can be expanded by clicking on the Falcon icon at the top left. The major items are Activity, Investigate, Hosts, Configuration, Dashboards, Discover, Intelligence, Users, and Support.
Activity is the first place to start work once the platform is up and running. There is a strong dashboard here, with the most important items brought into view. Good graphics show detections by scenario over the last 30 days, and you can click through here into the Detections submenu to view more detail. You get a strong reporting infrastructure, with a good choice of filter options presented front and centre here. You can also examine quarantined files and real-time response sessions here too.
The Investigate menu takes you into a comprehensive search facility. This covers hosts, hashes, users, IP addresses, domain and event searching. This is aimed at locating specific issues across the network estate in the recent history. The default is 24 hours, pre-set filters are provided up to 60 days, and customization options are available.

The Hosts/Host Management page, shown above, lists all the device installations, by version and platform. It provides immediate understanding of which devices are offline or disconnected. From here, you can go to the Sensor Download menu and download sensor installations for all the platforms.
The Configuration menu is the heart of the policy driven process within CrowdStrike Falcon. From here, you create policy definitions which cover all aspects of the AV and prevention processes of the platform. And then you apply that process to groups of installations. You can have different policies for Windows, Mac and Linux clients here too.
The Dashboards menu gives access to the executive summary view of the estate. There are detailed graphics for detections by scenario and severity, and identifications of the top 10 users, hosts and files with most detections. This is just the tip of a very deep iceberg, allowing for comprehensive analysis of what is happening. You can search by almost anything, and use this to discover what has happened on the network during an outbreak. This includes where something entered, how it attempted to execute, what processes it used, and how it was contained. Getting through this is not for the fainthearted, but it cannot be denied that you have very powerful set of audit and analysis tools here.
The Discover menu allows you to discover devices, users and applications on the network. You can search by application inventory, asset, MAC address, accounts and other app/process-based inventory. You can also review user account information including domain accounts, local accounts and their password reset status.
The Intelligence menu takes you into an overview of the current landscape threat as perceived by CrowdStrike. This can be categorised by different factors. Examples include geographical origin of threat, target industry, target country, and motivation (espionage/criminal/Hactivist and destruction). Each threat is detailed by these parameters. Clicking View Profile on the threat takes you to a comprehensive analysis and explanation of that specific threat. This is a comprehensive resource, which is unusual and most welcome.
The User menu allows you to create the usual user profiles for administrators and other activities within the platform. There are pre-built roles already created for Endpoint Manager, Event Viewer, Administrator, Analyst, Investigator, Real Time Responder, and others. You can map these roles onto existing internal working structures, or to custom-build new roles as required.
The CrowdStrike Store allows you to extend the capabilities of the Falcon platform with a host of ready-to-go partner apps and add-ons.
Endpoint protection software
On the end-user client, the default setting is to have the client completely invisible to the user. No alerts or user interface are shown. In our test, we found that malware copied to the test system was immediately detected and deleted on access.

Verdict
Cybereason’s management console is easily navigated from a single menu. We were impressed with the clear, well-illustrated way in which information is laid out, particularly the Malops Inbox and Malops detail pages. Amongst other advantages, this would make the console very comfortable to use on a tablet. The ultra-simple and fast client deployment process means that even inexperienced administrators would have no difficulty getting the product up and running. We noted that the product’s real-time protection is highly sensitive, and detected malware instantly in our functionality test.
About the product
Cybereason Defense Platform Enterprise uses a cloud-based console to manage endpoint protection software for Windows, macOS, Linux, Android and iOS devices.
About the product
Cybereason Defense Platform Enterprise uses a cloud-based console to manage endpoint protection software for Windows, macOS, Linux, Android and iOS devices.
Getting up and running
The endpoint agent can be installed by downloading the setup file from the console and running it. There is a Download Cybereason Installers button on the System\Overview page of the console. A slide-out menu lets you choose one of four OS versions: Windows, macOS, Linux or Linux Ubuntu. Once the installer file has been downloaded and executed, setup takes a single click, and completes in seconds.
Everyday management
The console is navigated from the menu in the top left-hand corner. The default Discovery board, shown in the screenshot above, shows “Malops” (malicious operations) in columns, according to type. The blue dots represent a malicious or suspicious activity. The size of the dot represents the number of the affected machines, and the shade of colour refers to the activity time (as explained in the panel on the right-hand side of the console). If you click on a dot, a pop-up box displays the name of the file/process, the nature of the threat (e.g. malicious code injection), along with the date and time of the action, and the affected device. Clicking on the pop-up opens the details page for that threat, with an abundance of information about the Malop in question. This includes the device, user, file hash, incoming and outgoing connections to and from the process, and a timeline. This information is laid out in very clear diagrams, which provide an at-a-glance summary of the threat. This strikes us a remarkably effective way of communicating the important information quickly and easily. Actions that can be taken from the details page include Investigate, Isolate and Respond.
The Malop inbox shows a list of detected malicious operations in chronological order. Information for each item includes an identifier (file/process name), detection module, and affected devices, along with date and time. This is laid out in spacious rows, making it easy to read the information. Different view options let you sort the Malops by activity type, root cause, or affected device. Clicking on one of the Malops opens its details page, as described in the paragraph above.
Malware alerts shows items that “need your attention”. These are given names like “vaultfile12009845677446252183.vol”, based on the system’s internal quarantine naming process. For each item, there are Investigate and Exclude buttons.
The Investigation page allows you to create customised hunts, using criteria such as machine, user, process, connection, network interface and registry entry. There are also pre-built queries, such as Files downloaded from Chrome and Child processes of Explorer.
On the Security profile page, you can adjust reputation criteria, create custom rules for detection and behavioural whitelisting, and manage machine isolation exceptions.
The main System page has a number of sub-pages. These are Overview, Sensors, Policies management and Detection servers. The default Overview page is divided into 5 panels. The Sensors panel provides a doughnut chart of the status of installed devices, with a traffic-light colour-coding system for Enabled, Suspended and Service Error states. A simple bar graph completes the picture by showing the proportion of up-to-date clients. The other panels show details of the management server, alerts, services and performance, with the latter displaying a graph of the processing rate over time.
The System\Sensors page is shown below. It displays a list of protected devices, with details such as sensor version, OS type, IP address and component status. The details columns can be customised, letting you add a variety of items like CPU usage, memory usage and OS version. You can select a device or devices and perform tasks from the Actions menu, such as update, restart, set policy and start a system scan. A panel at the top of the page allows you to filter a long list of devices by sensor status, data collection, OS, update status, app control status and ransomware-protection status.

The System\Policies management page lets you create and edit policies for the endpoint software. For each policy, there is a configuration page with a left-hand menu column. Items are Anti-Malware, Exploit protection, PowerShell and .NET, Anti-Ransomware, App Control, Endpoint controls, Collection features, and Endpoint UI Settings. Each item opens the relevant configuration page, with neatly laid-out controls for the individual sub-components. System\Detection servers lets you add and edit the details of the sites and servers that manage the protection software.
The Settings menu item lets you configure items such as notifications, authentication, and password policy. The product’s support services can be accessed by clicking Support, as you would expect.
Windows endpoint protection software
There is a minimalist interface to the endpoint protection software. This consists of a System Tray icon, which shows a concise status display when right-clicked:

If a user should inadvertently copy a malicious program to their system, Cybereason will instantly detect and delete it. A sample alert is shown below:

The interface of the server protection software is identical to that of its client counterpart.

Verdict
Elastic Endpoint Security is aimed at larger organizations that require prevention and EDR capabilities. Deploying it will require some planning and training, meaning that it is not a solution that you can just install and forget about. However, for larger organisations with suitable resources, it provides a comprehensive range of features.
About the product
Elastic Endpoint Security provides prevention, detection and response measures. It has threat-hunting capabilities aimed at stopping targeted attacks. The management console can be run from the cloud on any modern browser. On-premises deployment is also an option. Elastic Endpoint Security supports Windows, Linux, Mac, and Solaris clients and servers.
Getting up and running
We used Elastic Endpoint Security’s cloud-based infrastructure. This simply requires you to browse to the URL and log in to the management console. Deployment of the client “sensor” (agent) can be done in one of two ways: “in-band” and “out-of-band”.
In-band is currently only for Windows. The administrator installs the sensor directly onto Windows clients or servers from the Elastic Endpoint Security management console. The administrator can scan the network for unmonitored endpoints and install the sensor after entering credentials for that endpoint.
Out-of-band is supported for all operating systems. Out-of-band installation lets you deploy the sensor using a management tool such as Microsoft System Centre Configuration Manager. You can also install manually after downloading an installation package from the Administration/Sensor page.
The installer is transferred by the administrator to an endpoint and run from an elevated command-prompt window. You have to use specific command-line syntax (in the documentation) to do this. Double-clicking the .exe file simply deletes it.
Everyday management
The management console has six menu choices on the left-hand side. Dashboard gives an overview of the status of the entire estate of client devices, and reports how many alerts are in play at any one time. It also displays top alerts, exploits, malware and file-less alerts, allowing for a comprehensive view of what is happening. Each of these can be clicked through to drill into more information.

The Endpoints page (shown above) gives a view of all the managed clients. You can select and sort by name, IP address, OS version, policy applied, sensor version, alerts and groups. From here, you can choose a range of endpoints and then run tasks on them. These include applying a new policy, deploying/upgrading/uninstalling/deleting endpoints, and configuring a response when threats are encountered.
Alerts takes you into the heart of the platform. Here you get a list of current event types such as malicious file execution prevention or file detection. The catalogue of events can be sorted and categorised by event type, assignee, OS, IP address, hostname and date.
If you click on an event, it takes you to the Alert Details page for that event. Here you can see much more detail about the event, where it started, what it has done and the analysis of the malware, if appropriate. Here you can choose Take Action, whereby the options include Download Alert, Resolve, Dismiss, Start Investigation, Isolate Host, Download File, Delete File and Whitelist Items.
Of particular interest here is the Start Investigation feature which lets you create a “Hunt”. A Hunt can cover multiple information sources, e.g. firewall rules, drivers, network, persistence, process, registry, media, or system configuration. It allows you to search the network for information relevant to your enquiry. A key component here is the “Ask Artemis” feature, which is a natural-language query engine. You can simply type in a question, and Artemis will attempt to resolve it.
The Investigations menu item shows a list of ongoing investigations, who is assigned to them, which endpoints are involved, and so forth. This is very important for understanding how the current analysis is progressing.
Reporting provides a simple overview of alert types and endpoints in graphical form.
Finally, the Administration menu item gives access to the Policy Settings, Users, Sensors, Alerts, Whitelist and Platform features. The Policy Settings page lets you define policy for events such as privilege escalation, process injection, and credential access. As an example, you can choose what policy to apply when malware is executed. Do you detect or prevent it? Do you allow self-injection or detect DLL injection and so forth? This is a level of power and control that goes significantly beyond normal antivirus.
Windows endpoint protection software
The Windows desktop protection software is essentially invisible to the user. If the user should inadvertently copy a malicious file to the system, Elastic will detect and quarantine it on access. An example alert is shown below. This takes the form of a banner running across the screen. The user cannot take any action, other than to close the alert.

The GUI of the server protection software is identical to that of its desktop counterpart.

Verdict
The ESET Endpoint Protection Advanced Cloud package is very well suited to the SME market. ESET have made it very flexible and scalable. It is simple enough for a company of 25 users, but also sophisticated enough to cope with larger networks. You can get the console operational in no time, and its simple menu structure makes it very easy to navigate. We found the interface very intuitive, and were able to deploy and manage the client software without any difficulty. The ability to customise different elements of the console is very welcome. We also noticed that the console is very responsive when it comes to showing alerts. Overall, it provides a very attractive option for small to medium-sized businesses.
About the product
As its name suggests, ESET Endpoint Protection Advanced Cloud includes a cloud-based management console. There is endpoint protection software for Windows clients, Windows file servers, and macOS clients. For the Windows and macOS clients, you get the choice of Endpoint Antivirus or Endpoint Security; the latter includes a web control feature and ESET’s Network Protection module. The licence also allows you to install unmanaged protection for Linux and Android devices.
Getting up and running
As the console is cloud-based, there is no installation required. You just open the URL and enter your credentials. When you log on for the first time, you can choose the location (country) of the datacentre to be used. There is also a recommendation to set up two-factor authentication, but this is optional. Next, the startup wizard invites you to create installation packages. Naturally, you can cancel this and come back to the task later. After the wizard has been completed, a tutorial runs. This is very short and simple, and points out the main areas of the console interface.
To install the client software, you first need to create installation packages on the Installers page. This just requires you to select a product. You can enable or disable the PUA detection and ESET Live Grid feedback options, or get the wizard to prompt for these during installation. Language, Group and Policy can also be specified. Once you have made an installer, you can send it to users by email directly from the console. Alternatively, you can download it and distribute it via network share or removable device, or use the mass deployment tool. When you run the installer on a target computer, the setup wizard lets you choose the interface language. Otherwise there are no choices to make, and installation completes with a couple of clicks. It is also possible to install the ESET Management Agent via a Microsoft Active Directory or System Center Configuration Manager script, and then push the endpoint software from the console. This choice of deployment methods means that the product would work well for both smaller and larger networks.
Everyday management
You can find all the main functions of the console in a single menu column on the left-hand side. The console opens on the Dashboard/Computers page, shown in the screenshot above. This provides an at-a-glance overview of the network, in the form of colour-coded doughnut charts. You can see the security status of the network, along with details of any problems and rogue computers. The time of last connection and last update are also shown, as is the distribution of different operating systems. You can easily get more details for any item just by clicking on its graphic. Similar links to details and solutions are provided throughout the console. The panels of the dashboard are very customisable. You can move them around, resize them, and change the chart type, among other things. Other tabs on the Dashboard page let you zoom in on antivirus or firewall threats, ESET applications, and incidents.

The Computers page is shown above. It gives you an overview of all the managed devices on the network; you can click on a computer’s entry to get more detailed information about that device. This includes a detailed hardware inventory, amongst other things. You can also organise computers into groups, and carry out tasks such as scans and updates. There are some pre-configured dynamic groups, for example Computers with outdated operating system. These make it easy to find all the devices that need your attention.
The Detections page shows information about all threats encountered by all managed devices on the network. You can click on the entry for any threat to get details such as file hash, source URL and detection mechanism.
Reports provides a wide range of preconfigured scenarios such as Active Threats and Last Scan. Running a report on one of these is as simple as clicking its tile on the page. You can also create your own report scenarios if you want. Reports can be scheduled, and you can specify the language.
Tasks allows you to take a wide variety of actions on individual devices or groups. These include running scans, product installations and updates. You can also run OS-related tasks, such as installing Windows Updates and restarting the operating system.
Policies has a convenient list of preconfigured policies that you can apply. These include different security levels, device control options, and how much of the user interface to show to users. You can also create your own custom policies if you want.
Computer Users allows you to create users, add contact details, and link them to devices.
On the Quarantine page, you can see all quarantined files, along with useful details such as the hash, detection type (Trojan, PUA, test file), and number of computers affected.
The Exclusions page shows files/paths that have been excluded from detection/scanning, and provides instructions for creating such exclusions.
Notifications lets you receive email notifications for a number of different scenarios. These include threats being detected, and endpoint software being out of date. These are very simple to set up and edit. You just have to select the scenario(s), enter an email address, and enable the notification.
Finally, the Status Overview page provides a brief overview of important status items, divided into the categories Licences, Computers, Products, Invalid Objects and Questions. The Invalid Objects section advises of e.g. policies that refer to out-of-date installers. Questions points out any issues that cannot be resolved automatically, and require the attention of the administrator.
Windows endpoint protection client

By default, users can access a fully-featured endpoint protection client. This has very similar functionality to a consumer antivirus program. The GUI is a model of simple and clean design. All the features are easily accessible from a single menu on the left-hand side of the window. Users can run updates and scans, and see logs and quarantined files. However, Windows Standard Users cannot disable protection or restore items from quarantine. If you want, you can set a policy from the console to disable the GUI on any device or group; in this case, no interface will be visible to the user.
If the user should inadvertently copy a malicious file to the system, ESET will detect and quarantine the malware on access. An example alert is shown below. The user cannot take any action, and the alert closes after a few seconds.

The GUI of the server protection software is very similar to its desktop counterpart. However, additional system information is provided on the home page. The Log Files feature also has its own entry in the menu column.


Verdict
FireEye Endpoint Security is a highly powerful platform. It includes signature-based, behavioural and machine-learning engines. A core strength is in the acquisition of data from the agent for analysis and subsequent decision-making process. This allows the admin to hunt down and investigate any threats that might bypass initial detection.
This deep insight enables analysis and response across the largest of enterprises. There is however a significant entry cost in terms of training. This is required for both the initial configuration and ongoing operations. To get the most out of FireEye Endpoint Security, security operations teams should have some knowledge of investigations. Alternatively, FireEye can assist with their Managed Defence practice. However, it should deliver a level of insight and operational management which is at the bleeding edge.
About the product
FireEye Endpoint Security provides endpoint protection with detection and response. There is a cloud-based management console. The product is designed to handle the largest of organizations, with support for up to 100,000 endpoints per appliance. There are agents available for Windows clients and servers, macOS, and various Linux distributions.
Getting up and running
The cloud console requires no significant installation. Client installers can be downloaded from the Admin menu/Agent Versions page, and deployed onto the client machines.
The management console is quite different from a conventional centralised AV product. The emphasis is on detection and response. This involves acquisition of data from clients, analysis of it, and then responding appropriately.
The platform has an extremely powerful and extensive set of information gathering tools. These allow you to build comprehensive queries of almost any type. These are then dispatched to the clients. Analysing this information is the core of the server product.
You could treat FireEye as a straightforward AV package, allowing the engines to process malware as it is found. However, the real strength comes in the analysis and containment capabilities.
There is little work required to configure the platform once the agents are deployed. Of course, you can build custom policies if you wish. But it is likely that global default settings will be the bedrock of the deployment.
There isn’t much in the way of handholding in the initial setup process for the smaller organisation. Clearly the product is aimed at the more professional, larger organisation. It also assumes there will be training and consultancy for deployment.
Everyday management

The management console is not a tool to be dipped into occasionally. Unlocking its huge power needs considerable understanding of what the platform offers and how to achieve it. There is little handholding here. The product is aimed squarely at the large corporate space, where training and consultancy will be provided. From that point of view, this is not a product for the SME space.
Firstly, you need to understand what FireEye is trying to achieve. It relies on threat detection, plus data gathering and analysis. The emphasis here is solidly on information acquisition, analysis and reporting. This allows the administrator to gather information from a wide array of client machines. The information can then be processed, allowing you to take actions based upon it.
There is a basic front-page overview of the status of the deployed agents. This allows you to drill down into more detail. As an ongoing view, this is probably sufficient. The power comes once you drill into the Hosts, Enterprise Search, Acquisitions and Rules sections. The essential component here is building search routines to find what you are looking for. You can request containment of the device. This locks out the user whilst informing them of the centralised management control. You can then to dig through what is happening. This ability to lock out a device is a key component of the handling of a widespread malware event.
It should not be underestimated how much technical and systems knowledge is required to get the best from this. This is not a criticism. Indeed, for a hard-core IT administrator, it is a great strength to have access to this level of query and analysis of the network.
Windows endpoint protection software
The Windows desktop protection software displays a System Tray icon, from which a program window can be opened. This lets you see the event log and quarantined items.

If the user should inadvertently copy a malicious file to their system, FireEye will detect and quarantine it on access. An example alert is shown below. The user cannot take any action, and the alert closes after a few seconds.


Verdict
The Fortinet Enterprise Management Server package is a strong product. It is probably aimed at larger organisations. It is straightforward to deploy, but would benefit from more handholding for the smaller organisation. There is some welcome graphical reporting, but more help could be given to dig through the status of the network. The day-to-day operation would benefit from training time to get the most out of the product.
About the product
The server-based console is called FortiClient Endpoint Management Server (EMS), and the client is called FortiClient. The console requires a Windows Server OS (2008 R2) or later. There is endpoint protection software for Windows clients and servers, Mac OS X and Linux. Please note that as well as anti-malware functions, the product includes other features such as telemetry and secure remote access. These are not covered by this review, however.
Getting up and running
EMS is a local server-based product. Installing the management console is very simple and requires almost no user interaction, although you may have to restart the server during installation. The console functionality can be accessed from the desktop shortcut (dedicated window), or a web browser. Once up and running, there are some tasks you need to perform before the client can be deployed. The real-time protection feature of the endpoint protection software is disabled in the default policy. However, it is very simple to switch it on under Endpoint Profiles/Default.
You can then deploy the client to the desktop. Under Manage Installers/Deployment Packages you can create an installer with a specific program version and patch version. A URL to the server’s repository is then displayed, which you can use to download the installer to client machines. Setup is very quick and easy, and the client connects to the management server automatically. On the server side, there are good reports for devices discovered that are not part of the management structure, and it is easy to remediate this. There is a clear and clean view of the status of the network through the Dashboard/FortiClient Status view.
Creating users for the management console is fairly easy. A user can be assigned granular permissions. These include creation, update and deleting of various settings, and the abilities to manage endpoints. Finally, you can assign permissions for policy management here too. So, you can create a relatively fine-grained set of permissions here for various administrative levels.
There isn’t much in the way of handholding in the initial setup process for the smaller company. Clearly the product is aimed at larger organisations, with training and consultancy provided.
Everyday management
The Enterprise Management Server console has a fairly clear UI. It definitely benefits from a larger screen. There is a single menu down the left-hand side. Clicking an item here populates the right-hand side of the window. The Dashboard/FortiClient Status page provides a graphical overview of the platform and client status. You can click through from the items to get more data, but it is not always clear what detail has been uncovered. For example, taking our “2 infected endpoints”, we click through and get a view of the two devices. But again, there is little here to tell me what is actually wrong with these devices. More clarity here would help when dealing with problems and outbreaks.
The Vulnerability Scan page has an interesting set of “traffic light” views. These go from green (low) through yellow (medium) to orange (high) and red (critical). Underneath this is a set of buttons selecting what is being reported. For example, operating system, browser, MS Office and Services are shown. Moving the mouse over these buttons causes a graphical refresh of the traffic lights. However, it is not clear what the data means until you actually click on a button. This is a useful interface that is slightly compromised by its implementation.

The Endpoints page (shown above) allows you to look at the status of all endpoints. There is an attempt to be graphical here, but some of the icons could be clearer in their meaning.
Endpoint Profiles lets you build up the policy to be pushed to a user’s computer. It is quite straightforward and obvious what needs to be done here. There is a Basic/Advanced view button which is helpful if you want to dig into the details, or stay with a more simplified view.
Finally, Administration and System Settings allow control of the underlying settings of the platform.
It is fairly straightforward to get reports of what is happening, and initiate scans or remedial actions as required. The UI is quite well designed, but would benefit from some final polish to make it more obvious. A stronger splitting of setup from day-to-day and from system administration would help too.
Windows endpoint protection software
The Windows desktop protection software provides a program window with status information. Users can run scans, but not change any settings.

If a user should inadvertently copy a malicious file to the system, FortiClient will detect and quarantine it on access. An example alert is shown below. The user cannot take any action, other than to close the alert.

The GUI of the server protection software is identical to that of its desktop counterpart.
FortiEDR
The FortiEDR component of the package has a separate, cloud-based management console.

The Dashboard page, shown above, provides a graphical overview of threats and suspicious processes.
Event Viewer, shown below, gives details of such processes, and allows you to take action by e.g. investigating or deleting them. Other pages include Threat Hunting; Communication Control (applications and policies); Security Settings (security policies and automated incident response); Inventory (collectors, IoT and system components) and Administration (licensing, organizations, users etc.).


Verdict
G DATA AntiVirus Business provides a sophisticated, server-based management console. It could be used to manage larger networks with multiple servers. It offers a wide range of functions, in a design similar to the Microsoft Management Console in Windows. It may appear slightly dated, and a little exploration may be needed to find all the functions. Nonetheless, professional system administrators should have no difficulty finding their way around it. There is some scope for customising the types of information displayed, which we liked. The endpoint protection software has a minimalist interface. However, admins can let users carry out simple everyday tasks such as updates and scans.
About the product
G Data uses a server-based console to manage endpoint protection software for Windows, Linux, Mac, iOS and Android devices.
Getting up and running
G Data provide a single installer package which you can use to set up both the management console and the endpoint protection software. The console installation wizard lets you use an existing SQL Server installation if you have one. Alternatively, it can install SQL Server 2014 Express along with the management software. Installation is very quick and simple. We note that you may need to adjust Windows Firewall settings on the server and clients to enable communication between them, however. When the console is first used, a deployment wizard runs, allowing you to push the endpoint software to clients over the network. Alternatively, you can run the installer on individual client devices. To connect the client to the server, just need to enter the latter’s IP address.
Everyday management
The panel in the top left-hand corner of the console displays the management server(s) in use. Here you can switch between different servers if you have more than one. For each server, the default Dashboard page of the console, shown above, provides a graphical display of 4 important status items. The first is the status of individual components, indicating what proportion of devices are correctly configured. Then there is the share of devices that have connected to the console recently. You can also see which clients have had the most detected threats. Finally, there is a timeline of important events.

The Overview tab of the Clients page, shown above, displays a list of managed devices. You can see information such as status, definitions used, client version and operating system. The columns are customisable. Thus, you could also display the last active user, and various network items such as IP address and DNS server. From the row of buttons along the top, you can run various tasks. These include installing or uninstalling client software, updating the definitions and software, and deleting devices. The Software button on the top toolbar provides a detailed inventory of programs installed on the client device(s). Hardware shows basic system details such as CPU, RAM, and free storage space.
The Client settings pages lets you configure some options such as automatic signature and program updates. You can also allow users a degree of interaction with the endpoint software on their PCs. For example, you could let them run scans and/or display the local quarantine.
As you would expect, the Tasks page lets you see the status of any tasks, such as installation, that you have set up. Logs provides a detailed list of relevant events. These include malware detections, updates, and settings changes. Statistics lists the status of individual protection components, such as Email Protection and Anti-Ransomware.
In the bottom left-hand corner of the console are a number of shortcuts to specific pages. The Security page lists malware detections. Details provided are status, date and time, affected device, file name, threat name, and location. Info displays information relating to the anti-spam functionality. The Signatures page shows configuration options for definition updates. You can also run an update with a single click here. Program checks whether the management console itself is the latest available version.
Windows endpoint protection software
By default, the endpoint protection client has a minimalist user interface. There is a System Tray icon. This lets you run an update, and display details of the program version and current signatures. As mentioned above, you can change settings from the console to allow users to run scans, if you want. This adds a variety of scan options to the System Tray menu. It also adds a Scan for viruses (G Data Antivirus) item to Windows Explorer’s right-click context menu. If a user should inadvertently copy a malicious file to their system, G Data will detect and quarantine it on access. A sample alert is shown below:

The interface and options for the server protection software are exactly the same as for the client.

Verdict
K7 Cloud Endpoint Security is designed for enterprises of all sizes, but its ease of use makes it particularly suitable for smaller businesses and less-experienced administrators. It is very quick and straightforward to set up, due to the cloud-based console and very simple installation process. The management console is very easy to navigate, and the endpoint client lets users carry out scans and updates very simply. One minor suggestion for improvement would be a means of selecting multiple devices at once on the Devices page. However, overall it is very straightforward and intuitive to use.
About the product
K7 Cloud Endpoint Security uses a cloud-based administration console to manage endpoint protection software for Windows clients and servers.
Getting up and running
As the console is cloud-based, no installation is necessary. When you log on for the first time, a help page is displayed, with concise explanations of the features and how to use them. Deploying endpoint protection software is almost as simple. All you need to do is go to the Settings page and download an installation package, then run this. The setup wizard is very simple, with no choices to be made. Thus, you can install the client with just a couple of clicks.
Everyday management
All the console’s functionality can be accessed from a single menu strip at the top of the window. When you log in, the console opens on the Dashboard page, which shows an overview of the system status. There are various detail panels, showing detected threats, blocked websites, violations of hardware policy, vulnerabilities detected, device security status, numbers of devices running specific Windows versions, and a timeline of threats discovered. There is a link from the Device Security Status panel to the Protected Devices page, so you can get more details just by clicking on it.
The Groups page of the console lists device groups you have created. There are links to the policy applied to each group, and a list of tasks you can apply to all group members.
The Devices page, shown in the screenshot below, lists individual computers on the network. The links in the Actions column let you view a computer’s details, uninstall Endpoint Security, or change its group. For the latter two tasks, means of selecting multiple devices at once would be helpful. Currently you can only select one device at a time.

From the Application Control page, you can regulate which applications are allowed to run or access the LAN/Internet. This can be done very simply by selecting an application from the list, and selecting Block from Running, Block Internet Access or Block Network Access from the drop-down list. You can add an application not already on the list using its MD5 hash value. We note that a file’s MD5 hash could potentially be spoofed, and suggest that SHA256 would be more secure.
The Policies page lets you control settings for the endpoint software. These are conveniently ordered into groups such as Anti-Virus, Behaviour Protection, Firewall, Web Filtering and Device Control.
Under Actions you can create tasks to run on individual computers or groups. Available tasks include a variety of scans and a client update.
The Settings page lets you download installation packages for the endpoint protection software, and configure email notifications.
Reports page provides a very simple means of running reports on items such as detected threats, and vulnerabilities, websites blocked, and scan results.
Windows endpoint protection software
The Windows desktop protection software has a window with a component status display. This lets users run definition updates and a wide variety of scans. However, no settings are accessible to the user by default. This can be changed by the administrator in the policy, if so desired.

Should the user inadvertently try to copy malware to the system, K7 will detect it on access, and delete it. An example alert is shown below. The user cannot take any action, and the alert closes after a few seconds.

The GUI of the server protection software is identical to that of its desktop counterpart.
 - Select")
Verdict
Kaspersky Endpoint Security for Business (KESB) Select is a tier of Kaspersky’s Endpoint Security for Business product line. It is a powerful and sophisticated product, aimed at medium-sized businesses and larger enterprises. There is very good cross-platform support, and the web-based console provides a wealth of functionality. The menu structure is straightforward. However, some learning time would be required to make the most of it.
About the product
Kaspersky Endpoint Security for Business Select provides server-based management tools. It supports management of endpoint software for Windows PCs and servers, Linux tablets, PCs and servers, and macOS. There is also support for Android and iOS mobile devices. Users can choose between a modern web-based console and a legacy MMC-based console. We have looked at the web-based console (shown in the screenshot above) in this review.
Getting up and running
Installing the management console is a straightforward process for an experienced administrator. An SQL database is required, which could be the free Microsoft SQL Server Express. You can use Windows credentials to log in to the console if you want. When you first run the web-based console, an optional brief tutorial is shown. This highlights the most important functions, and provides a brief description of each. Next, the Quick Start Wizard takes you through initial configuration. This includes defining the type of computers to be protected (server/workstation) and operating systems. Finally, the Protection Deployment Wizard lets you set up remote push software installation. This is a very neat and simple process. You can also install clients manually (there are three different methods of doing this).
Everyday management
The console functions are arranged in two menu bars across the top of the page. The upper menu bar shows the main functionality areas. These are Monitoring & Reporting, Devices, Users & Roles, Discovery & Deployment, and Operations. The lower menu bar provides access to the sub-pages of each major menu item. In some cases, the items on the lower menu bar open drop-down lists of further items.
The Monitoring and Reporting\Dashboard page provides a graphical overview of important items. These include protection status, new devices, plus details of threats and infected devices. Please see the screenshot above. The Reports page lets you run a wide variety of reports, on topics such as protection status, deployment, updates and threats. These can be easily accessed from a preconfigured list.
On the Notifications page, there is a list of recent alerts. You can filter these by topic, such as deployment, devices or protection.
The Devices tab, Managed Devices page lists managed computers, along with the status of major components. You can filter the list using criteria such as status, real-time protection or last connection time. The list is customisable, and so you can add additional criteria like operating system or network details. By selecting individual devices, you can run tasks on them. These include installation, deinstallation, or changing group membership.
 - Select")
The Policies and Profiles page lets you create and apply new configuration policies. Device Selections provides advanced filtering options for selecting clients.
Under Users & Roles, you can see a list of predefined console users, along with Windows local and domain accounts for the Windows computers on the network. These can be assigned one of 16 different management roles for the console, allowing very granular access.
Discovery & Deployment includes various features for discovering unmanaged devices on the network, and deploying software to them. The Quick Start Wizard can be rerun from here. The Device Selections page lets you find devices in pre-configured groups. Examples include Databases are outdated and Devices with Critical status.
Amongst other things, the Operations tab provides an overview of licensing, repositories, and the quarantine functions. The Backup feature actually appears to be a standard quarantine function. Malware that had been detected on client PCs was found here. However, there is a separate Quarantine feature, which was empty after our test. The Kaspersky online knowledge base explains the functions of these two items: https://support.kaspersky.com/help/
Windows endpoint protection software
The Windows desktop protection application is evidently designed for central management by IT staff, rather than local management by the end user. Consequently, under default settings, users can view settings, but not change them. The program window is essentially a comprehensive status display. It shows security status and detection statistics for the different technologies involved. These include machine learning, cloud analysis, and behavioural analysis. As in the console, the Backup feature is part of the quarantine functionality. We note that users can run manual scans of both local and remote drives, folders or files by means of the context menu in Windows Explorer.
 - Select")
If the user should inadvertently copy a malicious file to the system, Kaspersky Endpoint Security will detect and quarantine it on access. No alert is shown on the desktop system. The GUI of the server protection software is identical to that of the client.

Verdict
The Intune cloud console has a very clean, modern design. It is very easy to navigate using the single menu bar on the left-hand side. The Live Tiles on the Dashboard page provide a good overview of the security situation. The integrated links mean that the admin can easily find more information, and take the necessary action. The management agent can easily be deployed manually in smaller companies. You can also deploy via Group Policy, for larger enterprises. Intune can be used to manage thousands of devices. Its intuitive, easy-to-navigate interface make it an excellent choice.
About the product
Intune is a cloud-based service. It provides companies with security management for their devices, apps and data. Platforms covered are Windows Desktop, Windows Mobile, macOS, iOS and Android. This review covers the use of Microsoft Intune to manage Windows’ out-of-box antivirus and security features. Please note that a dual management interface is available. In this review, we have covered the Classic interface, shown above.
Getting up and running
As the management console is cloud based, no installation is necessary. A management agent has to be deployed to the clients. After this, you can monitor and control them from the console. The agent is easily found under Admin/Client Software Download. You can install it manually on the client with just a couple of clicks. For larger networks, the admin can use Group Policy to deploy the software automatically.
In the case of Windows 10 and Windows 8.1 clients, Microsoft’s antivirus client is already incorporated into the operating system. No further software installation is required. With Windows 7 PCs, however, the antivirus client is not pre-installed, but is available as an update. If the Intune management agent is installed on a Windows 7 client without AV protection, the Microsoft AV client update will be installed automatically.
Everyday management
The Intune console is navigated using a very neat, clean menu column on the left-hand side. The Dashboard (home) page displays the status of different components using Live Tiles. The Endpoint Protection tile shows the number of devices with resolved and unresolved malware detections. These are displayed graphically as colour-coded bar charts. Other tiles provide information on Warnings/Critical Alerts, and Device Health. Clicking on an element within a tile, such as Warnings, opens the relevant details page for the item concerned.
Under Groups\Devices, you can see managed computers. There are details such as operating system and date & time of last update. The Protection page provides a more detailed overview of malware detections, device status and most frequently detected malware. There is also a list of all malware items that have been detected in the network. Alerts displays details of all security-related warnings, including reports any of failed client software deployments.
Endpoint protection software
The precise nature of the Windows desktop protection software GUI is dependent on the version of Windows installed on the PC. Recent Windows 10 clients (Builds 1809, 1903 and 1909) have the Windows Defender Security Center interface. This is shown below:

Older versions of Windows, including Windows 7 and 8.1, use the same GUI as Microsoft Security Essentials. This is similar to that of a typical consumer antivirus program. All variants allow the user to update malware definitions, and run full, quick, custom and context-menu scans.
Malware is detected on file copy, and quarantined. An example alert is shown below. The user cannot take any action, and the alert closes after a few seconds.

The GUI of the server protection software is essentially the same as its desktop counterpart. However, the components Account protection, Device performance & health and Family options are not included in Windows Server.

Verdict
Panda Endpoint Protection Plus on Aether is a very strong product. It is powerful enough for larger organisations, but simple enough for smaller businesses too. It is very easy to set up, as it requires no on-site server. There is an excellent, very clean and useful administrative console. This has a clear installation and deployment workflow. We were particularly impressed with the clean and obvious design of the user interface, and the speed at which it could be mastered.
About the product
This is a cloud-console managed system. There are device clients for Windows/Linux servers, Windows/Linux/macOS PCs, and Android mobile devices. The desktop client software has a simple interface, which allows users to run updates and various scans. It is suitable for organisations of all sizes.
Getting up and running
The product is managed from a cloud-based console, which requires no installation. Deployment is carried out using the Add Computers button on the Computers page. You can download the installer directly, or click on Send by email. This opens an email message with a link for download and installation. This works for Windows, Linux, macOSand Android. The user clicks on the provided link to install the client, and this is then automatically licensed. Either installation method lets you pre-allocate the client to a management group.
Everyday management
Protection status and threat detection history are provided on the Status tab/Security page, which opens by default. There are excellent graphics for detected threats. These include offline computers, outdated protection, and blocked URLs here. This provides a solid daily overview of issues. We particularly liked it because it provides a headline view of the status, but allows you to click through for more detailed information. For example, clicking on the main Protection Status graphic takes you to the Computers page. The console’s quarantine function is accessed by clicking on Threats detected by the antivirus.
The Status tab includes a left-hand menu column, from which you can open additional status pages.
Web access and spam shows categories of website, such webmail, games and business, which users have accessed. Licenses is self-explanatory. A section called My Lists provides simple but useful overviews of different aspects of the network. There are links for hardware and software of managed computers, lists of unprotected workstations and servers, and threats detected by AV. This list is customisable, and a number of other categories can be added. These include computer protection status, and web access by computer.
The Computers tab, shown below, lists computers on the network. You can filter by various criteria, including OS, hardware and installed software. You can also display computers by management group.

This page shows all the protected computers and mobile devices. It is very clearly laid out, and shows essential information. A Windows-like folder tree on the left lets you show devices by group.
Using the Settings tab/Users page, you can create console users and assign them full control or read-only access. The Settings/Security page lets you define separate security policies for computers and Android mobile devices. Under Settings/My Alerts you can set up email notifications for various items. These include malware and phishing detections, unlicensed/unmanaged/unprotected/unlicensed computers, and installation errors. Other settings pages let you manage updates and proxy servers etc.
Finally, the Tasks tab can be used to set up scheduled scans.
Windows endpoint protection software
The Windows desktop protection software allows access to solid end-user capabilities like Full Scan, Critical Areas Scan and Custom Scan. The user can force a synchronisation of the updates from the System Tray menu. However, there is no access to any settings.

If a user should inadvertently copy a malicious file to their system, Panda will detect and quarantine it on access. An example alert is shown below. The user cannot take any action, and the alert closes after a few seconds.

The GUI of the server protection software is identical to that of its desktop counterpart.

Verdict
There is a lot of power and capability here, and the design of the management console is clean and well laid out. Most of the product works in a clear and consistent way. For a reasonably experienced system administrator, it is straightforward to implement, deploy and manage. For new system admins, the scope of functionality available in the console may make essential AV management tasks a little slower to find.
About the product
Sophos Intercept X Advanced uses a cloud console (Sophos Central) to manage Windows clients and servers, Linux servers, and macOS clients. Intercept X uses neural network analysis of malware. It provides protection from ransomware and exploits, along with additional browser security. There are also investigative and removal capabilities.
Getting up and running
The product is wholly managed from a cloud-based console. Licenses are applied to this, and then can be handed out to client computers. Installing the client is very straightforward. You can download the installation package and install from that, or push it out through your chosen management interface.
Devices can be assigned to groups (as you would expect), and inherit centrally defined policy. Users are automatically created in Sophos Central when they use a Sophos-protected device. They can also be imported via CSV, and synched via an Active Directory application. A user account is also used to control access to the Sophos management facilities. A user can be classified as User, SuperAdmin, Admin, Help Desk and Read-only here. This allows a layered configuration of management of the Sophos platform. There is a range of capabilities which can be applied to policy. These include web URL blocking, peripheral control and management of application execution.
Everyday management
The Sophos Central Dashboard view is quite straightforward. It has a clean, uncluttered user interface, offering an overview of all the systems and protection capabilities. Here you can see how many endpoints are active, the most recent alerts, and statistics on the web URL access management.
The Alerts item gives you a list of all the alerts which have occurred. You can sort by Description, Count and Actions.
Logs and Reports shows a collection of default reports. A notable report here is Policy Violators. This shows those users who have tried to access blocked websites most often.
The Global Settings page does what you would expect. People provides a user-centric view of the network, letting you see all the devices assigned to a particular user, and all the activity associated with these.
Devices shows the managed devices on the network. These are separated into three different pages: Computers, Mobile Devices, Servers, as shown below:

Endpoint Protection takes you to another set of user interface and menus. This also has pages for Dashboard, Logs and Reports, People and Computers menu items. Here you can also configure policies, settings and download endpoint installation packages.
Windows Endpoint Protection Software
The Windows desktop protection software has a GUI with a comprehensive status display. It also allows users to carry out scan tasks. The Status tab displays the overall security status, and provides summaries of recent threat types. The Events tab lists recent malware detections. Users can run a full system scan from the Scan button on the Status page. Alternatively, they can right-click a file, folder or drive in Windows Explorer, and click Scan with Sophos Anti-Virus in the context menu.

If a user should inadvertently copy a malicious file to their system, Sophos will detect and quarantine it on-access . An example alert is shown below. The user cannot take any action, and the alert closes after a few seconds.

The GUI of the server protection software is identical to that of its desktop counterpart.

Verdict
SparkCognition DeepArmor Endpoint Protection Platform (EPP) is very straightforward to set up. The console is cloud based, and the deployment process is simple. The management console has a very clean design that avoids overwhelming the admin. Getting the most out of the product would doubtless take some time, but the user interface makes this process as easy as possible.
About the product
SparkCognition uses a cloud-based console to manage the endpoint protection software. There are clients for Windows, Mac and Linux systems.
Getting up and running
The console does not require any installation, as it is cloud-based. Deployment of endpoint protection software is similar for all platforms. You just download the appropriate installer from the Deployment page of the console, and run it on the respective client device. This is a very straightforward process. You can install Windows clients using System Centre Configuration Manager or PowerShell.
Everyday management
When you log in to the console, you will see the Alerts Dashboard (screenshot above). This provides a summary of recent threats. The Devices Dashboard displays a device-centred overview. This shows you the total number of devices on your network, group membership, devices at risk, device connection status, and distribution of different endpoint agent versions. The title text for each dashboard panel is a link to more details. For example, clicking Medium Risk Devices shows you a list of devices with that status.

On the Devices page, you can see individual computers on your network. You can display these as tiles, as shown above, or as a simple list. By selecting a device or devices, you can run scans, change group membership, or remove from the console. It is possible to filter the devices displayed by using drop-down lists at the top of the page. You can filter by device group, device status, device risk, device platform or device version.
The Alerts page shows recent alerts, along with details. These include the file name of the malware, how it was detected, detection name, “confidence” (probability that the file really is malicious), name of affected device, time of detection, action taken or required, and file hash. Sub-tabs of each file’s details page show all detections of the file across the network (Occurrences). Clicking on an entry provides further details in a separate page. The Take Action button here provides the options Remote Remediate, Remote Restore, and External Remediate. These allow the admin to take immediate action.
The Administration menu includes the submenus Users, Security Policies, Device Groups, Global Lists, Audit Logs and Reporting. Users lets you add, edit and remove console administrators, who can be assigned varying levels of access (Admin, Manager or Auditor). Under Security Policies you can assign preconfigured settings to individual devices or groups. You can manage the latter from the Device Groups page. You can create whitelists of files and certificates, and file blacklists, under Global Lists. A list of admin logins and logouts can be found under Audit Logs. The Reporting page lets you create reports for specific groups or all devices. You can choose the time period covered by the report, and who will receive it.
On the Deployment page you can find installers for Window, macOS, and various different Linux distributions. Finally, Subscription shows you the total number of device licences available and used, and the validity period.
Windows endpoint protection software
The endpoint protection client has a GUI, but does not allow users to take any action. The Notification page (bell icon) lists the most recent threats discovered. The Protection page shows the configuration options for protection components, but these are deactivated by default.

In our test, we found that malware copied to the test system was not detected on access. However, when executed, it was detected and quarantined on access. An example alert is shown below. The user cannot take any action, and the alert closes after a few seconds.

The GUI of the server protection software is identical to that of its desktop counterpart.

Verdict
This product impresses with clear design, simple operational processes and strong reporting features. Even a less-experienced user could deploy the agent and manage the network. The product shows what clear thinking and good deployment flow can bring. There is strong reporting and an obvious process for day-to-day operation.
About the product
VIPRE Endpoint Security Cloud uses a cloud-based console to manage Windows and macOS clients and Windows servers. VIPRE Endpoint Security is the client that runs on the desktop. VIPRE tell us that the cloud service runs on the Amazon AWS cloud, and that this brings efficiency, scalability and growth.
Getting up and running
Access to the web portal is straightforward via a standard username/password login combination (two-factor authentication is also available). The user interface immediately impresses with its clean and clear design. The first page you see has a Getting Started area. This covers deploying of agents, creation of users and the setting of appropriate policies. The next section deals with more advanced post-setup topics. These include Dashboard, Devices, Exclusions, Notifications and Reports. A link on the Getting Started page takes you to the Deploy Agents page of the console. From here you can download installers for the endpoint software, or use the email function to send links to users. We note that when a new version of the agent installer is made available, the page displays a note to that effect. You can either approve the new version for all devices, or try it out on a few test machines first.
Everyday management
Once you have deployed the endpoint software to your devices, the menus on the left-hand side come into play. From the top, the Monitor section covers Dashboard which is a straightforward view of the status of all the clients. It is obvious which ones need attention, what the device and threat count is, and the version numbering of the devices deployed.
Quarantine gives a strong overview of the quarantine actions over the past week. You can easily extend the reporting-time window using obvious choices such as “Last 24 hours”, “Last 3 days” and so forth. The reporting is clear and clean, showing what devices have had issues, and with which malware sources.
Reports lets you dig into the data in a more detailed fashion, for example by client, by malware, by action taken, by policy definition. All of these are clear and clean, but more designed to be used through the web console. You can set up notifications and reports to be sent through the System menu.

The next section is Manage, which covers Devices (shown above). This displays which devices are in play, and their operational status. For any device or group, you can assign policy, run a scan, update the definitions, reboot the device, or delete the agent.
Policies lets you control how the clients are allowed to operate, and the security policies that they will deploy. There is a wide range of customisation here, but the Default Enterprise settings will probably be appropriate for most users. Here you can allow users to interact with the VIPRE client. For example, you can allow them to scan items via a right click, or force USB devices to be scanned on insertion.
Exclusions allows you to create exclusion lists of files, paths, folders and so forth that are excluded from scanning. This might, for example, include some shared space that is managed in a different way from normal storage.
Finally, the Setup area covers system settings and all the main defaults of the platform. Deploy Agents allows you to download an agent installer package, to create a policy installer, and to invite users via email. Profile lets you enable two-factor authentication.
The web console impresses both from the initial setup and deployment through to the ongoing management. The defaults are sensible, the screens clear and clean, and it is obvious what it is reporting and how healthy the clients are. It is simple to get clients to do centrally managed tasks, and the configuration of policy is easy too. Creating users is simple, and they can have the role of Admin or Analyst. The latter might be appropriate for, say, a help desk operative.
It is simple to create ongoing reports, and you don’t need to specify a mail server to send it through – this is provided for you. We would say the platform is appropriate for any size of company, from a small business with a few seats, through to a much larger organisation. The UI of the management console was always responsive under testing. It is built to cope with thousands of desktops and large numbers of events.
Windows endpoint protection software
The Windows desktop protection software is very similar to a consumer antivirus program. By default, users can run scans and updates, and view quarantine. However, they cannot not change settings or restore quarantined items. Admins can give users increased or reduced functionality, by means of changing the applicable policy from the console.

If a user should inadvertently copy a malicious file to their system, VIPRE will detect and quarantine it on access. An example alert is shown below. The user cannot take any actions, other than to close the alert.

The GUI of the server protection software is identical to that of its desktop counterpart.

Verdict
The manufacturers have clearly put a lot of thought into making Carbon Black Cloud intuitive to use. The design principle of the console is to show essential information without overwhelming the admin. You can drill down to get more details when you want. We found it very straightforward to see what actions were necessary, and to carry these out. Despite the simplicity of the design, the package provides a high degree of functionality. This makes it suitable for both larger and smaller businesses.
About the product
Carbon Black Cloud uses a cloud-based console to manage endpoint security software. There is support for Windows, macOS and Linux clients, and Windows Servers.
Getting up and running
The Carbon Black Cloud console is cloud based, so no installation is required. You just log on with your credentials and the console is ready to use.
You can install endpoints from the Sensor Options menu on the Endpoints page. There are two main options here, downloading the installer, or sending an installation link to users via email. Both are very quick and straightforward. The installation wizard is simple, only requiring you to accept the licence agreement and enter a vendor-provided code. Once setup has completed, the device will show up on the Endpoints page of the console.
Everyday management
All the main functionality of the console is found in a single menu column on the left-hand side of the page. This makes it very easy to navigate. The Dashboard page shows you an overview of threats, displayed in panels. These are Attacks stopped, Potentially Suspicious Activity, Attack Stages, Attacks by Vector, Top Alerted Devices, and Top Alerted Applications. There is also an Endpoint Health panel, which lets you see if you need to take action on any devices. The Getting Started panel shows the status of common tasks, such as adding console administrators.
The Alerts page shows you a list of threats encountered in chronological order. You can investigate any individual threat in more detail from here.
On the Investigate page, you can see a chronological list of events on any particular device. This allows you to monitor network connections and program executions, and build up a detailed picture of security-related events.
Enforce is home to the Policies page (amongst other things). Various configuration options for the endpoint protection software can be configured here. We found it very easy to create, edit and apply a new policy to specific endpoints. Policy changes take effect on applicable devices as soon as you log in to them. Malware Removal is also found under the Enforce sub-menu. Here you can see a list of quarantined malicious items, which you can e.g. investigate, delete or blacklist/whitelist. Malware is removed very quickly once you have given the command to delete it.

The Endpoints page, shown above, provides an overview of devices on the network. Details are kept to a very manageable level (status, details of the OS and sensor version, policies and last check-in time), but you can easily get more information about an individual device just by clicking on its name. This will show take you to that device’s Investigate page. A search box lets you search for a specific client in a larger network.
The Settings menu item lets you configure options for the console/system as a whole. These include Users and Notifications.
Windows endpoint protection software
The Windows desktop protection software has a minimalist interface. You can display a list of the most recent blocked threats, by right-clicking the System Tray icon. Users cannot change any settings or run any tasks.

If the user should inadvertently copy a malicious file to their system, Carbon Black will detect it on access, and quarantine it in situ. Should the user then try to execute the file, an alert like the one below will be shown. The user cannot take any action, and the alert closes after a few seconds.

The GUI of the server protection software is identical to that of its desktop counterpart.
