Archives
Real-World Protection Test Enterprise August-September 2018 – Testresult
Mac Security Test & Review 2018
What is it?
Avast Security for Mac is an antivirus product for macOS. Licensing is free. There are adverts within the app enticing you to upgrade to the paid-for features. Some functionality that appears to be built in is either trialware (VPN) or hooks to an upgrade (Ransomware Shield, Wi-Fi Inspector).
Product information on vendor’s website: https://www.avast.com/en-gb/free-mac-security
Online support: https://support.avast.com/en-gb
Overall
Avast Security Free for Mac is a solid and competent package. All the components appear to work well, and it catches malware of all types in a competent fashion. It is reasonably easy to use, and comes with useful capabilities. Some of the more powerful capabilities are trialware or demoware, but this is to be expected in a free product. Advertising is not intrusive, and you are left with the feeling that this is a useful free addition to any standalone Mac laptop or desktop computer. It is suitable for users of all levels, and appears to add value to the platform for no financial outlay. As such it is to be recommended.
Part 1: Product Installation and Configuration
Installation is relatively straightforward. Download the installer from the web site and run the installer package. The installer package includes an uninstaller routine, or this can be run from the app itself.
During installation you are asked whether you want to install additional items – Avast SecureLine VPN, Avast Passwords and Avast SafePrice. With macOS 10.13, in the final stages of installation, you will get an install warning from macOS stating that a System Extension has been blocked. This is part of macOS security preventing unauthorised system extension installation. Simply click on the Open Security Preferences button and authorise the extension installation.
After installation is completed, your work is not done yet. The web browser extensions are not installed by default, nor are you told that this needs to be done. To fix this, you need to dig into Preferences and then Browsers. Here you will see that both Online Security and SafePrice are not supported in Safari. The extensions for Chrome and Firefox need to be installed by pressing the buttons. This is somewhat fiddly, especially the Online Security plugin for Firefox.
The other components are separate products, and require additional setup, or payment for a full product. For example, SecureLine VPN has a 7-day trial, after which yo have to buy it. Avast Passwords requires full setup too, but this appears to be fully functional. Part of the setup includes installation onto Safari.
Part 2: Ongoing Use
By default, you see little of Avast in normal use. There is an icon on the top status bar, along with tools for SecureLine VPN and Avast Passwords if installed. You can choose to see basic status here, including the last status messages, or you can open the main Avast window.
The main Avast window has a set of menu items down the left-hand side, and a minimal set of commands in the main Apple menu bar at the top (this does include an uninstall routine, which is useful).
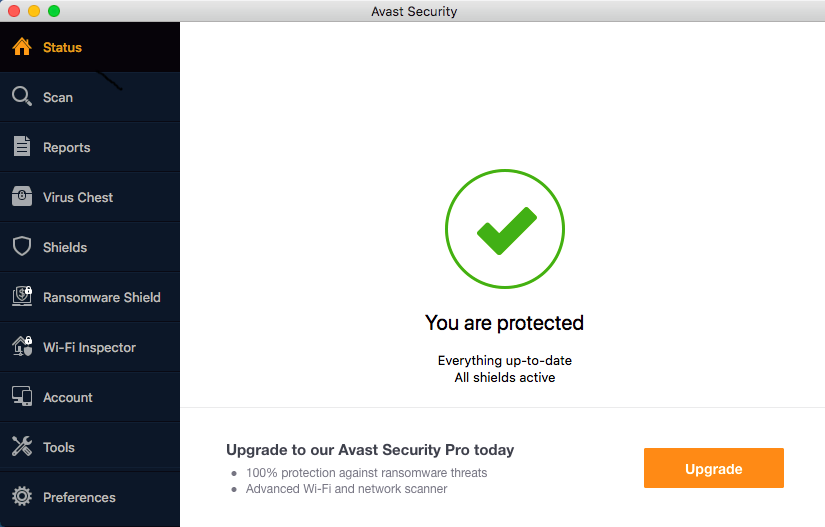
The main status window is clear and clean – you get a green tick mark, and confirmation that you are protected and that everything is up to date. There is an advert here to ask you to upgrade to Avast Security Pro, but it is not too intrusive. The Scan menu offers full system scan, removable volumes scan, custom scan, home network security scan and a scheduled scan capability. The home network scan does a ping around your home LAN and tries to identify which devices are present. It then digs into deeper information and offers remediation and security changes on devices which it deems to be weakly protected.
Reports gives you a view of recent activity, and Virus Chest allows you to see which malware has been quarantined. You can delete the files or restore them to their original locations from here. Shields shows a real time graphical view of the operational status of the File Shield, Mail Shield and Web Shield components.
Ransomware Shield and Wi-Fi Inspector require upgrades to the paid-for version for the functionality to be enabled.
Account allows you to log into an Avast account if you have one. Tools lets you open the SecureLine VPN tool and the Avast Passwords app, or to activate them on your iPhone.
Finally, Preferences has all the settings for the various components of the app.
The app is quite simple to use, and is clear and clean in operation. When you introduce malware to the system, there are status windows which appear in red in the top right corner of the desktop. If multiple malware threats are found, then multiple boxes start stacking vertically down the right-hand side of the screen. In a major malware situation, this can somewhat overflow the screen estate, and a more crafted arrangement here would be an improvement.
The malware warning windows themselves are reasonably useful, if somewhat dense and geeky. The information held within is of value, but it could be a little more customer friendly, especially for the less-experienced user.
What is it?
Avira Antivirus Pro is a paid-for antivirus product for macOS. There are very many products available on the Avira website, but once you have found the right page for Avira Antivirus Pro (link below), purchasing the license is straightforward, and the main installation is not complicated.
Product information on vendor’s website: https://www.avira.com/en/avira-antivirus-pro
Online support: https://www.avira.com/en/support
Overall
The product is competent in what it does, although some users might want more feedback and interaction with the capabilities of the system. If you are looking for a quiet, lightweight and unobtrusive AV package, then this might well be a good choice.
Part 1: Product Installation and Configuration
Purchase and installation are quite straightforward. You make the purchase, download and run the installer, then create a My Avira account which shows you your licence key. Please note that the software initially installs under the name of Avira Antivirus Free, but when you enter the licence key, this immediately changes to Avira Antivirus Pro.
The My Avira webpage allows you to manage licenses and oversee configurations. However, we could find no way of managing tasks such as remotely initiating a scan, although things like this would be useful in a family context.
Part 2: Ongoing Use
Normally you will see little of Avira in operation. There is a status icon at the top of the screen, and from here you can click to initiate an update, run a quick scan, disable the protection, or open the main app window.
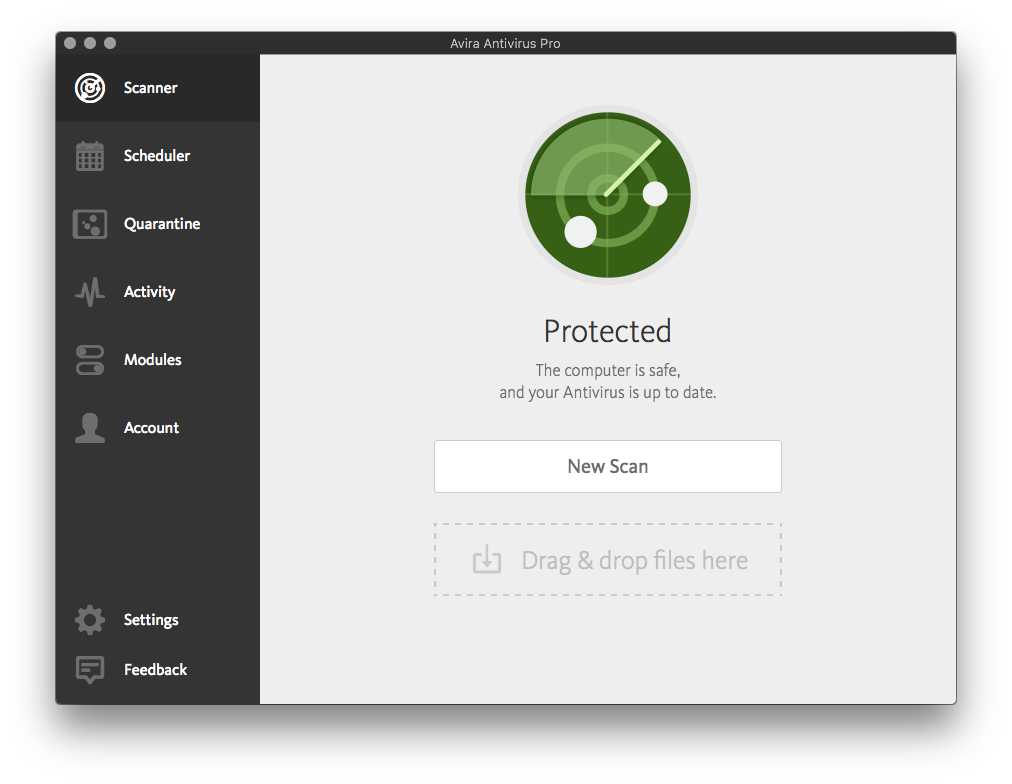
The main app window is clear and clean in operation, and tells you immediately if something is wrong. There are eight menu items down the left-hand side. On the Scanner (status) page, you can initiate a new scan. Scheduler lets you run scans on a schedule, Quarantine is self-explanatory, and Activity displays scan logs. The Modules section allows you to enable or disable the 3 main components of the products (real-time protection, cloud-based protection features, and USB scanner). There is also a Firewall switch, which you can use to enable or disable the macOS firewall that’s built into the operating system. Account allows you to log in and log out of the account. Settings allows you to change some very basic settings, such as update notifications and language of the GUI. Finally, Feedback opens a page of the Avira website where you can rate the product.
If you enable the USB Scanning function, then Avira notices when you plug in a USB storage device, and offers to scan it for you. This is a useful capability and one that users should employ, even though it is not enabled by default.
If malware is detected by the real-time protection, e.g. when copying files from an external device, you get an alert appearing in the top right-hand corner of the desktop:
For non-expert users, it might not be clear that “the log” noted in the warning is actually the “Activity” page in the main program window. We also note that the information provided on this page is very spartan – only the detection time and a very concise detection name are provided. However, more information can be found on any individual item by going to the Quarantine page and clicking the relevant “i” button.
What is it?
Bitdefender Antivirus for Mac is a paid-for antivirus product for macOS. It claims to offer full antivirus features, providing protection against Mac and PC malware. It comes with a VPN capability, which is new, offering 200MB of tunnelled traffic per day for free. This can be increased to unlimited traffic if you purchase a Premium account.
Licensing is straightforward and can be purchased in multiple units and years.
There is a demo version for download, and this runs for 30 days.
Product information on vendor’s website: https://www.bitdefender.co.uk/solutions/antivirus-for-mac.html
Online support: https://www.bitdefender.co.uk/consumer/support/
Overall
This is a strong and well-designed package. Setup is straightforward, makes clear that the browser extensions need to be installed, and provides the tools to do this in a simple and logical fashion. The program presents a clear and obvious UI to the user, and the Autopilot feature takes almost all decision-making away from the user. The only time the user has to make a choice is if the handling of a piece of malware has failed, and the user has to decide whether to delete the file. Overall, there is much to like here, and the calm way in which the package operates is praiseworthy.
Part 1: Product Installation and Configuration
Installation is easy to do, helped by the trial package which you can download for free. Purchasing is straightforward too. The installer gets the program up and running quickly with minimal interruption to the user.
As part of the installation, you will be asked if you want to enable “Safe Files” by default. This is an anti-ransomware feature which keeps a close eye on key folders for any sign of document encryption by ransomware. The default selection of Desktop, Documents, Downloads and Pictures is a good starting point, and it allows you to add in other folders easily (for example you might choose Music or a cloud-storage folder tree like Dropbox). Additionally, Bitdefender can watch your Apple Time Machine backups, to ensure that your backups have not been tampered with.
After installation, you open the main window of the app. Here it is made clear that the Web Protection features are not installed by default and that you have to continue to this step by pressing the “Fix Now” button. Bitdefender provides browser extensions for Chrome, Firefox and Safari. Installation of these plug-ins is straightforward, and guided by the installer app.
VPN tunnelling is provided as part of the setup program, and this is straightforward to use.
Part 2: Ongoing Use
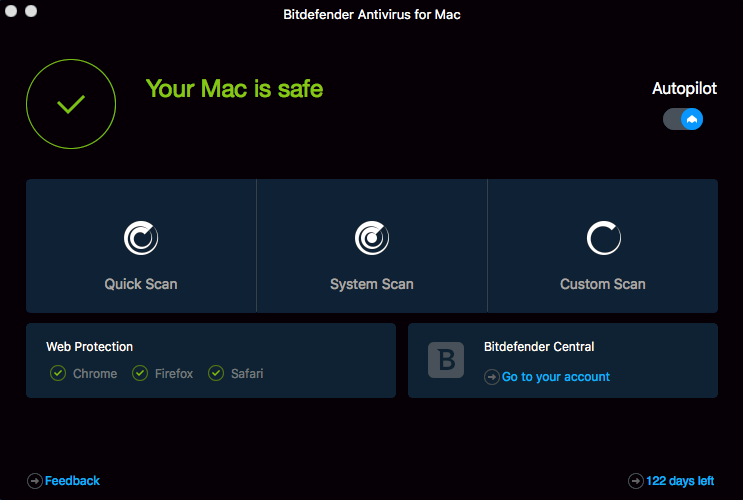
Like most end-user focussed packages, you see little of the operation of Bitdefender in daily use. Opening the main window shows a clear and well-designed layout which is obvious to navigate. The Autopilot feature is enabled, which allows Bitdefender to make decisions on your behalf in an appropriate way. The main window has a rather dark (black and grey) design, which is not maintained through the rest of the app. However, it does not impede operation.
If you want to scan files for malware, it is very simple and straightforward. And, like most AV packages, you can right click a file, folder or drive and choose “scan” for easy access to the functionality.
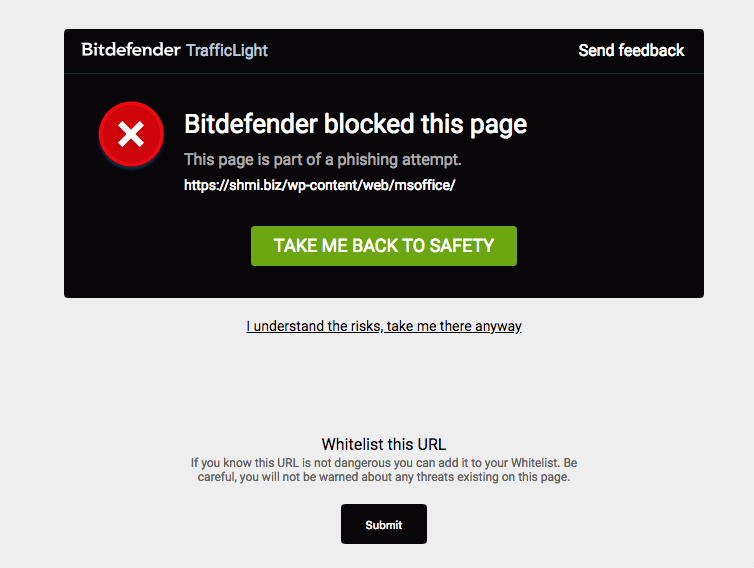
The web browser security works well, and picked up on phishing attempts. The message you get is clear and obvious, and there is a “Take me back to safety” button here. We liked the fact that this worked in all three of the browsers we had running (Chrome, Firefox and Safari).
When malware lands on the computer, the program reacts immediately as you would expect. It even automatically scans USB sticks on insertion, cleaning them without user intervention. We liked this, as it provides a level of protection that others do not offer by default.
Despite the vendor only claiming that it protects you against Windows and macOS malware, it had no issues discovering and cleaning Android malware too, offering a fully rounded solution here.
The only concern we have is when the package is presented with a lot of malware to clean. It performs this process just fine, but the messaging at the top right can be somewhat laboured, as each message is replaced by the next. There is room for improvement here, without resorting to the vertical stacking of messages which can somewhat overwhelm the screen on other packages. One status window that switches to “handling multiple issues…” would be clearer and more helpful here.
The messaging itself is clear, but it would be improved if there was a link to a virus encyclopaedia detailing each item.
What is it?
BitMedic is a paid-for antivirus product for macOS. It is purchased from the Apple Store, and cannot be bought or downloaded from the vendor’s website, unlike other AV products from competing vendors. There is no trial period. It appears that you can install it on multiple machines, providing they are logged into the same Apple Store account. There is a “Lite” version of the application available on the Apple Store, called BitMedic AntiVirus Lite, which is free to try. It lets you remove malware found in the first scan; the next time you run a scan and malware is found, you have to pay to remove it.
Product information on vendor’s website: https://www.antivirusmacapp.com/
Online support: http://support.pocketbitsllc.com/category/bitmedic-antivirus/
Overall
Clearly there is a strong AV engine at the core of this product. However, it is somewhat let down by the UI design, operational issues and rather confusing settings.
Part 1: Product Installation and Configuration
Installation is simple and straightforward, as you would expect from an Apple App Store purchase.
When you first run the program after installation, you get a five-page tutorial covering the main points of the app. The menu system is the default Mac app menu bar.
At this point, we started to have some doubts about the BitMedic app. The UI has some unusual “hi-fi style” slider buttons, and textual content, including the title bar, which was rather too small to read.
The “Antivirus test file” button takes you to a page where the EICAR test file is described, along with a button to initiate download. We note that this will only be detected by Bitmedic if the real-time protections is switched on, and the app itself is set to autostart (neither of these being default settings).
We were a little confused by the On/Off slider buttons and their labels; these have the On state with the slider to the left, as opposed to the more-or-less standard right=on configuration. We also found that the “Scan with BitMedic” menu item has no apparent effect.
Part 2: Ongoing Use
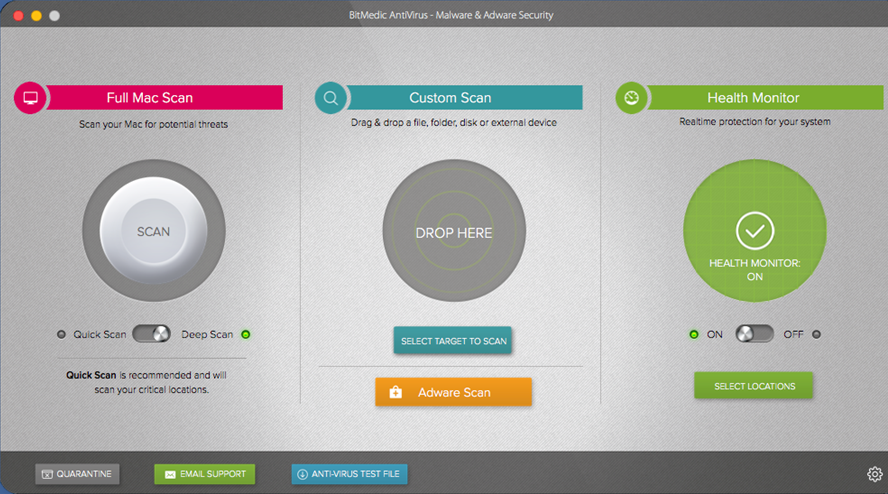
The UI is split between three large areas for scanning: full Mac scan, custom scan, and health monitor.
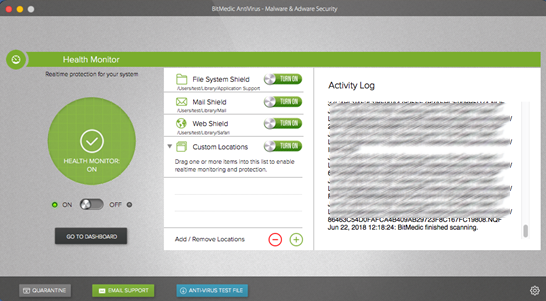
If you go into Health monitor and click on the small unlabelled Preferences button, then the Preferences window opens. Clicking on “open quarantine folder” opens a Mac file system folder view of the quarantine folder. You can drag and drop captured malware out of here with no intervention, although the quarantined items have their file extension replaced by “qua” so they won’t execute.
There was no automatic recognition of the plugging in of a USB stick. There was no real-time file system monitoring either, which meant that a user copying files to USB sticks could pass on malware to friends and family. On attempting to execute Mac malware, we did a full scan and it reported that OSX.Malware.Agent-1438593 was in the file /Application Suport/JavaW/JavaW, but its status for this malware was “Process Failed”. There was no other indication of what to do, or if the cleaning had been successful or not.
Finally, we tried the Adware Scan function. A window popped up saying “We will scan for all known adware and also remove your extensions, cookies and caches to restore your browser. Don’t worry, bookmarks and history will not be affected”. This seems a little excessive if you have known-good extensions in place.
What is it?
CrowdStrike is a multi-platform product for business. The product provides protection for Windows and Linux machines as well as macOS. It would be suitable for larger enterprises and organisations that use macOS devices. Please note that management is carried out entirely through a web-based console, and is effectively the same for any client PC, regardless of whether it uses macOS or another operating system.
Product information vendor’s website: https://www.crowdstrike.com/products/
Overall
CrowdStrike Falcon is very comprehensive platform, providing not only protection, but also detailed detection and analysis services. However, in our opinion it would require a significant investment of time to discover and make best use of its features, and so is very much aimed at larger organisations that can either train a dedicated team, or make use of specialised external consultancy.
Part 1: Product Installation and Configuration
The management console is cloud based, and so requires no installation or configuration. The client protection software is called a “sensor”, and is straightforward to deploy to clients by downloading from the console. You have to copy a checksum ID from the console, and execute the installer using the Terminal (command line). Once installed on a macOS computer, the sensor is effectively invisible to the user, i.e. there is no user interface.
Part 2: Ongoing Use
The cloud-based management console has a menu of buttons down the left-hand side, and this menu can be expanded by clicking on the Falcon icon at the top left. The major items are Activity, Investigate, Hosts, Configuration, Dashboards, Discover, Intelligence, Users, Support.
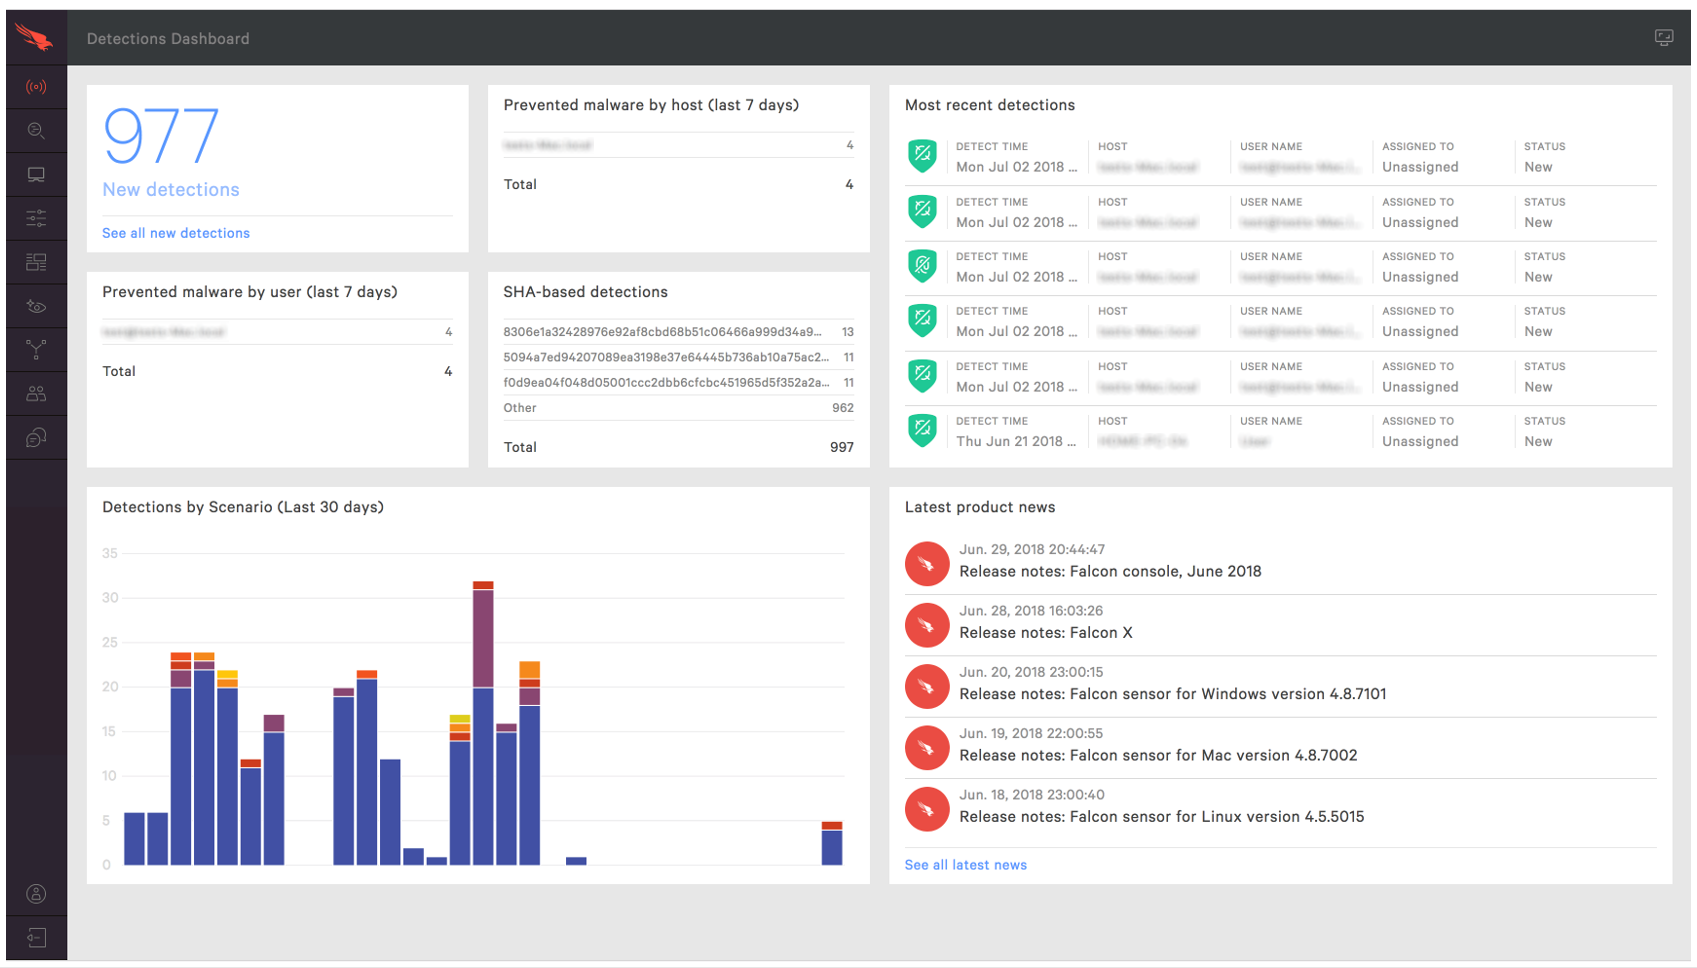
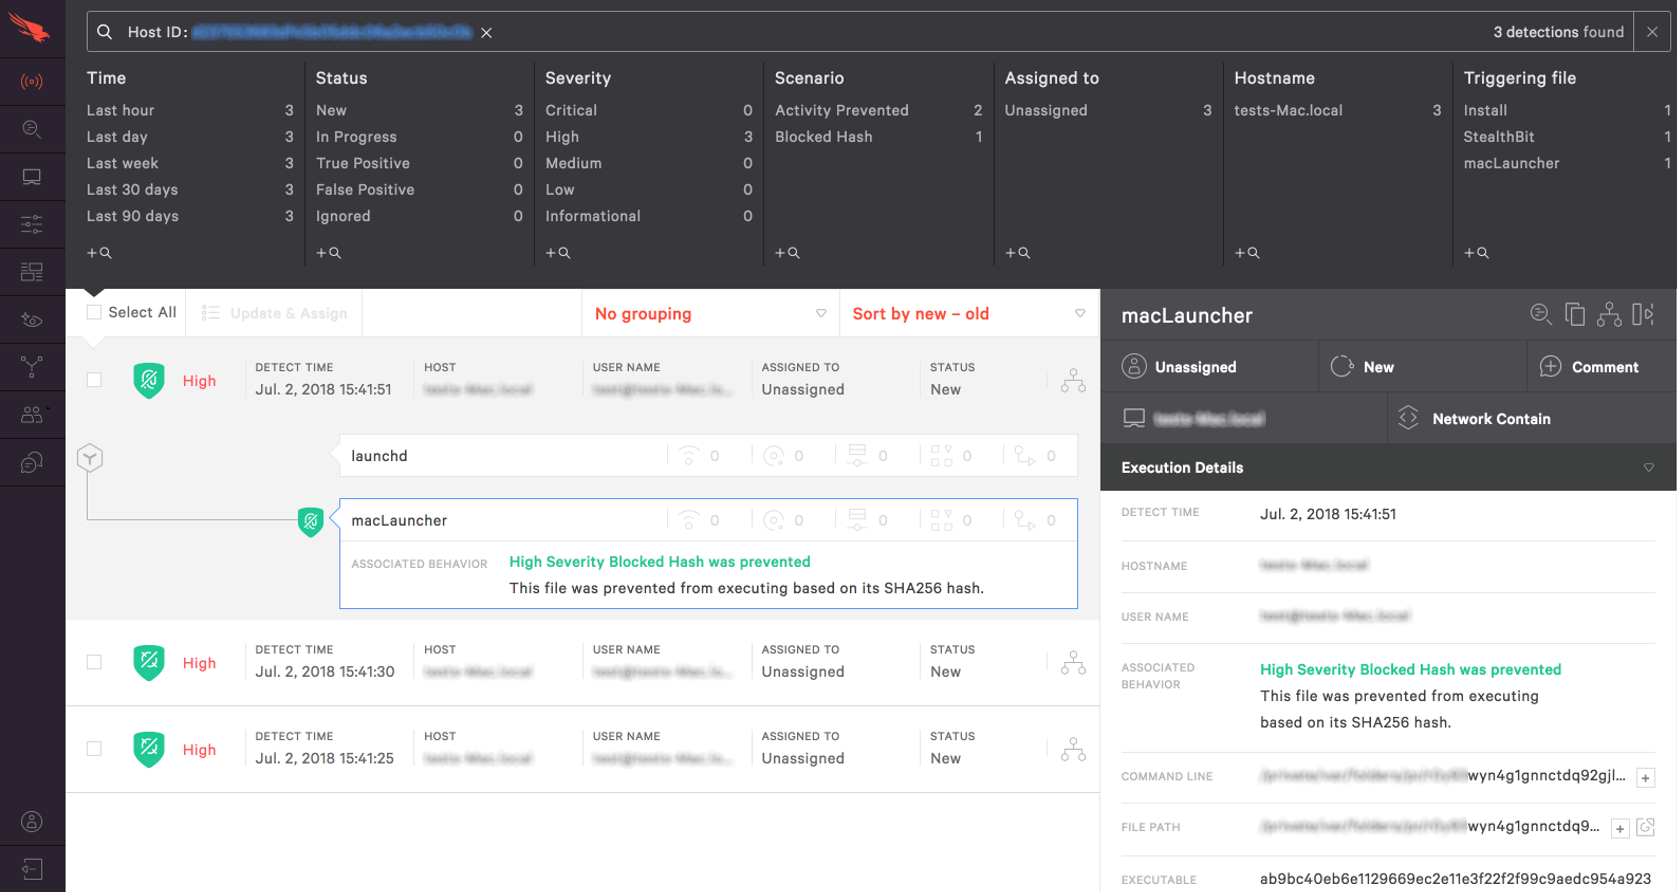
Activity is a dashboard, which provides a good overview of the most important items with clear graphics. You can see detections by scenario over the last 30 days, and you can drill down into the Detections submenu to get more detail. There is a strong reporting infrastructure, with good filtering options prominently presented. You can also check quarantined files and real-time responses.
The Investigate menu has a comprehensive search facility, covering hosts, hashes, users, IP addresses, domain and event searching. This lets you locate specific issues on the network, and allows you to set the time period to be investigated.
The Hosts menu provides an overview of client installations, by version and platform, and shows which clients are offline or disconnected. From here, you can go to the Sensor Download menu and download sensor installations for all the platforms.
The Configuration menu controls the policy-driven process within CrowdStrike Falcon. It lets you create policy definitions, covering the entire AV and prevention functionality of the platform, which can then be applied to groups of clients. You can set different policies for Windows and Mac clients.
The Dashboards menu shows the executive summary view of the estate, with detailed graphics for detections by scenario and severity, and identifications of the top 10 users, hosts and files with most detections. You can also get comprehensive details of what is happening in any area. It is possible to search using a wide range of relevant items, and use this to discover what has happened on the network during an outbreak, such as where malware entered, how it was attempting to execute, what processes it was using, and how it was contained. Administrators who understand the platform well have a very powerful set of audit and analysis tools here.
The Discover menu lets you explore the network by application inventory, asset, MAC address, accounts and other app/process-based inventory.
The Intelligence menu displays an overview of the current AV threat landscape according to CrowdStrike. This can be shown by geographical origin of threat, target industry, target country, and even the suspected motivation (e.g. espionage, criminal, Hacktivist or destruction). Each threat is detailed by these parameters, and clicking “View Profile” on the threat provides a comprehensive analysis and explanation of that specific threat. This is a comprehensive resource, which is unusual and most welcome.
The Users menu lets you create user profiles for console administrators and other management roles within the organisation. There are pre-built user profiles already created for Endpoint manager, Event Viewer, Administrator, Analyst, Investigator, Real Time Responder etc, allowing you to map these roles to existing company structures, or to custom build new roles as required. Two-factor authentication appears to be mandatory for all logins here, and this needs to be considered as part of the deployment design.
Finally, there is a comprehensive help and support function within the product, as well as the Intelligence capability.
What is it?
F-Secure Safe for Mac is a paid-for AV product for macOS. You can buy subscription bundles covering a number of computers, and these can be a mix of device platforms. Purchasing the license is straightforward, and the main installation is not complicated.
Product information on vendor’s website: https://www.f-secure.com/en_GB/web/home_gb/safe
Online support: https://www.f-secure.com/en_GB/web/home_gb/support
Overall
This is a strong product with a well-designed UI and capabilities. The setup and configuration could be more complete, but the only significant area of concern are the browser extension installations. Operationally, the product is easy to use, catches the malware and does a strong job of handling issues thrown at it. Parts of the UI could be clearer, especially around the Firewall capability. The help documentation is comprehensive, but we found some issues with it on specific areas of the functionality. The online web console is useful for managing the accounts and licensing, and to help with installation and deployment, but we would have liked to see the opportunity for a remote initiated update and scan to be delivered to the client. This would allow better control in a home environment, with a parent ensuring that a child’s computer is up to date. Or in a small business environment where an IT manager wants to ensure a travelling salesman is kept safe. “My F-Secure” doesn’t currently allow access to the family web filtering settings on Mac computers, though this is scheduled for later in 2018. Overall, it is a strong product that works well.
Part 1: Product Installation and Configuration
Purchasing and installing the app is not complicated, and the easiest route for installation is to log into My F-Secure and choose to install onto the current machine. This downloads the appropriate installer, which can then be run.
One criticism that can be raised here is that the F-Secure web pages are really quite opaque as to what functionality you get, especially when comparing a cross-platform suite such as SAFE. There is an online tool which allows you to select capabilities important to you, and the website then recommends a product. SAFE claims to cover the areas of antivirus, browsing and banking protection, family rules and ransomware protection. A comparison page can be found here: https://www.f-secure.com/en_GB/web/home_gb/compare-products
Part 2: Ongoing Use
Once you have the product installed, it is a quiet application in normal operation. There is an icon on the top menu bar, and this gives access to the main window. You can also access preferences, malware scanning, updating and reporting from here. Usefully it also tells you that your computer is protected and when it was last updated. The main application window is clear and easy to operate. There are three icons on the left-hand side. Antivirus takes you to a status page which gives an overview of the current system status, and tells you if the subscription is active. The Scan button starts a scan of the system.
The Tools icon brings up a menu selection of icons to choose from. Virus Scan is the same as Scan on the Antivirus page. “Choose what to scan” lets you choose a file or folder to scan. Check for updates causes the app to look for signature updates and to apply them if necessary. Infection report is the F-Secure term for looking at the quarantine folder. Submit a Sample opens a web page where you can send a file to F-Secure for analysis by their experts. There is one somewhat confusing feature here – Firewall. This allows you to turn the Mac firewall on and off. However, you might not realise it has worked, as the setting shown in the dialog box is only updated after some time. F-Secure tell us you can usually see the change immediately if you quit System Preferences and open it again.
The Preferences button opens the preferences panels. Most settings here are locked to prevent accidental status changes, which we liked. It is possible to temporarily disable the real-time scanning for a fixed period of time, default being 5 minutes. On the Browser Protection tab, you find that browser protection has been enabled, as is banking protection. It isn’t clear what “banking protection” actually does, and the help file doesn’t make this clearer. When you visit a known banking site, the system tells you that it is a banking site, so it is certainly recognising this. But what extra protection is offered is not clear at all. Browser protection requires the installation of browser extensions. These are not detected and installed as part of the application installation which is disappointing, nor does it make it obvious to the user that the browser extensions need to be installed and enabled. Pressing the Install Browser Extension button does do the installation work for you, but this should be automatic and much more obvious.
The Parental Control tab lets you turn on content filtering. There are the usual groups of definitions that a parent might want to exclude, including Weapons, Violence, Gambling, Drugs, Date, Adult and so forth. Parents should note that they must not let the child use a macOS admin account, or know the password to such an admin account, as otherwise he/she can unblock a banned site just by clicking “Allow web site”.
Finally, the “My F-Secure” button takes you to the online My F-Secure website where you can manage licenses. We would have liked some means to remote manage clients here, for example being to initiate a scan on a family member’s computer. One item which is not clear is that the My F-Secure status item for a Mac says that “Family Rules” is not available: “This device does not support Family Rules”. On a Windows machine, you can control the Parental controls remotely from the My F-Secure account, but not Mac devices. It’s possible that the feature has been added to the client but not made it through to the administration cloud services page yet.
What is it?
Intego Mac Premium Bundle X9 is, as the name suggests, a collection of tools. It is a paid-for product. There are bundle offers for 1, 3 and 5 computers, and for 1 or 2 years of subscription.
Unusually, Intego charges a premium for having both Windows and Mac support in the license. They state: “Intego offers the option for a Dual Protection version of our products that allows you to get protection for both your Mac and Windows computers. We partner with Panda, a Windows antivirus protection company, to provide Windows protection. When you select Dual Protection, you get an additional license for 1 Windows computer in addition to the number of Mac computers chosen.” From this we presume that if you buy 3 Mac licenses you get 1 Windows license in addition if you choose this extra item.
Product information on vendor’s website: https://www.intego.com/mac-protection-bundle
Online support: https://www.intego.com/support
Overall
There is quite a lot to like in this product. However, it appears a little of a “bundle of items” rather than a wholly integrated security platform. Although we like the facility to check that the built-in security capabilities provided by the modern browsers has been properly implemented, we would have been happier with a set of browser extensions provided by Intego themselves. The other functionality in the bundle is definitely useful. As such, there is a lot to find of value in this package.
Part 1: Product Installation and Configuration
Purchasing and installation is straightforward. There is a demo version of the tool bundle, but some components are somewhat limited in their capabilities. We examined the fully licensed version. Rather unusually you can have software for both Mac Windows and versions in the license bundle. This is enabled by a deal with Panda for the Windows version, and is at additional cost. The purchasing process is simple enough. However, we noted that the license auto-renews by default, with no option to disable this at purchase time. Also, Intego charge an addition £2.95 to extend the download period from a few days to the full year of the license. We prefer downloading to be available for the entire lifetime of the license at no additional cost.
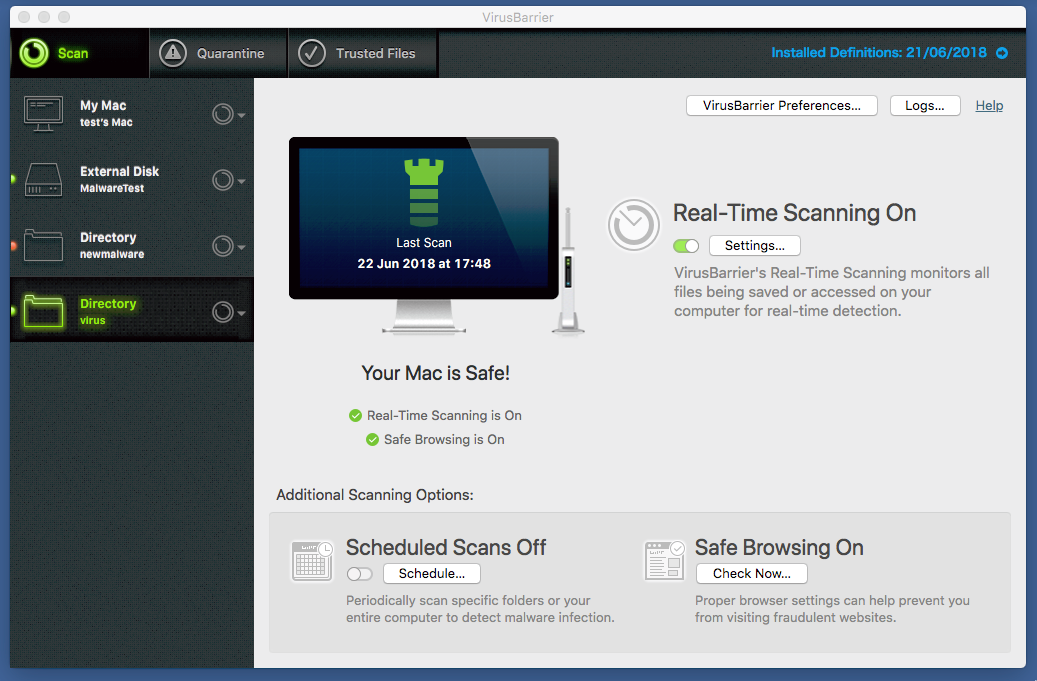
Installation is quite straightforward. As the name suggests, this is a bundling of tools into one package. The main app is called VirusBarrier, and this is the AV package. There are other components too, called ContentBarrier which is a parental control content filtering solution. NetBarrier is a firewall. Personal Backup is a backup and recovery application. And the rather cutely named Washing Machine is a clean-up tool for your Mac. Once the package is installed, the main window for VirusBarrier can be opened. We immediately noticed that we had some issues reported with Safe Browsing. The app indicated that Safe Browsing was not enabled. In fixing this, we were taken to a UI where it was shown that our browsers were not in safe browsing mode. We initially expected this to mean that we needed to install extensions, to provide in-browser filtering, safety and security in the usual way. However, this was not the case – the Safe Browser tool within Intego simply checks the browser settings to ensure that the built-in protection filters are enabled. In Chrome for example, this is found in chrome://settings, Advanced and check the “Protect you and your device from dangerous sites”. Whilst we like the fact that Intego is checking these settings in Chrome, Firefox and Safari, it should be clear that Intego is not adding additional security capabilities itself.
Part 2: Ongoing Use
In operation, there is little to see of the Intego apps, as you would expect. The top menu icon allows quick access to the various components of the application bundle. The main VirusBarrier window is quite straightforward. Across the top, you have buttons selecting Scan, Quarantine and Trusted Files which work as you would expect. And there is a status line telling you of the date of the installed definitions.
In the scan window mode, the left-hand side holds pre-cooked definitions of scans. For example, My Mac, External Disc and so forth. You can add to this with directories or files to allow for rapid access. As you would expect, you can right click on a file, folder or drive to initiate a scan. Each scan can have its own settings. By default, it detects Mac malware, but it can scan for Windows malware, Linux malware, Malicious scripts, Hacking tools and Keyloggers. In addition, you can set the scan to look inside archives. Scheduled scanning is possible, but this is disabled by default. In basic mode, it looks like you can only set up one scheduled scan, but if you choose the Advanced button the window expands to allow for multiple definitions.
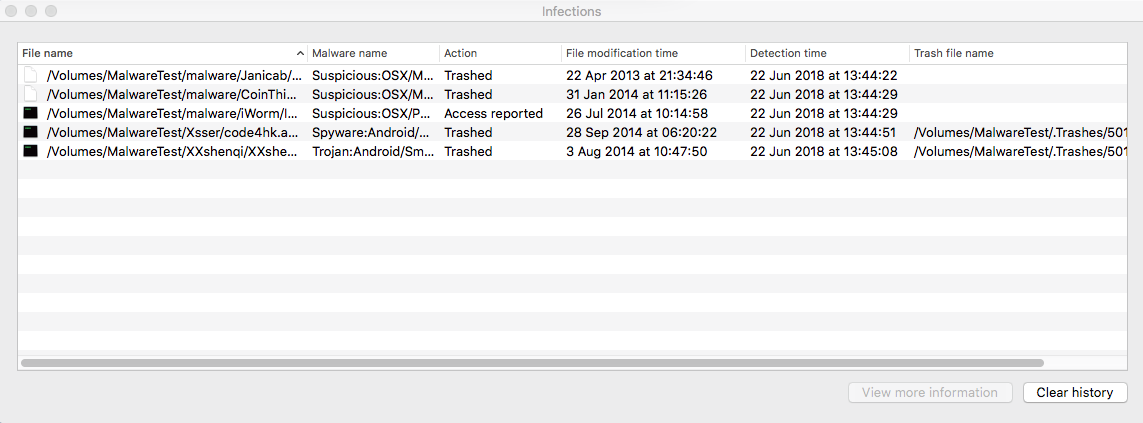
When you introduce malware to the system, you don’t get notifications in the usual notification area at the top right. A window pops up with a rather non-descript list of the malware found and its contents. By default, the app does not clean anything. It offers to Trust, Quarantine or Repair the file, with Repair being the default. We would have liked to see automatic options here, especially for the less technically-minded users. In addition, it is possible to push the warning window back in the Z order, so it can become obscured by other windows. A slightly more proactive and nagging UI here might benefit users.
It is not clear whether the quarantine facility is actually a locked-away quarantine. If you select a quarantined item, it shows the path to the malware at the bottom of the window. Double click on this, and the file system browser is opened at that point, showing the malware. It appears to be more of a holding list of malware found rather than a secure quarantine.
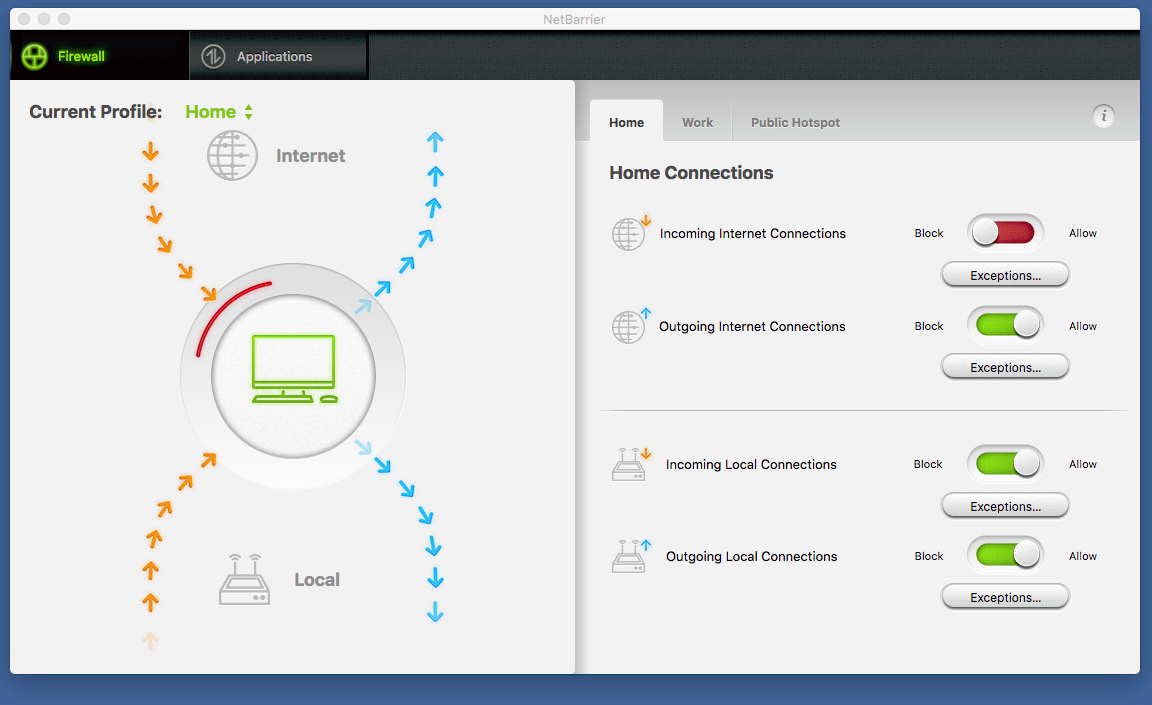
The other items in the bundle are useful tools too. Netbarrier is a firewall, with a particularly graphic view of network traffic. Washing Machine can help you look for space that can be reclaimed on your system, by hunting down duplicate files for example. Personal Backup can create backups of your system over the network or to local devices, and claims to be able to make these backups bootable too. However, the value proposition here is somewhat muted when compared to the built-in capabilities of Time Machine, for example. It would help if Personal Backup offered support for backup to cloud. Content Barrier lets you put filtering in place both for web content, but also for scheduled time access, chat access, and to block applications too. Finally, it can take snapshots of the screen taken at prescribed intervals (e.g. all windows every 3 minutes), and to record keystrokes too.
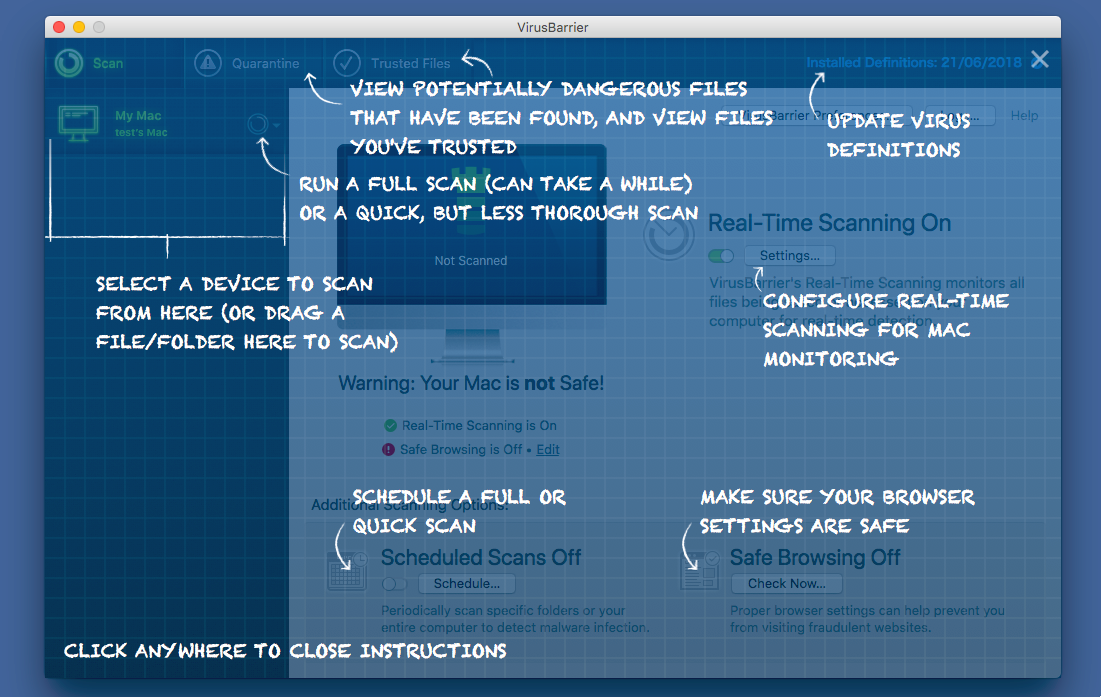
Built-in help is reasonable, and we liked the use of a “crayon drawing” overlay when you first open an app, to point out the major functions and features.
What is it?
Kaspersky Internet Security for Mac is a paid-for antivirus product for macOS. It is available as a standalone package, or as part of Kaspersky Internet Security and Kaspersky Total Security packages. Kaspersky Internet Security for Mac aims to protect you from malware, viruses and phishing attacks. It has extra security features for when you are doing shopping or online banking, and has parent control features too. An intrusion detection system, called Network Attack Blocker, is also included.
Product information can be found at: https://www.kaspersky.co.uk/mac-security
Overall
Clearly this is a solid and well-thought-out product. It operates in a calm, efficient manner, and provides the core functionality that you need. It performs a solid installation, and doesn’t force you to install additional capabilities that you might not need or want. In daily operation, it works very well, and the user interface and general experience is positive. We liked the carefully designed UI which informs without being patronising, or overly complex. We liked the cloud-based management console, and clearly this allows a family or small business to view, manage, update and control their devices. As such, it must be a solid recommendation.
Part 1: Product Installation and Configuration
Installation is simple enough and quite straightforward. In accordance with privacy laws, Kaspersky Lab goes to great lengths to get user consent for its privacy policy and data settings. The installer runs and asks for license credentials. The install process continues and takes little time. We liked how it prompts you before installing the browser extensions and provides good handholding here. This is welcome for the more beginner-level user. Browser extensions are provided for Safari, Chrome and Firefox. Finally, during install you are asked if you want to install Kaspersky Secure Connection, which is a VPN tunnel product, and Kaspersky Password Manager.
You also set up a My Kaspersky account. This is useful because it gives a cloud-based overview of the licenses that you have deployed. In addition, you can remotely manage devices. For example, for our macOS installation, we were able to schedule a Full Scan, Quick Scan, Update and also manage settings through the Components panel.
Part 2: Ongoing Use
As you would expect, there is a menu bar item which provides a drop-down list of common tasks. The first is to open the main application window. You can turn protection off, although you have to enter the macOS administrator password unless you are using an admin account. The menu gives easy access to the main functions, and also allows you to quit the app if required. If you are in the file system view on the desktop, you can right click and choose “Scan with Kaspersky Internet Security” on any file, folder or drive object.
The first thing that strikes you about the main Kaspersky product window is its clean and obvious user interface. It uses colour carefully in a traffic-light arrangement to immediately provide reassurance that all is well, or to highlight issues that need resolving. There are four main buttons: Scan, Update, Privacy and Parental Control.
The Scan window that appears gives you a target on which to drop any file or folder, which will then be scanned immediately. Or you can initiate a full scan, a quick scan or set up a scheduled scan. We liked the scheduled scan capabilities, allowing separate schedules for quick and full scans. And you can choose Weekdays, Weekends, Every Day, or choose particular days of the week, all along with a chosen time. The Scan History panel shows the results of recent activity, and you can easily drill down through this to get to the results of what happened. The Reports page is resizable, which is useful, but it would have been helpful to have encyclopaedia links to the defined malware, to provide more information.
The Update window is simple to use. It tells you that the databases are up to date, and also when they were last updated, so you are reassured that it is recent. Again, you can easily drill down to a report window that logs when updates were applied, and then dig even deeper to get the record of which definitions were affected.
The Privacy tab brings together some straightforward tools: block webcam and block website tracking. It also gives easy access to the Password Manager and Secure Connection components if these have been installed and enabled.
Finally, Parental Control opens a new operational window where you can define all the usual levels and types of parental control for a user. Although there is a fine set of definitions and locks here, it would have been even better if there was a predefined set of child definitions. For example, to be able to select “under 5 years” or “11 years and above” to help set starting values. The Reports tool here is useful, and allows a parent to monitor and then engage with the child about sites visited.
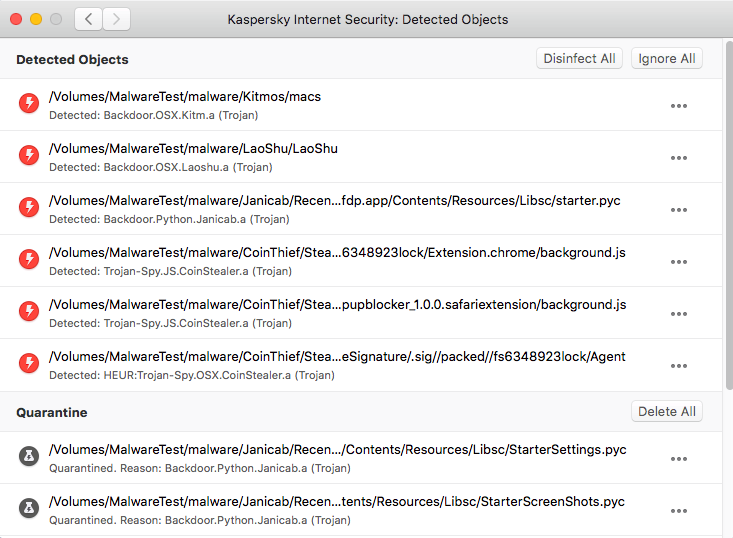
We placed some macOS malware onto the test computer, and asked Kaspersky to scan the files. It immediately sprang into action, and provided a clear report of what was happening. Please see screenshot below. By default, the program attempts to disinfect the computer, and we found this to be efficient and effective. It provided the right balance between alarm and reassurance to the user.
Visiting known phishing sites brought up clear and obvious warnings, against a stark black background. The user is offered the choice to ignore the alert or to go back. We also liked the analysis of web pages, which highlighted bad sites directly within the web page itself.
We liked the on-screen keyboard, and the ability to tap out a password instead of using the keyboard, in case keylogger malware was present.
What is it?
Trend Micro Antivirus for Mac is a paid-for antivirus product for macOS. It is available as a standalone product, and as part of the Maximum Security package, which adds in Windows, macOS, Android and iOS support. Trend Micro claims that Antivirus for Mac will protect your email, avoid web threats, stop malware and allow you to browse safely.
Product information on vendor’s website: https://www.trendmicro.com/en_gb/forHome/products/antivirus-for-mac.html
Online support: https://esupport.trendmicro.com/en-us/home/pages/technical-support/
Overall
We are left with mixed thoughts regarding Trend Micro Antivirus for Mac. On the one hand, it is an effective antivirus product for the macOS platform, and has a good range of capabilities. On the downside, there are aspects of the installation and daily use which we feel could be improved. A few small changes could significantly improve the usability of the product. At present it feels a little incomplete and lacking in a coherent design and operational strategy.
Part 1: Product Installation and Configuration
Purchasing is quite straightforward, although the current range of special offers and discounts can make the choice rather difficult. There is a temptation to buy one of the bundle offers, even if you don’t have an Android phone, for example. This is not helped by the setting up of auto-renewal of the subscription by default. So, although you might be buying a larger product than you need, at a low first year price, the auto-renewal price might be higher. It is not detailed what the auto-renewal price will be at the end of the year. We purchased a license for the straightforward Antivirus for Mac for one computer for one year. Turning off auto-renewal as part of the purchasing process is not difficult, and for that Trend Micro are to be applauded.
Trend Micro offer a backup disc option at extra cost, but this is optional and not placed in the basket by default.
Payment and download of the package is straightforward with no issues.
Installation is mostly quite straightforward. Walking through the setup process is relatively easy, and few users will have issues. We did receive a warning on installation that “Trend Micro Antivirus is not optimised for your Mac”, indicating that the app might contain 32-bit components. This is a new warning that Apple issues on app install since macOS 10.13.4. We are confident that Trend Micro will update the installation package to rectify this.
Installing the browser extensions is quite straightforward, and there is handholding for this.
During setup, you are asked if you want to set up Folder Shield. This is a tool which monitors key areas of the disc for malware apps that try to make unauthorised changes to data files (ransomware).
At the end of the installation, we opened up the app and discovered that it needed updating, according to the dialog box that was presented to the user. Although it was no problem choosing the update function, it would have been nice for either the download to be up to date, although Trend Micro tell us that the app will automatically initialise an update about 10 minutes after the setup is completed.
Getting to the support area seems to require a Trend Micro account. Unlike other apps which offer an element of cloud control, we found no such capability in the Trend Micro cloud platform after logging in.
Part 2: Ongoing Use
As you would expect, there is a status icon in the top bar of the screen. This gives access to Scan Now, Update Now, Open Trend Micro Antivirus, Open Preferences, Open Help, an on/off selector for Detect Web Threats, and Shut Down Trend Micro Antivirus.
As soon as you open the app and start looking at settings, you notice that the app is locked down against casual fiddling, and that you have to enter a password to unlock each page to make changes.
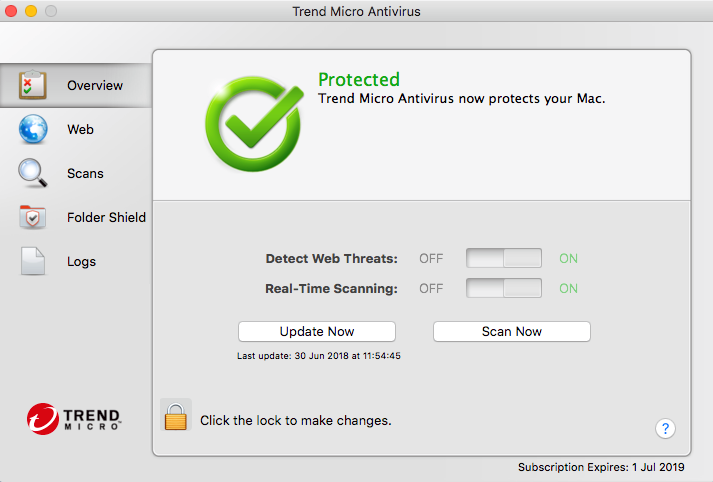
The main application window is quite straightforward, with a clean and clear user interface. On the left-hand side is a set of menu items, starting with Overview. This gives a quick view of the status of the app, and allows you to run updates and perform scans.
The Web menu gives access to an overview of the Privacy Scanner, which claims to “check your privacy when you share information on Facebook, Google, Twitter and LinkedIn”. The Web Threat Protection element protects you against fraud, malicious software and other threats. The Website Filter is a straightforward parental control filter, which is disabled by default. It has pre-sets for Child, Teenager, Mature Teenager, Adult and Custom settings.
The Scans menu entry allows access to Smart Scan, Custom Scan (which is essentially a files and folders picker), and Full Scan. You can also change the defaults here: for example, it is set up to do a scheduled scan every month on the 15th at midday. Some might prefer a more proactive scanning rate, but this can be set. Scanning compressed files is off by default but can be enabled.
The Folder Shield menu is the tool which prevents mass file encryption by malware. It is set up to monitor the Documents, Music, Pictures and Movies folders by default, but you can add other folders as well. And it can monitor connected USB devices too.
Finally, the Logs menu shows you what has happened.
Introducing malware to the system has a mixed response. Firstly, there is no right click feature to scan a file, folder or drive: you have to use the Trend Micro menu system, or drag a file/folder to the main Trend Micro program window. Secondly, there is no on-access scanning on copy, so it is possible drag malware from a USB stick onto the desktop untouched.
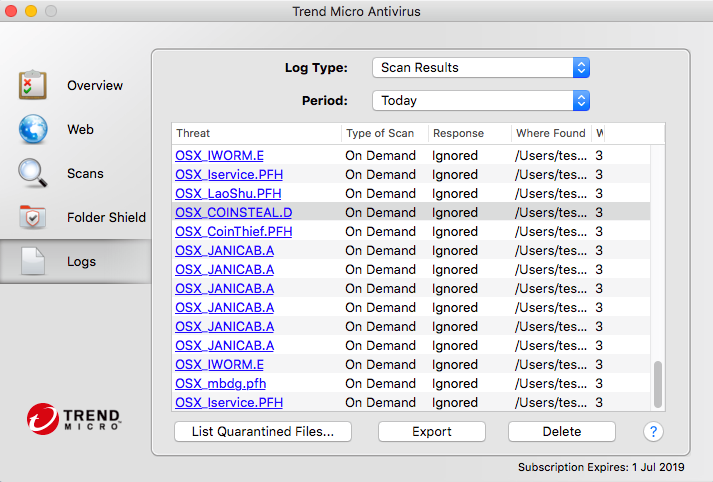
However, our biggest concern is what happens when you scan malware. It efficiently scans the malware test folder, and reports that there is malware. However, this is a very muted dialog box and certainly doesn’t project any level of concern or worry to the user. Worse still, if you choose the View Results link, you get a view of the log file. This is not a resizable window, and it is much too small for the amount of information it is trying to display. You have to try to resize the columns to fit within the fixed window, and this is awkward. Trend Micro tell us that it is possible to export the information as a .csv file, however.
We were not particularly impressed with the application reporting that numerous pieces of malware were detected but “ignored” in the Response column. The report window does highlight each malware type as a clickable URL to take you into the antivirus encyclopaedia at Trend Micro. However, for each item of malware that we clicked on, the Trend Micro website reported that it had no information for that malware type, which was a considerable disappointment. Trend Micro inform us that they have made improvements to the handling and reporting of malware in a later build (8.0.3055).
The lack of phishing support via extensions for Safari was disappointing, but the extensions for Firefox and Chrome appeared to work well. The report page for an attempted phish was clear and obvious, and offered to ask Trend Micro to review the page for you.
The lack of a significant cloud-based management console is a disappointment for the family user.
What is it?
SecureAnywhere is a paid-for antivirus product available for macOS and Windows. It is available in three bundle versions: the straightforward SecureAnywhere package itself, then SecureAnywhere Internet Security Plus, which adds in support for tablets and smartphones, along with logins and password support. Finally, there is Internet Security Complete, which adds in 25GB of secure online storage for backup and recovery, and tools for removing any traces of online activity.
Product information on vendor’s website: https://www.webroot.com/gb/en/home
Online support: https://www.webroot.com/gb/en/support/support-home
Overall
This is a solid, easy-to-use product that delivers a quality, polished experience for the user. We liked the core AV functionality, along with the antiphishing feature. As is often the case, the value of a cloud backup solution and a password manager must be weighed against the use of existing specialist products. Some users might prefer to be running TimeMachine for local recovery, and a tool like 1Password or Dashlane for password management. However, if you don’t have these items in place, then the built-in functionality is worth considering. Overall, the program has very many good points, and impresses with its confident functionality.
Part 1: Product Installation and Configuration
Purchasing and installation is straightforward. We purchased the SecureAnywhere Internet Security Complete package, and found the process straightforward. Downloading is easy, and you run the installer in the usual way. As is the case with most security packages, you have to explicitly authorise the package in System Preferences to allow the security modules to be registered with the operating system. At the end of the installation, a scan is run against the computer, which we liked. It is always good to have confidence that you are starting from a known clean state.
As part of the setup process, the relevant extensions are loaded into Safari and Chrome automatically. You simply need to authorise their deployment, but this is straightforward. There is an equivalent extension for Firefox. Please note that if Firefox is running when the extension is installed, you will have to restart the browser before you can use it.
You don’t have to create a Webroot account, but it is useful if you are managing multiple machines. And since you get 5 as part of the license, it makes sense to use this. Setting up an account is quite straightforward, and we were impressed by the account security used – not only do you need a username and password, but also a security key number from which two characters are chosen at random during login. Managing devices from the console is simple and definitely worth using. A licensed computer automatically registers with the cloud account here, but this can take some time for a device to become visible. We found it taking upwards of an hour for a test machine to register. Patience is rewarded here.
Part 2: Ongoing Use
Like most macOS AV packages, there is a status item in the top bar. This allows you to open Webroot, scan the computer, remove threats, shut down SecureAnywhere and pause the Secure Keyboard Entry. We were a little surprised to see that the SecureAnywhere package could be shut down without requiring an appropriate password, at least by default.
Accessing scanning on a daily basis is simple, and can be done via the usual right click function on any file or storage folder or drive.
The main SecureAnywhere window is quite straightforward in operation, and has a strong green design theme. The default settings are good and everything is enabled. Backup & Sync, and Password Manager were not enabled in our package.
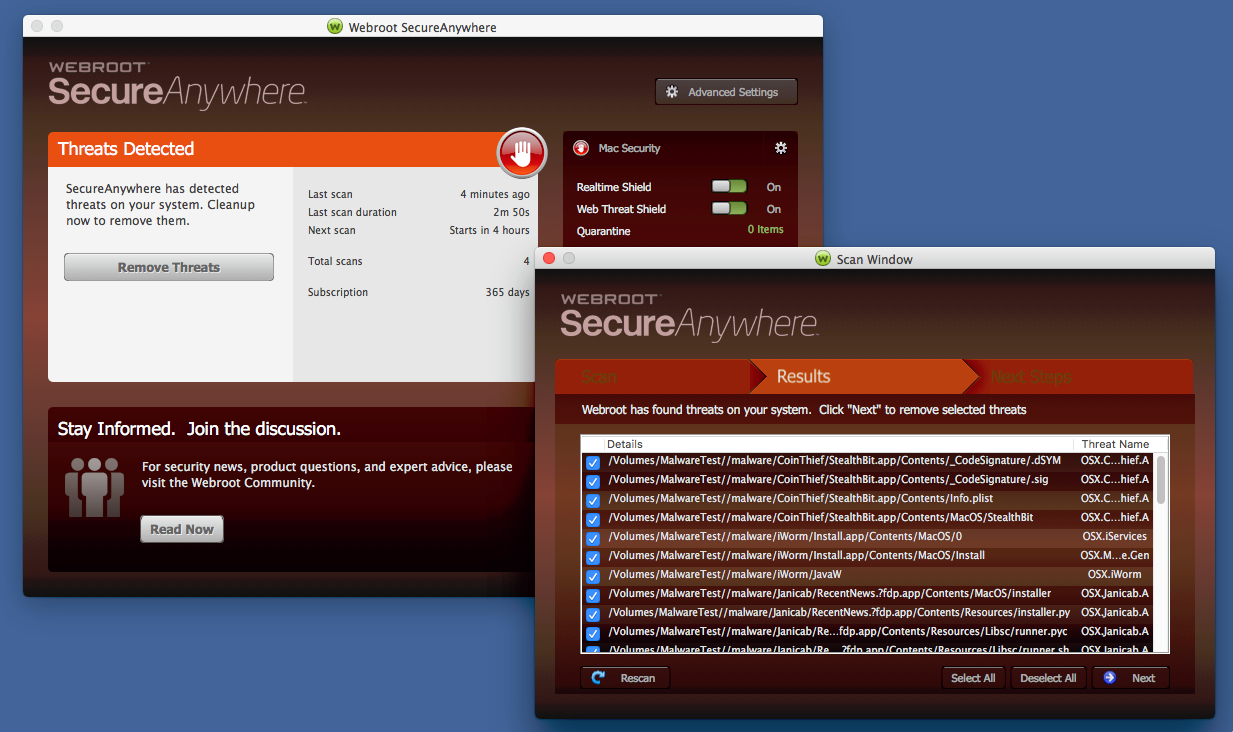
The main window has a large button for “Scan My Computer” and this immediately initiates a system scan. The Scan page is clear and allows you to cancel at any time. The Results page is clear, and hopefully tells you that the system is clean. There is a third tab, Next Steps, which appears if problems are detected.
By default, there is no automatic scan on insertion of USB devices (although this can be enabled in the settings). When we ran a manual scan of a USB stick loaded with macOS malware, the main application window almost immediately turned red and indicated that there were issues. We chose the option to resolve the issues automatically, and after that a full system scan was run again to ensure that the machine was clean. Once this had completed, the software returned to its normal green look and feel, showing that there were no issues.
There is one minor inconsistency in this model. If Webroot’s real-time protection picks up malware being copied from external drive to desktop, the alert window displayed is green. Webroot tell us that this will be rectified, however.
Moving to the rest of the user interface, there is a vertical stack of items on the right-hand side. At the top is Mac Security, along with a configuration button. By default, all of the settings should be adequate here. Then there is Identity Protection, which is the built-in anti-phishing service. We tried this against known phishing sites and found it to offer clear and concise warnings to the user, with no possibility of confusion. It is possible to submit the URL to Webroot for a review of the security rating of a site, which is useful in the rare case of a false positive.
Then there is Backup and Sync, which uses the bundled 25GB of cloud storage. Password Manager is next, followed by Utilities which covers System Control of processes, and Reports of activity within the package.
The My Account button gives information about the current version of the app, and the remaining subscription. Finally, Support/Community takes you to the online help capability.
Real-World Protection Test Enterprise March-June 2018 – Testresult
Performance Test June 2018
Business Security Test 2018 (March – June)
What is it?
Cloud-console managed endpoint protection solutions. The portfolio consists of three products: Antivirus, Antivirus Pro, and Antivirus Pro Plus. Antivirus is a full-featured antivirus solution for SMBs; Antivirus Pro additionally includes automatic software updates, data shredding to permanently delete files, and extra security for Exchange and SharePoint servers. Antivirus Pro Plus provides additional data and identity protection to secure users and connections in open and public networks. The product is available for Windows client, server and macOS. There is no mobile device support available.
Product information on the vendor’s website: https://www.avast.com/managed-antivirus
Online support: https://www.avast.com/business-support
Summary
A strong product aimed at the small to medium-sized business looking for a solution that requires no onsite server component. It focusses on the Windows client and server, and the macOS client, but doesn’t offer mobile support. The UI is clear and clean, and the defaults are sensible for the smaller organisation. A non-technical user should not have any problems deploying this to their collection of Windows desktops, servers and macOS devices within their organisation and then keeping track of what happens. It’s probably aimed more at the smaller end of the organisational size, but still has grouping and profile capabilities to protect the larger estates. The product was liked as a straightforward platform. The lack of integrated control of Android devices is probably the only significant limitation compared to other small business products.
Part 1: Product installation and deployment
There is no server component to install because it is run from a cloud-based console. You create the account, apply appropriate licensing, and then add devices. Deployment is via an installer package which can be downloaded for manual sharing and installation, or by sending a download link via email. The installer is offered in two sizes – a Light version which is around 6MB which then pulls the rest of the install from the cloud when running; or the full version, around 300MB, which has no subsequent download requirement to complete. The former is ideal for smaller networks, the latter is better for larger deployments to minimise internet traffic. The client installs a straightforward client onto the machine. The user can interact with the client to run daily tasks.
Part 2 – Ongoing use
Starting with the client, it offers a wide range of capabilities, very similar to a normal end-user desktop solution. There is a Status panel, and then a Protection panel which contains a range of tools. Scans, Wi-Fi Inspector, Firewall, Core Shields, Software Updater, Virus Chest and Sandbox are found here. The central policies determine what can be changed or adjusted, but there are still useful functions here.
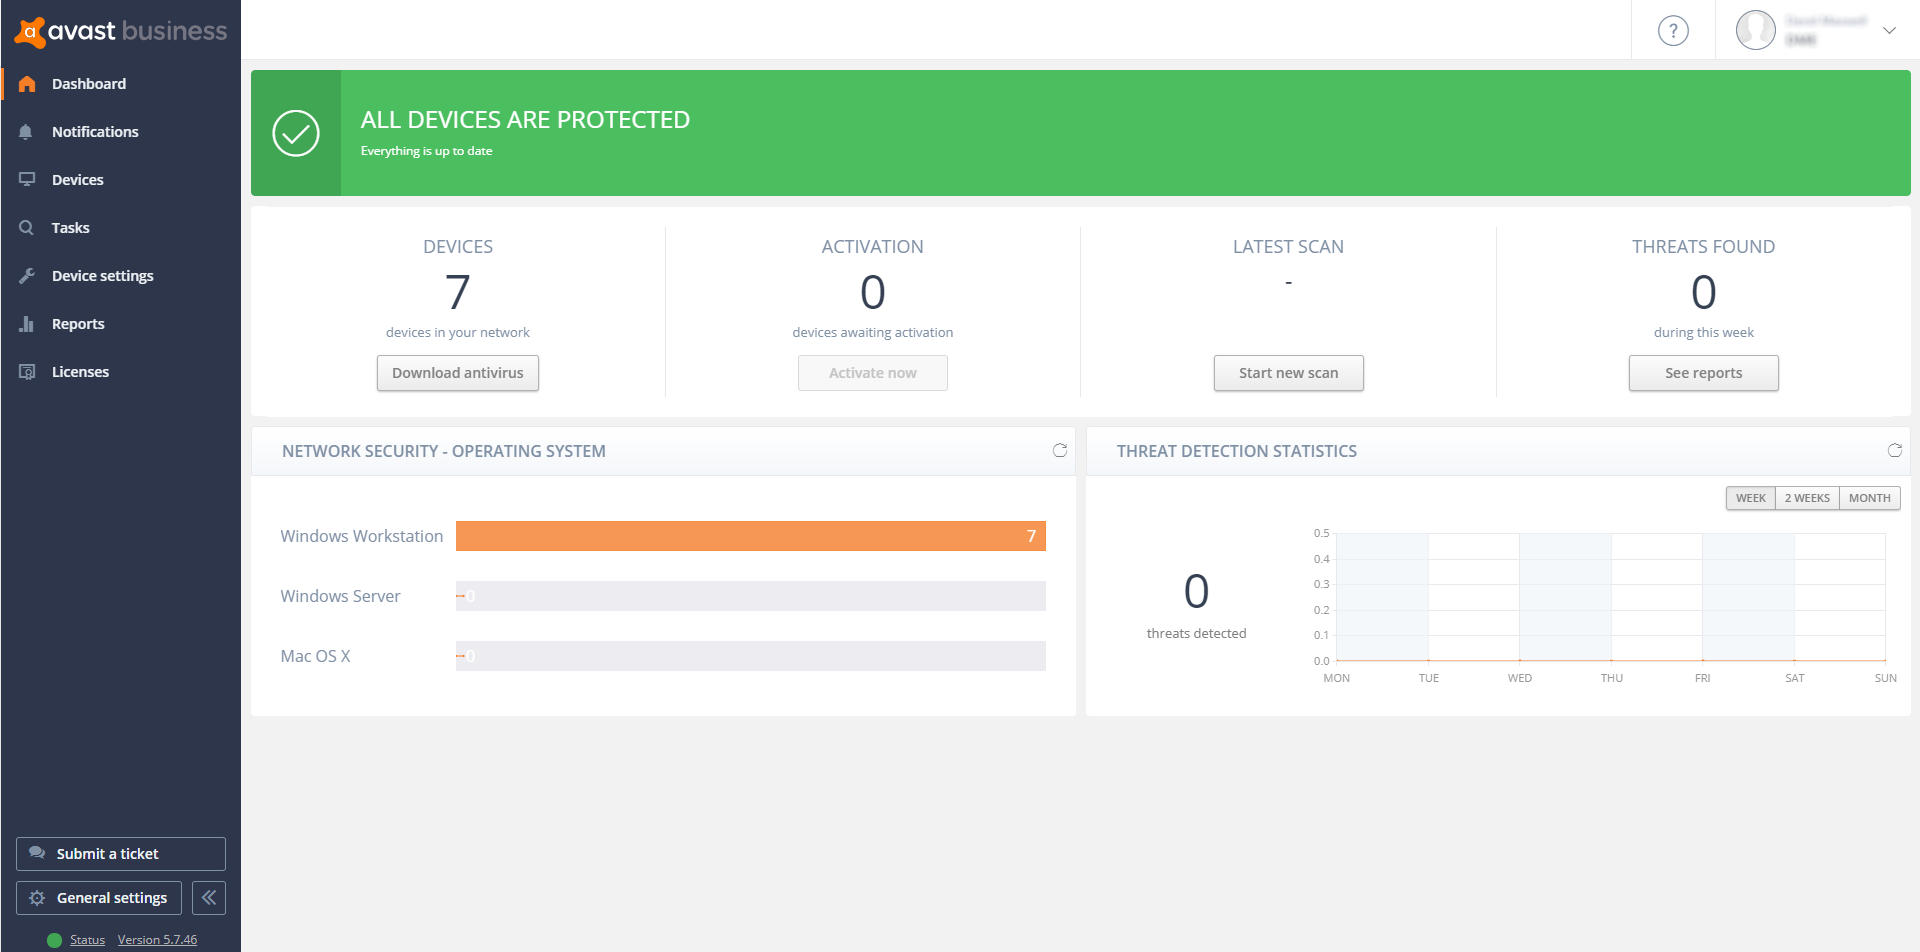
On the server console, there is a clear set of main menus down the left-hand side: Dashboard, Notifications, Devices, Tasks, Device Settings, Reports and Licenses. The main Dashboard view gives a comprehensive and clear overview of the installation and how it is running. You see how many licenses you have deployed, how many are awaiting activation, how many threats have been found and some graphical views of this information too. It is a straightforward, reassuring overview for the non-expert administrator.
Notifications collates all the main event information into one place, and you can take a malware event and go through to the Virus Chest on the affected computer from here too. The settings panel in Notifications is comprehensive, and allows you to set up how notifications will be handled across a wide range of scenarios. We particularly liked the “if not read then send email notification” which can be set to “instantly”, “batched end of week” or “never” for each setting. This offers a lot of control of how you are notified when an event occurs, and means you can ensure that you are not swamped with information that is not immediately relevant.
The Devices tab gives access to each device configuration, its current licensing and when it was last seen. You can group devices into groups, and apply settings and policy through that group.
Tasks is a powerful scheduler area which is initially empty, although by default it says, “You haven’t created any task yet, why don’t you start with a scan?”. It is here that an administrator can create tasks to run particular events. For example, do a quick scan every day at 2pm. You can also use it to send a short message to your devices, to update the device and to shut it down too. It is a simple task manager, but has useful capabilities for the small office and organisation.
Device Settings allows you to create a settings template which is then applied to a group of devices. In here, you have access to all the control functionality for the device. So, you can determine that file scanning is on, Antispam is running, the firewall must be applied, and so forth. From these templates, you can apply policies to devices.
The Reports tab gives access to all the statistics about the system and its collection of users. You can drill through here to get a view, and it is a better and more comprehensive overview than the Dashboard view. Our only criticism here is that we found no way to either email a PDF of this page nor save it to a file location, which would have been a useful daily report.
Part 3: Remediation and outbreak containment
There is little here on the cloud management console to remediate an outbreak, although you can instruct all clients to update and run a scan. The reporting is strong but doesn’t really handle the task of forensically analysing a large population outbreak. However, this is almost certainly beyond the intended deployment size of the product anyway.
What is it?
Cloud-based management platform with local device clients. Clients can be Windows, macOS or Linux, and can be desktops, servers or virtual machines. There are various versions of the GravityZone product, and its management can be cloud based or local server based. It can be purchased with the HD component, which adds in the “Hyper Detect” engine, an endpoint integrated sandbox, and visibility of suspicious activities. There is no built-in support for Android or iOS mobile devices in the cloud console, although this is available with the on-premises server-based version.
Product information on the vendor’s website: https://www.bitdefender.com/business/enterprise-products/elite-security.html
Online support: https://www.bitdefender.com/support/business/
Summary
There is much to like in this solution. The clarity and clear thinking of the design of the management console, the way the tasks are grouped together, the initial walkthrough wizard, plus the strong help and support, all contribute to a sense of calm and understanding of what is happening. We particularly liked the Dashboard capability, and felt that the policies and endpoint management allowed for a coherent and clear understanding of the rules that are being applied to endpoints. The addition of mobile device management would make it an excellent all-round solution for a modern diverse environment.
Part 1: Product installation and deployment
Getting the main cloud console up and running is very simple: create the cloud account, log in and you have a working environment.
The first thing you see on login is the “Essential Steps” wizard. This is a four-step process to guide you on getting up and running as quickly as possible. Each panel has copious explanations to help explain what that step is achieving.
Step 1 is “Install Protection” which allows you to install directly onto the computer you are working from, and to send email invites for multiple installs to your user base. Or you can use the Remote Installation capability to remotely install the endpoint client onto other targets in the network. To enable this, the first deployment must be a “Relay” deployment, to act as the bridgehead. You can also deploy to a security server here if you wish to do so.
Step 2 is to define the Security Policies in use at your organisation. This allows you to define a pre-cooked set of operational requirements onto each target device, or group of devices.
Step 3 is to create appropriate User Accounts. These are not accounts for ordinary users, but administrative accounts for the management of the platform. The roles here can be Company Administrator, Network Administrator, Reporter and Custom. A “reporter” user might be on a help-desk role, for example, and can see reports of activity without being able to manage users or the company structure.
Step 4 is Reporting where it shows you how to create appropriate reports of activity on your network.
Having gone through these steps, you should have a deployed and managed network.
The client package offers a reporting window but no real functionality if the default lockdowns are applied. It will report what is going on and what has happened, but it is intended that most users are hands-off here. Of course, this could be enabled from central policy if required, and might be needed for a specialist role in the company, like a software development and testing role, for example. The user interface does allow the user to initiate a scan if required, or check for updates, but again this is determined by policy.
Part 2 – Ongoing use
Starting with the client, this is a simple application with a clean interface. It clearly shows what is going on, but is designed to have minimal footprint on the user experience. Indeed, one policy setting is to make the whole UI invisible to the user. This might be beneficial in a heavily locked-down environment. Others might prefer to offer the end user the opportunity to do an update or run a scan, which might be more applicable to a roaming user, a travelling salesman away from the office, for example.
The server console is particularly clear and clean. The initial walkthrough wizard is an excellent idea because it helps you focus on the necessary tasks in a clear and coherent fashion. This helps make the product eminently suitable to a smaller, less IT-skilled workplace as well as a larger, more IT-literate infrastructure.
The main console has a menu structure down the left-hand side which is clear and clean. Dashboard, Network, Policies, Reports, Quarantine, Accounts.
Dashboard gives you an instant overview of the installation and the performance of the clients. Each panel here is called a “portlet” and can be clicked on to drill into more information. We particularly liked the way that the Portlets can be rearranged, added to, and laid out to your preferences. The strong capabilities of Dashboard mean that you get to the information you require very quickly, with the minimum of digging through the UI.
The Network menu item lets you configure deployment packages, and then tasks which can be run once or multiple times.
Policies is where you define the operational groups within your organisation, and then apply those policies to computers, thus imprinting onto the client machine the functional roles that the IT department requires. As you would expect, there is a wealth of capability here, including full control of the firewall, application operation, device control (including disallowing access to various hardware components on the desktop, like USB drives) and rules for Exchange Server too.
Reports lets you build views of what is happening, by functional group or by task area.
Quarantine gives you an overview of all the malware that has been quarantined on the network, and the ability to choose what to do with those files.
Accounts lets you monitor the activities of the user accounts that have been set up.
On the right-hand side there is a vertical list of Notifications. Drilling into each gives a clear explanation of the problem and a description of what happened. We particularly liked the reporting of a malware outbreak which informed use that “at least 28% from a total number of X endpoints were found infected with” a piece of malware, making it much easier to separate out isolated incidents from a network-wide pandemic.
Part 3: Remediation and outbreak containment
The clarity and careful design of the user interface makes it relatively easy to get a comprehensive view of the status of the network and all end points. The reporting of multiple incidents clustered into one report helps understand what is happening when there is a network-wide event. And the clarity of the UI helps ensure that settings have been applied appropriately, even by a relatively inexperienced system administrator.
What is it?
Cloud management console with client AV packages. The product is called CrowdStrike Falcon and the cloud-based management console can be run from the cloud on any modern browser.” Clients are provided for Windows, macOS and RedHat, Ubuntu and Amazon Linux platforms. There doesn’t appear to be provision for mobile clients.
Product information vendor’s website: https://www.crowdstrike.com/products/
Online support: https://falcon/crowdstrike.com/support
Summary
CrowdStrike Falcon is a very comprehensive platform, providing not only AV services within an organisation, but also a comprehensive set of detection and analysis services. It is aimed at the larger organisation, and is not really a “fit and forget” product. Basic everyday monitoring and management tasks are simple enough; however, to get the best out of it, some investment of time for learning is needed, possibly coupled with external consultancy. Its range of capabilities is sufficiently deep that it would be unwise to have only a minimal understanding of its operation.
Part 1: Product Installation and deployment
It is simple to deploy the cloud infrastructure, because it comes pre-packaged for you in a cloud console, which can be run from any modern browser. Deployment of the client “sensor” is quite simple here, and relies on the download of the installation package appropriate to the target platform. There is a checksum ID to be copied into the installation routine. On Windows, you can use an automatic sensor deployment like Windows System Center Configuration Manager.
On the Mac platform, we were a little surprised to see that a command line execution is required. Nevertheless, deployment is straightforward. Once you have installed onto Windows, it registers with the platform as the AV provider and disables Windows Defender.
Once installed on Windows, the Falcon Sensor is almost invisible to the end user.
Deployment across an organisation will take planning and appropriate tools, with preparation for the appropriate layers of policy to be applied to users. Once this work has been done, deployment should be quite straightforward. Because of the capability of the platform, this is not a product aimed at the smaller end of the SME marketplace, although it could most certainly be used there if appropriate skills were available, and the data risk was sufficiently high.
Part 2: Ongoing use
The management console is based in a web browser, as you would expect from a cloud-based solution. There is a menu of buttons down the left-hand side, and this menu can be expanded by clicking on the Falcon icon at the top left. The major items are Activity, Investigate, Hosts, Configuration, Dashboards, Discover, Intelligence, Users, and Support.
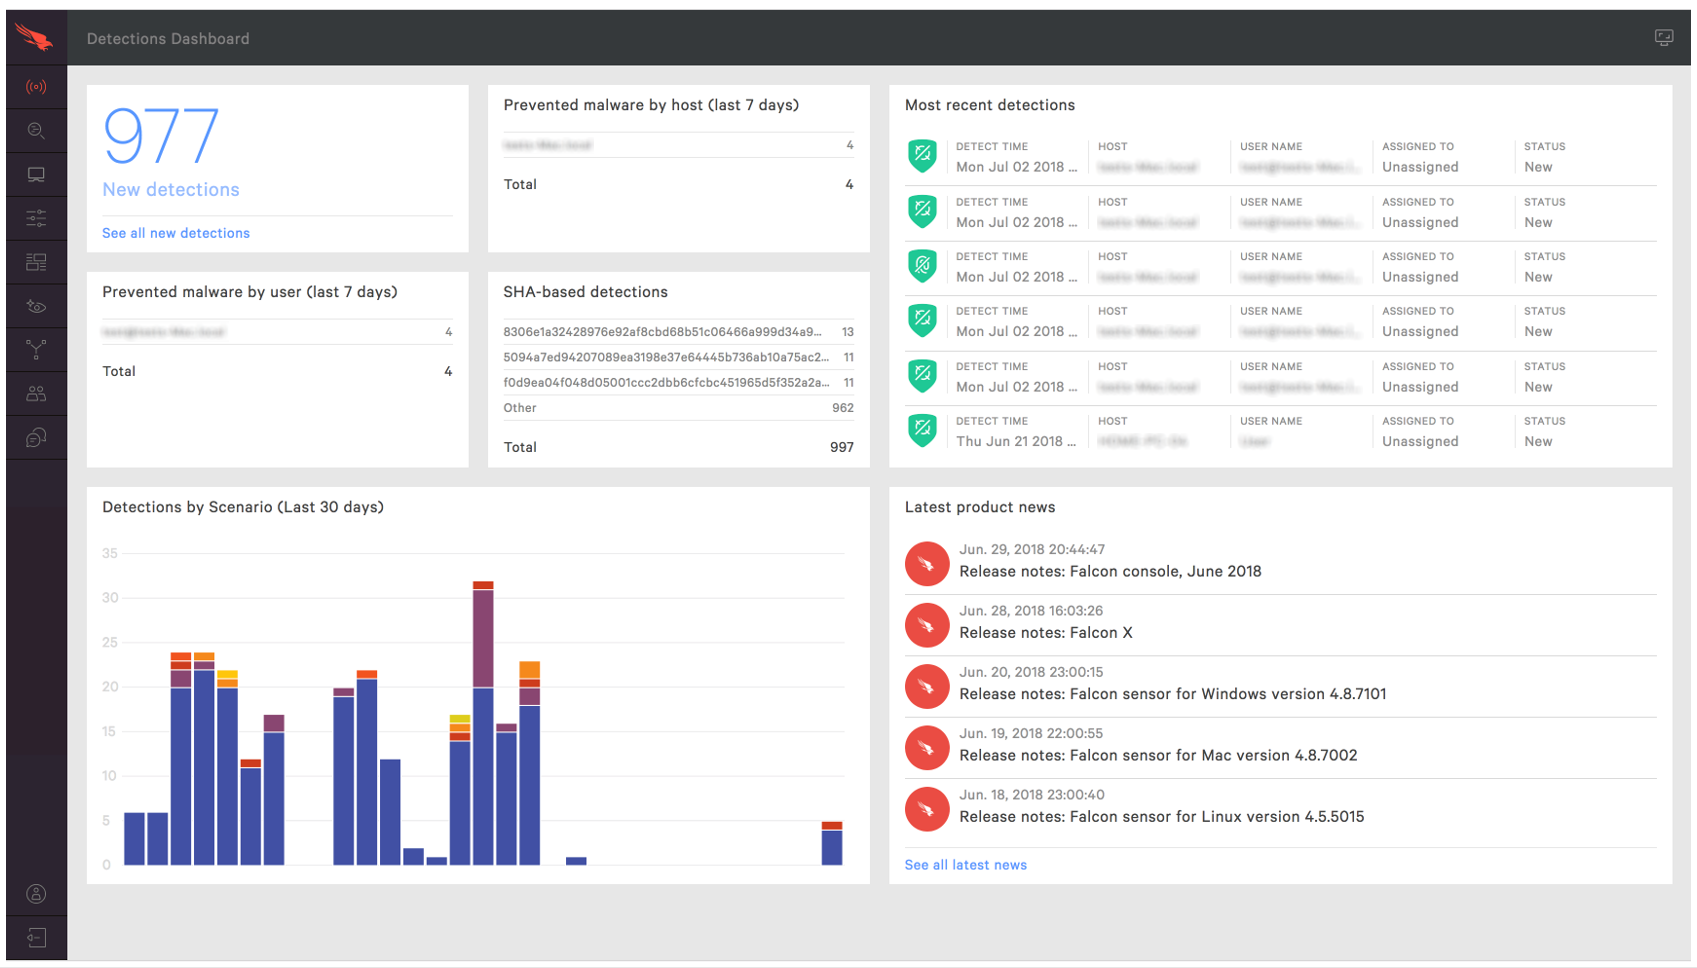
Activity is the first place to start work once the platform is up and running. There is a strong dashboard here, with the most important items brought into view. Good graphics show detections by scenario over the last 30 days, and you can click through here into the Detections submenu to view more detail. You get a strong reporting infrastructure, with a good choice of filter options presented front and centre here. You can also examine quarantined files and real-time response sessions here too.
The Investigate menu takes you into a comprehensive search facility, covering hosts, hashes, users, IP addresses, domain and event searching. This is aimed at locating specific issues across the network estate in the recent history – the default is 24 hours, and it recommends limiting your search to no more than 3 days. Pre-set filters for up to 30 days are provided.
The Hosts menu gives a dashboard of all the host installations, by version and platform, and allows immediate understanding of which hosts are offline or disconnected. From here, you can go to the Sensor Download menu and download sensor installations for all the platforms
The Configuration menu is the heart of the policy driven process within CrowdStrike Falcon. From here, you create policy definitions which cover all aspects of the AV and prevention processes of the platform. And then you apply that process to groups of installations. You can have different policies for Windows and Mac clients here too.
The Dashboards menu gives access to the executive summary view of the estate, with detailed graphics for detections by scenario and severity, and identifications of the top 10 users, hosts and files with most detections. This is just the tip of a very deep iceberg allowing for comprehensive analysis of what is happening. You can search by almost anything, and use this to discover what has happened on the network during an outbreak – where something entered, how it was attempting to execute, what processes it was using, and how it was contained. Getting through this is not for the fainthearted, but it cannot be denied that you have very powerful set of audit and analysis tools here.
The Discover menu allows you to discover the network by application inventory, asset, mac address, accounts and other app/process-based inventory.
The Intelligence menu takes you into an overview of the current landscape threat as perceived by CrowdStrike. This can be categorised by geographical origin of threat, target industry, target country, and motivation (espionage/criminal/Hactivist and destruction). Each threat is detailed by these parameters and “View Profile” on the threat takes you to a comprehensive analysis and explanation of that specific threat. This is a comprehensive resource which is unusual and most welcome.
The User menu allows you to create the usual user profiles for administrators and other activities within the platform. There are pre-built roles already created for Endpoint manager, event viewer, Administrator, Analyst, Investigator, Real time responder, and others, allowing you to map these roles onto existing internal working structures, or to custom build new roles as required.
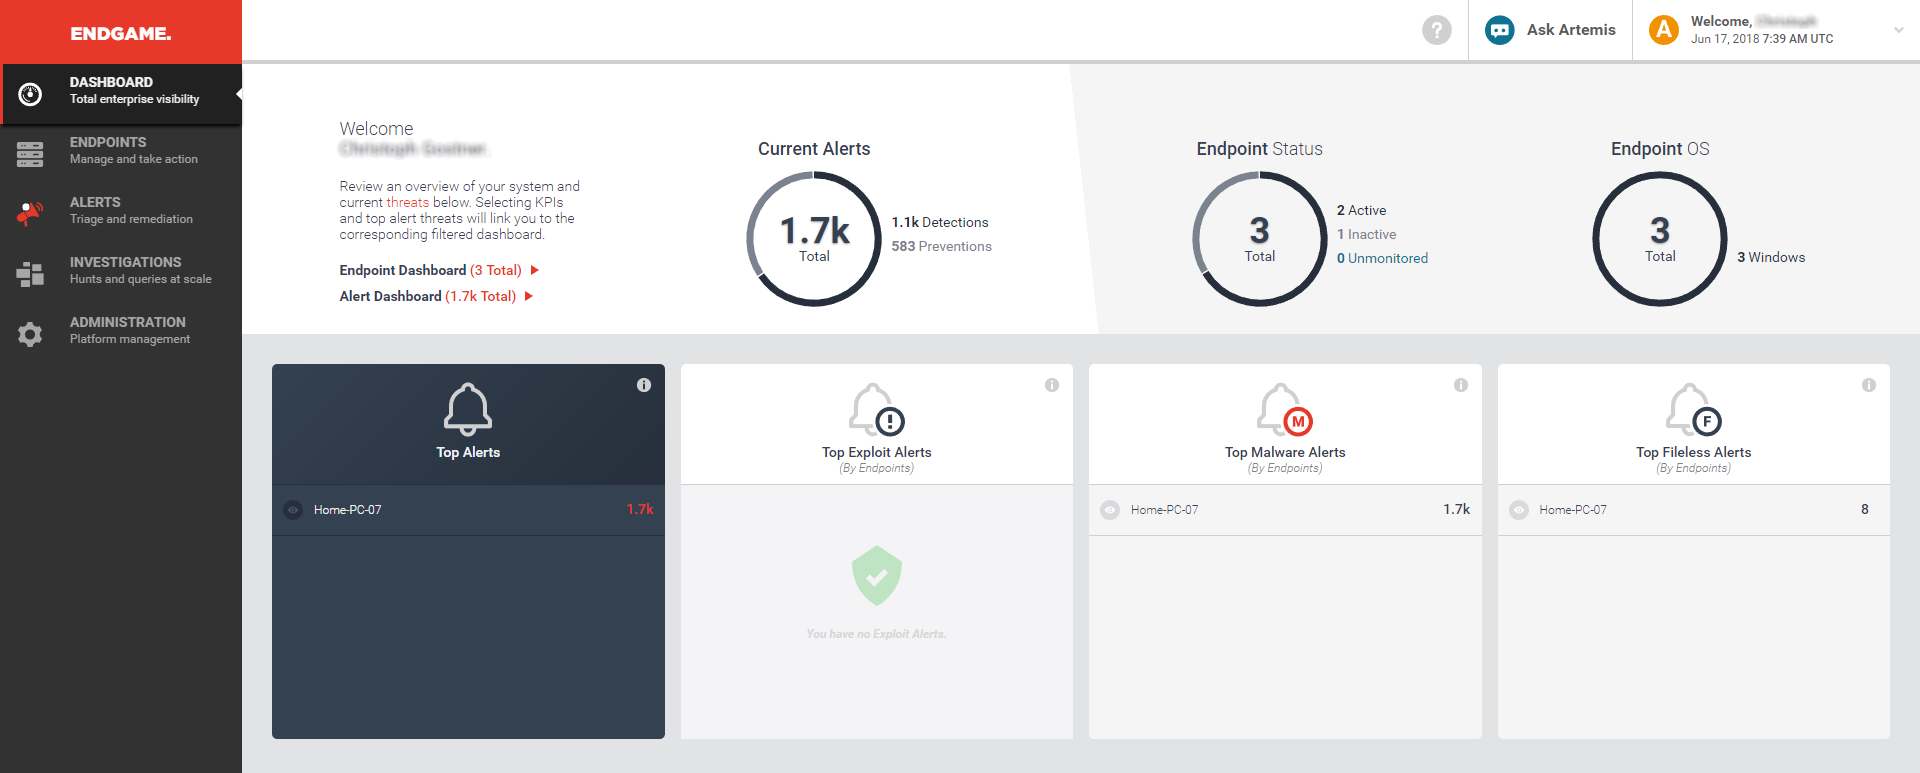
The management console has five key menu choices on the left-hand side. Dashboard gives an overview of the status of the entire estate of client devices, and reports how many alerts are in play at any one time. It also gives a clear top-view of top alerts, exploits, malware and fileless alerts, allowing for a comprehensive view of what is happening. Each of these can be clicked through to drill into more information. Two-factor authentication appears to be mandatory for all logins here, and this needs to be considered as part of the deployment design.
Finally, there is a comprehensive help and support role within the product, in addition to the Intelligence capability.
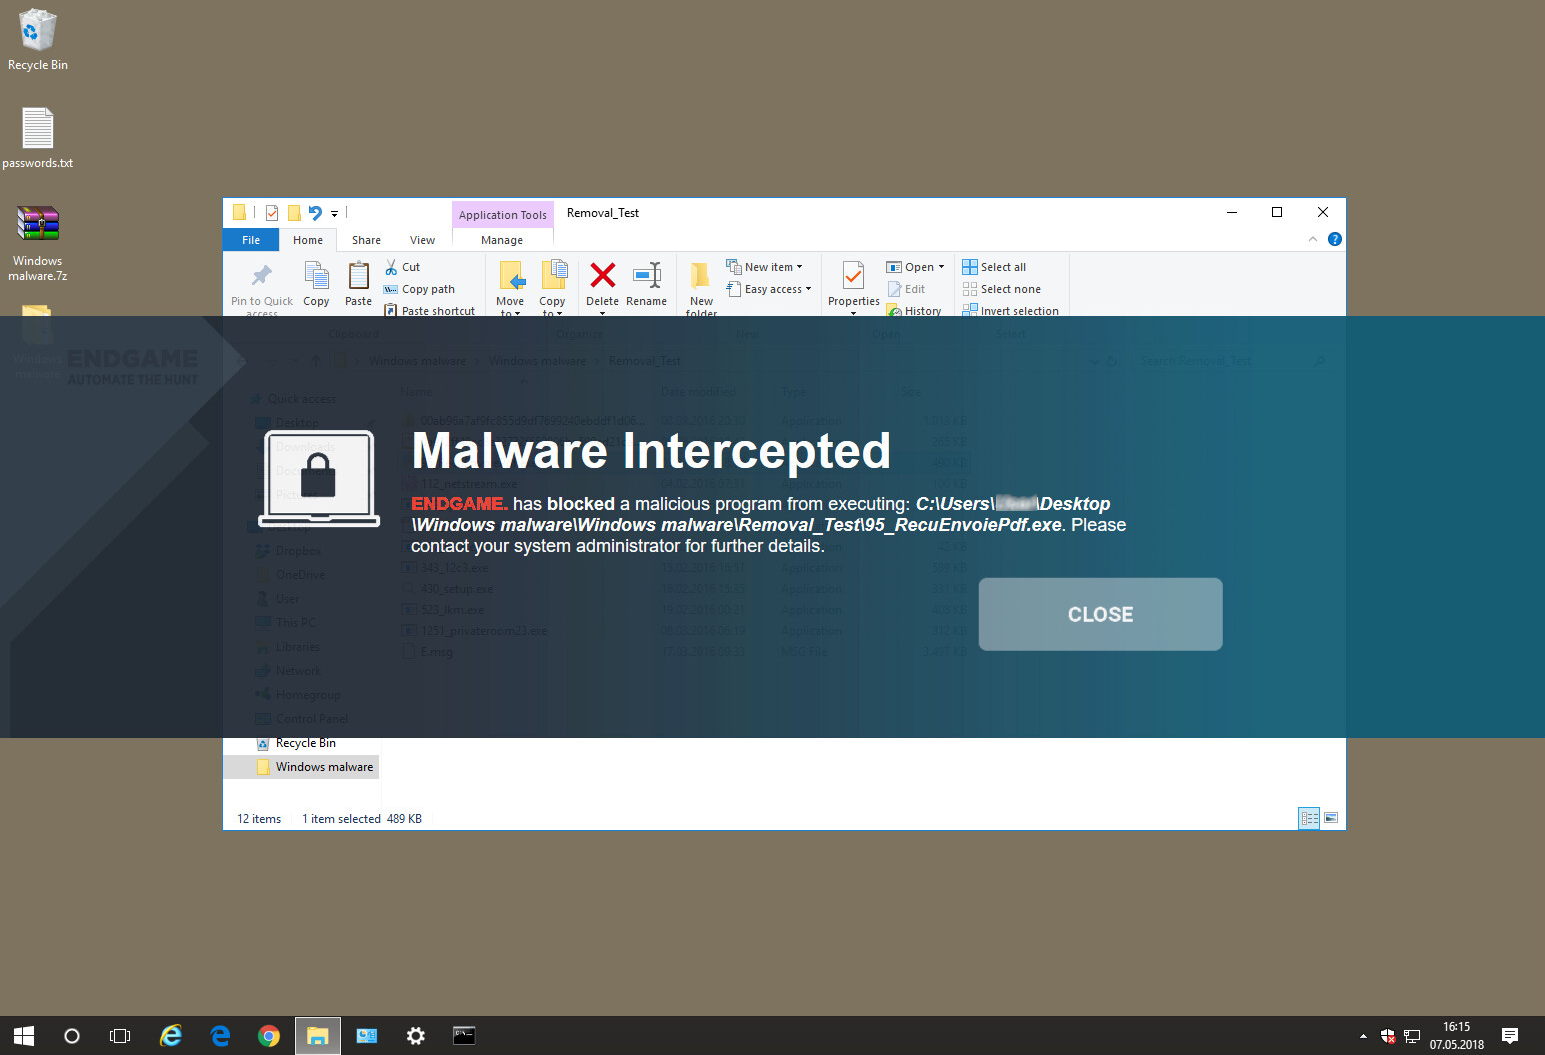
On the end-user client, the default settings is to have the client invisible to the user (aside from malware alerts – please see screenshot below). However, this can be enabled and adjusted through user policy if required.
Part 3: Remediation and outbreak containment
Understanding what is happening across a large installation base is the core functionality of CrowdStrike. It offers all the power you need to clearly understand, review, audit and control an outbreak in a comprehensive layered fashion. This power comes with a need to thoroughly understand the platform, and it requires a layered multi-user security approach to its daily management. However, it is clear that this will reward a serious and comprehensive implementation with excellent power, control and auditing.
What is it?
Local server-based engine with device clients. The product is available for Windows client and server. There is no mobile device support available, nor MacOS.
Product information on the vendor’s website: https://www.emsisoft.com/en/business/antimalware/
Online support: https://support.emsisoft.com/
Summary
A fairly traditional on-premises client/server AV implementation. The client support is for Windows only, so companies wanting to protect Mac or mobile devices would need another solution for these. The console and client software both use a very clean, modern design, which we found very easy to navigate. For an experienced admin, installing the console and deploying the client software is very straightforward. We would suggest the product is well suited to a business large enough to have its own full-time IT administrator, and is powerful enough to cope with larger organisations too.
Part 1: Product installation and deployment
Deploying the server component is unproblematic and requires little user intervention. Once it is up and running, you apply appropriate licenses to it to prepare for deployment. Getting the client onto a device is relatively straightforward: the easiest route is to do a remote login to the target using admin rights, and the run the packages.
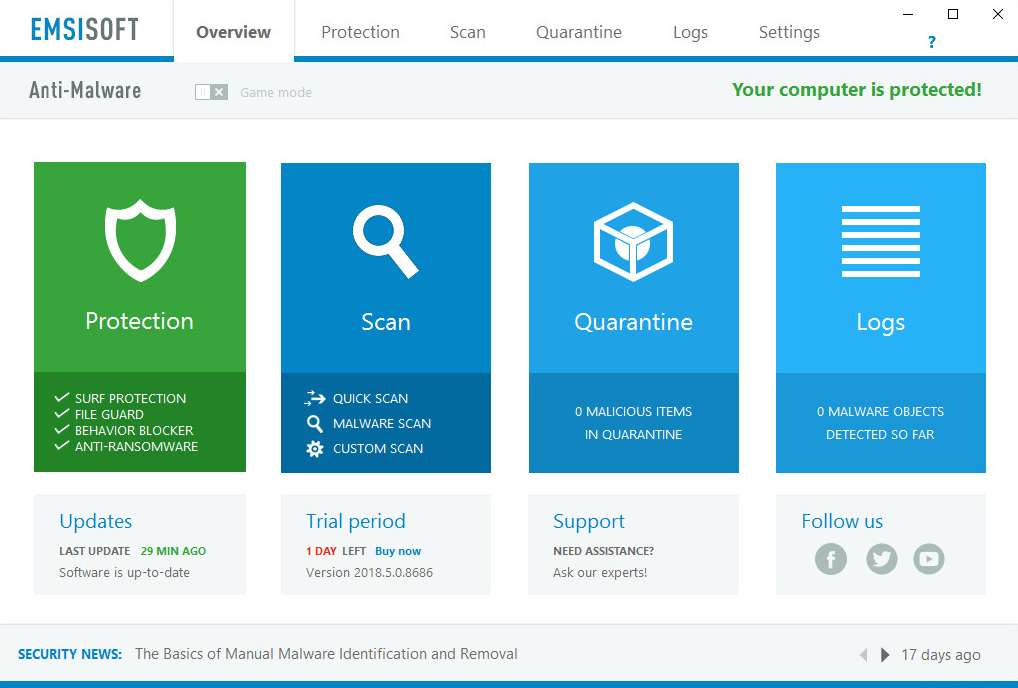
The client itself looks like a fully featured AV package. The user can run scans and updates from the System Tray icon or main program window.
Part 2 – ongoing use
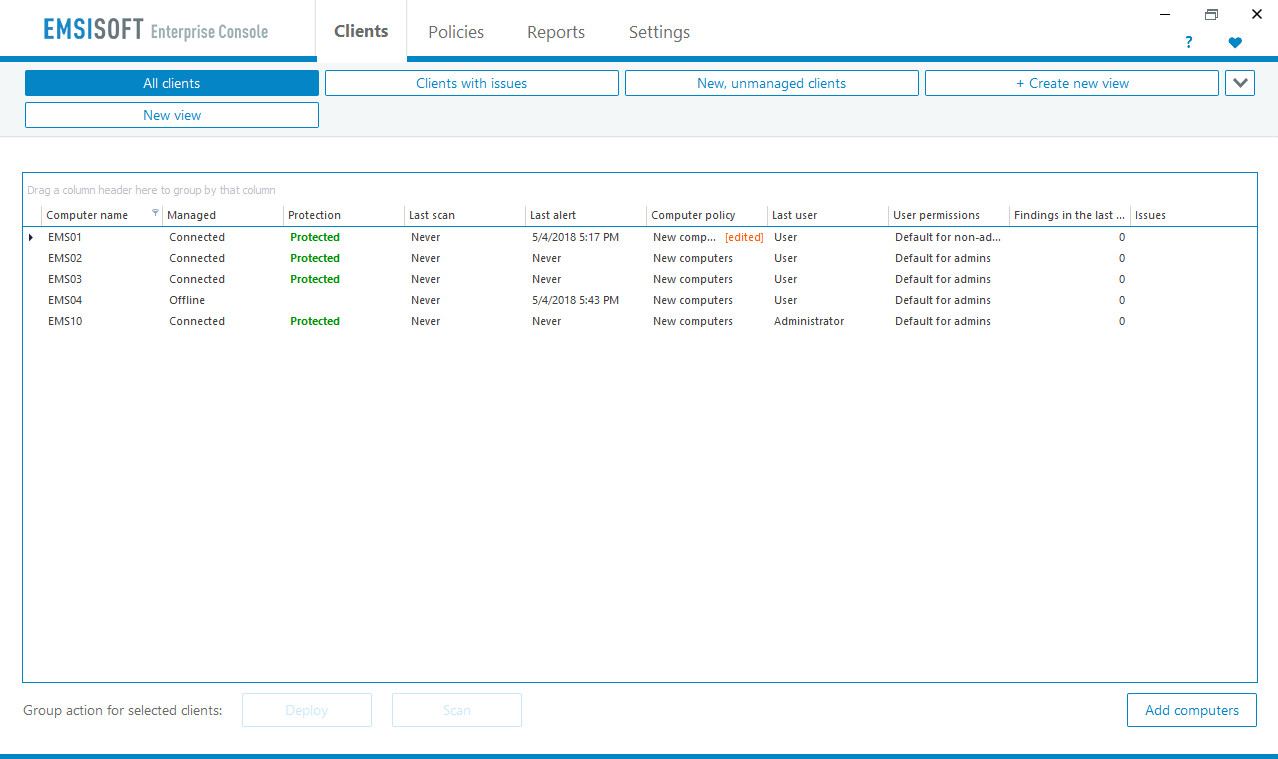
The client looks like a regular AV client, with a good Overview tab showing the status of the product. The Protection tab has three selection tabs – Surf Protection, File Guard and Behaviour Blocker. Surf Protection is a rather quaint term for web filtering. Behaviour Blocker allows control over running processes on the machine. The Scan tab offers the usual Quick/Malware/Custom scans, scheduling, settings for the scanner and a download link for building an emergency kit for scanning an infected machine. Quarantine shows what has been detected and placed into the quarantine area, and Logs shows the event status of the client. Settings has a range of configuration settings for the client. It is only possible to make any configuration changes using a Windows administrator account. Standard Windows users will see settings controls greyed out.
Moving to the server, it is a rather clean design here. There are four main tabs. Clients lists the clients by grouping (all, Clients with Issues etc), Policies allows you to define and deploy policies to the clients. The settings here are split between Computer policies and User policies. Computer policies lets you set organisational groups and then define default settings for that group (e.g. start on Windows startup, Windows Explorer integration and so forth). User policies lets you define user profiles, with defaults set to either Read-only access, Basic access (default for standard users) or Full Access (for administrators). This area supports drag and drop, so you can move a client from “Default for admins” to “Default for non-admins” easily enough.
The Reports tab has a set of standard reporting views. You can build your own reports easily enough in this area, by selecting New Report. Reports support save to PDF and send via email, and you can schedule a pdf report to be sent by email by clicking on Settings, Notifications. Finally, the Settings tab allows control of the various underlying processes and configurations within the server product.
Part 3: Remediation and outbreak containment
The Clients page of the console shows the protection status of the clients as text (e.g. Protected/Not Protected), along with green, orange or red colour as appropriate. If a computer is shown as Not Protected, there will be a Solve link in the Issues column of the same page. To test this, we locally disabled all the protection features on one of the client PCs. The client’s status was immediately shown as Not Protected in the console, and clicking Solve instantly reactivated the protection and updated the status in the console to Protected. We did notice one minor bug here: the console displays a message box that states “Protection of Emsisoft Anti-Malware was not enabled”, but we verified that this was a false alarm. We have notified Emsisoft of the bug, and they are working on a fix for it.
What is it?
The Endgame endpoint protection platform provides prevention, detection and response measures, and threat hunting capabilities aimed at stopping targeted attacks. Their management console can be run from the cloud on any modern browser. A hosted option is also available. The platform supports Windows, Linux, Mac, and Solaris endpoints (although we felt this was not made very clear on the vendor’s website). There is no provision for mobile clients.
Product information vendor’s website: https://www.elastic.co/security/endpoint-security/
Summary
Endgame is aimed at larger organizations that require prevention and EDR capabilities. Deploying it will require some planning and training, meaning that it is not a solution that you can just install and forget about. However, for organisations with the resources to make full use of it, it provides a comprehensive and coherent set of tools and capabilities. Administrators might want to consider disabling Windows Defender via Group Policy.
Part 1: Product Installation and deployment
We used Endgame’s cloud-based infrastructure, which simply requires you to log in with your correct credentials to gain access to the management console. Deployment of the client “sensor” can be done in one of two ways: in-band and out-of-band. In-band deployment is currently only supported by Windows, while out-of-band supports Windows, Mac OS, Solaris, and Linux clients. For in-band deployment, a system administrator installs the sensor directly onto the Windows client from the Endgame management platform. With out-of-band, customers can deploy via the platform or use a management tool of their choice – this could be Microsoft System Centre Configuration Manager or equivalent.
In our installation, we downloaded a zip file from the Administrator/Sensor page. From this, you extract the installer and configuration file, then run the installer from an elevated command prompt using the configuration file. You have to search the documentation to find the necessary command-line syntax to do this. Double-clicking the .exe file simply deletes it.
Once installed on Windows, the Endgame agent is largely invisible to the end user. It does not register as an Antivirus platform in Security Center. The Endgame platform includes a wide variety of protection features, with many available configuration options and customizations. Users may find it complex to deploy for the first time. The platform is designed to be run either by trained internal security teams or as part of a services offering. It is definitely a product aimed at the medium to larger end of the deployment size, and is not really a product for smaller businesses.
Part 2: Ongoing use
The management console has five key menu choices on the left-hand side. Dashboard gives an overview of the status of the entire estate of client devices, and reports how many alerts are in play at any one time. It also gives a clear top-view of top alerts, exploits, malware and file-less alerts, allowing for a comprehensive view of what is happening. Each of these can be clicked through to drill into more information.
The Endpoints menu gives a view of all of the estate of the clients that are currently monitored, and allows you to select and sort by name, IP address, OS version, Endpoint policy that has been applied, the sensor version, alerts and tags. From here, you can choose a range of endpoints and then apply tasks to them – apply a new policy, discover new endpoints, tag/uninstall/delete endpoints from the catalogue.
Alerts takes you into the heart of the platform. Here you get a list of current event types which could be, for example, a malicious file execution prevention, a file detection and so forth. The catalogue of events can be sorted and categorised by platform, OS, IP address, Host and date. Most important is the ability to assign an event to a user to manage that alert, and ensure it is appropriately dealt with.
If you click on an event, it takes you to the Alert Details page for that event. Here you can see much more detail about the event, where it started, what it has done and the analysis of the malware if appropriate. Here you can choose to Take Action: the options include download alert, download timeline, resolve, dismiss, start investigation, download file, delete file or whitelist items. Of particular interest here is the Start Investigation feature which lets you create a “hunt”. A hunt can cover multiple information sources – firewall rules, drivers, network, persistence, process, registry, media, system configuration and so forth, and allows you to reach out into the estate to locate information relevant to your enquiry. A key component here is also the “Ask Artemis” feature, which is a natural language query engine. You can simply type in a question, and Artemis will attempt to resolve it.
The Investigations menu item shows a list of ongoing investigations, who it is assigned to, what endpoints were involved and so forth. This is very important for understanding how the current analysis is progressing.
Finally, the Administration menu item gives access to the Policy settings, Users, Sensors, Alerts, Whitelist and Platform capabilities. Of particular interest here is the policy settings page, which allows defined policy to be set for items such as command and control, discovery, execution, lateral movement and so forth. As an example, you can choose what policy to apply when there is a process injection – do you detect or prevent it? Do you allow self-injection or detect DLL injection and so forth? This is a level of power and control that goes significantly beyond normal antivirus.
On the client side, there is effectively nothing to see unless the system detects an issue. At this point, a large banner appears on the screen telling them what has happened. From a user perspective, the Endgame platform is essentially invisible and there is nothing here for the user to interact with.
Because Endgame does not register as an AV package in Windows. Endgame tell us that their product is designed to be compatible with Windows Defender or any other “traditional” AV product, and detects and prevents malicious activity before such an AV product springs into action. However, they also say that their software provides all the protection needed, and so running an antivirus product as well as the Endgame product is not necessary. Administrators not deploying an additional AV product might like to disable Windows Defender via group policy, to prevent any possibility of conflicts, or Defender taking action against threats (as this would not show up in the Endgame console).
Part 3: Remediation and outbreak containment
The management console is designed specifically to handle large estates of clients, possibly on a global scale. Because of this, malware issues are expected to be happening, and Endgame offers a very strong set of analytics and remediation to handle such an outcome. The ability to track the progress of an outbreak appears to be strong and thorough, along with the tools to manage and contain it.
What is it?
Local server-based engine with device clients. The server runs on Windows Server. The clients support Windows, macOS and Linux devices. Mobile support is available through the “eScan Corporate 360 (With MDM and Hybrid Network Support)” edition and supports Android.
Product information on the vendor’s website: https://www.escanav.com/en/windows-antivirus/corporate-360.asp
Online support: https://www.escanav.com/en/support/escan-tech-support.asp
Summary
We suggest that the product is best suited to experienced IT professionals in larger corporate networks, for a number of reasons. For example, the remote installation function requires Active Directory. The opening page of the console provides a good status overview, with a very standard, MMC-style menu panel on the left-hand side. However, navigating other areas of the console might not be immediately obvious for inexperienced administrators. We had the feeling that the console design was not consistent throughout, and indeed the MDM component (mobile device management) runs as a separate interface in a separate browser page. Whilst the functionality available from the console is very good, in some areas the GUI could be improved to make it easier to use.
Part 1: Product installation and deployment
Deploying the server component is straightforward and needs little user intervention. It requires a Microsoft SQL Server installation; eScan will install SQL Server Express if necessary.
Once it is up and running, a malware scan is run on the server to ensure it is clean. The deployment wizard starts automatically when you first open the console. Choosing the target clients and pushing out the client installation should be simplicity itself.
You apply appropriate licenses to it to prepare for deployment (full functionality is available in the 30-day trial version). The product supports only Windows clients (no MacOS, or mobile) so deployment is limited to those targets. Getting the client onto a device is relatively straightforward: the easiest route is to do a remote login to the target using admin rights, and the run the packages.
The client itself looks like a fully-featured AV package. It can be started from the shield icon in the Taskbar, or by running the “escanpro.exe shortcut” on the desktop. It has quite a straightforward status view along with appropriate tools for scanning.
Part 2 – ongoing use
The client looks like a regular AV client, and the front window has clear areas highlighted in red and green to indicate that the services were running. There is a little confusion here over the use of colour, because we could have the “file antivirus” panel in green despite it also saying “Dangerous Objects Detected: 18”. Some clarity over the meaning of the colours would help. The green colour is intended to demonstrate “protection working as it should”.
At the bottom of the screen are Scan and Update buttons, which function as you would expect. Once you choose one of the coloured panels, you are taken into a specific task area, with a list of the other panels at the top of the screen, so you can directly jump from one to another. Again, there is confusion here: our Web Protection panel is in green and states “Started” but once you click into it we have “Web Protection Status” reporting as Stopped, as is Web Phishing Filter Status. The green colour here means that some sub-component of a module is started.
By default, almost all the settings here are controlled via centralised policy and hence are greyed out. If the admin sets up password-controlled access, temporary changes can be made on the client software. These will be undone the next time the client synchronises with the server. Over on the server side, it is a web-based interface despite being a server hosted solution and not cloud. It uses a local web server and a high port number, so typically the URL will be “localhost:10443/ewconsole/ewconsole.dll/homepage”. Alternatively, “http://localhost:10443” could be used.The layout of the console will be very familiar to anyone who has used Windows’ Microsoft Management Consoles such as Device Manager. All the functionality can be accessed from a single menu panel on the left-hand side, with content shown in the main right-hand panel. Any menu item which has sub-menus is clearly marked with a “+” sign. The familiar Windows look extends to other areas of the GUI. For example, the tree structure and icons used in the Managed Computers page is very consistent with the design of Windows’ File Explorer.
A wealth of information about client computers is provided. There are over 20 items, including IP address, name of logged-on user, installed product and its status, installation directory, last policy applied, last connection, and client OS. Whilst this ensures the administrator is very well informed, anyone with a smaller monitor will inevitably have to scroll a lot to the right to see all the items displayed. However, it is possible to customise the page by hiding any items you do not require. The left-hand menu column can be hidden, to provide more space for content, although the very small arrow button that does this was not immediately obvious to us. There is a setup wizard which lets you deploy the endpoint protection software to client computers. Logically enough, this is at the very top of the menu panel. Whilst it is very straightforward to use, we note that Active Directory credentials have to be provided in order to access client computers. As a result, another installation method has to be used in a Windows Workgroup environment.
The Report Templates page provides a wide variety of possibilities, including Update Report, Scan Report, USB Control Report and File Activity Report. All of these are available for Windows clients, with a slightly smaller selection for Mac and Linux clients. The logo(s) next to the text indicate(s) which platforms are supported for each report type. We note that reports can be scheduled and emailed. This small subsection of the system has its own SMTP email settings, which are quite separate from the email settings found in OutBreak Notification, for example.
The menu item for the MDM component (mobile device management) stands out, as it uses a different colour scheme. This is in keeping with the fact that it opens in a new window, and is essentially an independent console. This uses a very similar layout to the main console, although there is a different colour scheme. The separate email settings for reports and outbreak notifications, and the separate interface for the MDM component, rather gave us the impression that the product had been assembled from a number of existing components, rather than having an overall design.
Part 3: Remediation and outbreak containment
There is basic help here to help remediate an outbreak in the “Outbreak Notification” menu item, which allows you to generate email notifications when the number of viruses detected exceeds the default of 25 in 1 day. However, all of this is disabled, and requires access to an SMTP server. We expected this to be part of the service provided by eScan, at least as a default backstop to get you up and running.
What is it?
Local server-based management console with client AV packages. The management console is called ESET Remote Administrator and can be run on Windows or Linux servers. It is also available as a virtual appliance. Clients are provided for Windows, macOS and Linux, and there is support for mobile devices on Android and iOS too. The Windows client is called ESET Endpoint Security. However, there are multiple products to choose from according to the website, and it is important to know the differences. For Windows, you can choose Endpoint Security or Endpoint Antivirus. For macOS, there is Endpoint Security, and Endpoint Antivirus (which is just the AV component). For Linux, there is the NOD32 Antivirus Business Edition for Linux Desktop, which is the core AV product. ESET also provides antivirus software for virtual machines (Azure VM, agentless ESET Virtualization Security), file servers (ESET File Security for Windows Server, Linux/FreeBSD) and SharePoint, gateway and email servers. All of these products can be managed from the Remote Administrator console.
Product information vendor’s website: https://www.eset.com/int/business/endpoint-protection/
Online support: https://support.eset.com/kb6744/which also offers live chat directly from the management console.
Summary
It is obvious that this is a comprehensive and well-considered platform. The choice of going for an internal server-hosted platform will appeal to many, as will its broad selection of client capabilities across many OS’s. It is powerful and capable, and certainly able to scale up. Its reach to the smaller sites might be limited both by its local server requirement, and the slightly geeky/technical nature of the product. However, it is quite obvious once you have learned a few of the main daily tasks, and it is clear that ESET have put a lot of effort into this platform to make it accessible.
Part 1: Product Installation and deployment
Because this is a locally hosted server-based solution, it is best to get the server side working first. Installation is not without some issues however. Depending on your server configuration, you might find that the installer stops and demands the installation of .NET 2.0 and Java. Download links are provided for this. You have to stop the installation, do these separate installations and then restart the main installer.
Once this is completed, opening the console takes you to an introductory wizard which covers off the main points of getting the clients installed, and the management system running. From here, you can create installer files for the endpoints and either choose to run the installer at the endpoint itself, or use a push installation. The management interface is reasonable obvious although it does suffer from a lot of information on the screen. It most definitely benefits from a large high-resolution display, and this should be taken into consideration. Running it on a normal resolution and size of desktop means that many items are rather cramped.
On the console, there is a main menu down the left-hand side, covering Dashboard, Computers, Threats, Reports and Admin. Depending on which area you choose, you might get a secondary menu for additional choices. Getting agents onto the clients is not completely obvious here. It is not accessed through these side menus, but through a small icon on the top right corner. Indeed, this is where most of the setup and management functions are found. Add new computer, add new mobile device, add new user, generate report, new client task, create the installers, the section relating to policy, and server management are all in this somewhat small area.
Creating new devices is simple, and allows you to import a CSV definition list here. Adding a mobile device requires enrolment via email (server settings required here for your own SMTP server) or via a link or QR code.
Creation of the new policy takes you firstly away from the direct server product, because it asks which ESET product you are wanting to create policy for. The list is populated by all the server products that ESET makes. Prepopulating it with those actually on this licensed server would help. Once the endpoint product is chosen, you can then make all the selections to create the policy definition. Then you can use the Assign Policy function to push policy out to clients. There is a wide range of predefined policies here for you to choose from. For example, “Antivirus – Balanced”, “Antivirus Maximum Security”, “Firewall – Block all traffic”, “Visibility – Balanced” and so forth.
As a UI it is reasonably easy to set up and get deployed to a range of client devices. It is not the simplest to use, nor the most obvious, but time spent learning the UI is rewarded.
Part 2: Ongoing use
The Remote Administrator console is designed to handle a lot of devices, tasks and processes. Despite this, it is still reasonably clear and obvious. Dashboard gives a strong overview of the current set of managed hardware. You can click onto segments of the graphical data and drill down into the underlying data. There are multiple paged views here, covering Client computers, Server, Antivirus Threats, Firewall Threats, and ESET applications. You can add more tabs here if you wish, and then populate the structure with the desired collection of data. Overall it works well.
Handling the day-to-day operations of clients is quite simple. The product automatically groups clients by type, and you can also add in additional groups as required. This should allow you to manage a large estate of devices, across geographical locations and platforms.
The Threats menu takes you to a strong set of onscreen reporting. Again, a larger screen helps here.
The Reports menu is particularly strong, with a long list of predefined report types. For each you can decide to generate it now, run it on a schedule, download it in a variety of formats, and deliver it via email and to file. This is a very comprehensive set of reporting capabilities and is doubtless one of the strengths of the platform.
On the client side, by default the user gets a quite comprehensive Endpoint Security client. Capabilities here are, of course, determined by policy from the central server. But the user can do useful tasks here if required, like scanning the computer, updating and so forth. The Tools menu is particularly effective, offering a range of useful overview data and statistics, which can be helpful when viewed through a remote management tools from a helpdesk, for example.
Part 3: Remediation and outbreak containment
The management console is easily up to the task of handling and remediating a significant outbreak. It should be possible to identify which machines are compromised, and how you wish to proceed. The policy management allows you to lock down devices to help prevent, and contain, issues when they arise. There is a lot of power here, which is not too scary for a smaller organisation, but which clearly can scale up to a larger one.
What is it?
Cloud-based management console with client AV packages. The server component can be deployed either to the cloud, or as a virtual or on-premises hardware appliance. It is designed to handle the largest of organisations, with support for up to 100,000 endpoints. There are clients available for Windows, macOS and Red Hat Enterprise Linux. There is no support for mobile platforms.
Product information vendor’s website:
Online support: https://www.fireeye.com/support/contacts.htmlincluding live chat support.
Summary
FireEye Endpoint Security is a highly powerful platform. Its core strength is in the acquisition of data from the agent for analysis and subsequent decision-making process. This deep insight into the operations of the endpoint estate enables analysis and remediation across the largest of enterprises. With such power comes a significant entry cost in terms of training, both for initial configuration and for ongoing operational effectiveness. To get the most out of FireEye Endpoint Security, security operations teams should have a knowledge of investigations; alternatively, FireEye can assist with their Managed Defence practice. However, it should deliver a level of insight and operational management which is at the bleeding edge.
Part 1: Product Installation and deployment
The cloud console requires no significant installation. Once in the management console, the client installers can be downloaded from Admin/Agent Settings to install onto the client machines.
There is no user interface provided by default on the Windows client, not even a status icon. Windows pops up a warning window when malware is found. Otherwise the client is designed to be wholly managed from the centralised console with no user input.
The management console is quite different from a conventional centralised AV product. The emphasis here is clearly on acquisition of data from clients, analysis of it, and then responses to the data acquired.
From this perspective, the platform has an extremely powerful and extensive set of information gathering tools, allowing you to build comprehensive queries of almost any type. These are then dispatched to the clients. Analysing this information is the core of the server product.
Because of this, although you could treat FireEye as a straightforward AV package, allowing the engines to process malware as it is found, the real strength comes in the analysis and containment capabilities.
There is little work required to configure the platform once the agents are deployed. Of course, you can build custom policies if you wish, or create different settings for groups that diverge from the default. But it is likely that global default settings will be the bedrock of the deployment.
There isn’t much in the way of handholding in the initial setup process for the smaller organisation. Clearly the product is aimed at the more professional, larger organisation which will have had training and consultancy for deployment.
Part 2: Ongoing use
The desktop client is essentially invisible to the user unless something has been detected. Even then, the client is informational rather than allowing the user to interact with the software. There is no equivalent to “Scan with FireEye” available to the user. The platform relies on its information gathering and threat analysis.
The management console is not a tool to be dipped into occasionally. It offers a huge amount of power, but that comes with the need for considerable understanding of what the platform offers and how to achieve it. There is little handholding here, and the product is squarely into the large corporate space where training and consultancy will be demanded. From that point of view, this is not a product for the SME space.
Firstly, you need to understand what FireEye is trying to achieve, both from its information gathering, analysis and threat detection capabilities, along with the “behind the scenes” operation on the client. The emphasis here is solidly on information acquisition, analysis and reporting. This goes way beyond a conventional AV product, and allows the central administrators to initiate information gathering from a wide array of client machines, processing of the resultant information and then taking actions based upon it.
Whilst you could use the product as a straightforward AV platform, that would be to overlook its core strengths.
There is a basic front-page overview of the status of the deployed agents, which allows you to drill down into more detail. As an ongoing view, this is probably sufficient. But it is once you drill into the Hosts, Enterprise Search, Acquisitions and Rules sections that the power comes through. The essential component here is building search routines to find what you are looking for, request containment of the device which locks out the user whilst informing them of the centralised management control, and then to dig through what is happening. This ability to lock out a device is key component to the handling of a wide spread malware event.
However, it should not be underestimated how much technical and systems knowledge is required to get the best from this. This is not a criticism, indeed for a hard-core IT administrator it is a great strength to have access to this level of query and analysis over such a large estate of end user computers.
Part 3: Remediation and outbreak containment
This is the key to FireEye. The ability to see what is happening, to contain and manage the devices, and then to analyse what has happened, is exceptionally powerful. But the power requires deep understanding of both the platform and of the deployed installation. This is not for the faint of heart, but it gives tools that should allow for fast and effective identification, remediation and containment.
What is it?
Server-based management console with client AV packages. The server is called Fortinet FortiClient Enterprise Management Server, and the client is called FortiClient. The server runs on Windows Server 2008 R2 or later. There are clients for Windows, Mac OS X and Linux, with limited support on Android and iOS. Only Windows offers Advanced Threat Protection Components. There is a client for Windows Mobile, but this is for SSL VPN only, and there is a web-filtering client for Chromebook.
Product information vendor’s website: https://www.fortinet.com/content/dam/fortinet/assets/data-sheets/FortiClient.pdf
Online support: https://www.fortinet.com/support.html
Summary
This is a strong product aimed at the larger organisation. It is relatively straightforward to install and deploy, but would benefit from more handholding for the smaller organisation. There is some welcome graphical reporting, but we felt that more could be done here, especially helping the administrator dig through the status of the network. Nevertheless, the day-to-day operation would benefit from training and time spent learning, in order to extract the full understanding and performance.
Part 1: Product Installation and deployment
This is a local server-based product with clients that are deployed to the desktop. Installing the management console is very simple and requires almost no user interaction. Once up and running, there are some tasks you need to perform before the client can be deployed. By default, antivirus functionality is not enabled, and so this needs to be enabled under Endpoint Profiles/Default.
Once you have done this, you can then deploy the client to the desktop, usually by browsing to the server URL and downloading the installer. After the client installer has been deployed, it fully takes over the Windows AV security role. The functionality available to the client user depends upon policy, but can allow for file/right click/Scan with FortiClient Antivirus for example, which can be useful in an environment where users are encouraged to be part of the AV strategy. The client app is somewhat modular in design, depending on what functionality has been configured and deployed.
On the server side, there are good reports for devices discovered which are not part of the management structure, and it is easy to remediate this. There is a clear and clean view of the status of the network through the Dashboard/FortiClient Status view.
Creating users for the management console is fairly easy. A user can be assigned granular permissions, including creation, update and deleting of various settings, and the abilities to manage endpoints. Finally, you can assign permissions for policy management here too. So, an organisation should be able to create a relatively fine-grained set of permissions here for various levels of administrative role.
There isn’t much in the way of handholding in the initial setup process for the smaller organisation. Clearly the product is aimed at the more professional, larger organisation which will have had training and consultancy for deployment.
Part 2: Ongoing use
The desktop client offers little of day-to-day use to the average user. Being able to initiate a scan is useful for some levels of users, but the client is mostly a status and version reporting tool for the administrators.
Over on the server, there is a fairly clear UI. It definitely benefits from a larger screen.
The Enterprise Management Server app has a menu system down the left-hand side, and choosing from here populates the right-hand side of the window. Starting with Dashboard, there is a fairly graphical overview of the status of the platform and clients. One criticism here is the lack of colour used to highlight issues. For example, our status screen shows “2 infected endpoints” but this is in the same grey design as other status objects reporting no issues. A little more boldness in UI design would help here.
You can click through from the items to get more data, but it sometimes is not particularly obvious what detail has been uncovered. For example, taking our “2 infected endpoints”, we click through and get a view of the two devices. But again, there is little here to tell me what is actually wrong with these devices. More clarity here would help when dealing with problems and outbreaks.
The Vulnerability Scan window has an interesting set of “traffic light” views, from green “low” through yellow “medium” to orange “high” and red “critical. Underneath this is a set of buttons selecting what is being reported, for example operating system, browser, MS Office, service, etc. Moving the mouse over these buttons causes a graphical refresh of the traffic lights, but it is not clear what the data means until you actually click on a button. This is a useful interface that is slightly compromised by its implementation.
The Endpoints menu allows you to look at the status of all endpoints. There is an attempt to be graphical here, but some of the icons could be clearer in their meaning.
Endpoint Profile lets you build up the profile to be pushed to a user’s computer. It is quite straightforward and obvious what needs to be done here. There is a Basic/Advanced view button which is helpful if you want to dig into the details, or stay with a more simplified view.
Gateway Lists allows you to manage this aspect. Finally, Administration and System Settings allows control of the underlying settings of the platform.
It is fairly straightforward to use the platform on a day to day basis, both getting reports of what is happening and initiating scans or remedial actions as required. The UI is quite well designed, but would benefit from some final polish to make it more obvious. A stronger splitting of setup from day-to-day and from system administration would help too.
Part 3: Remediation and outbreak containment
The Enterprise Management Server lets you view the status of what is happening on the network, and to focus on those devices where there are issues that need remediation. It is a fairly standard set of tools here, and there is not a lot of deep analysis of what has happened, and where it has spread. Nevertheless, it should be fairly straightforward to handle an outbreak and ensure that the affected clients are identified and/or cleaned depending on policy and internal processes.
What is it?
Server-based management console. Targeted at medium to large enterprises and organizations. Supports management of endpoint security clients for Windows, Mac, and Linux desktops, Windows and Linux servers, Android and iOS mobile devices.
Product information on vendor’s website: https://www.kaspersky.com/small-to-medium-business-security/endpoint-select
Online support: https://support.kaspersky.com/kes11
Summary
A strong product aimed at medium-sized and larger businesses. Very good cross-platform support, a well-designed and customisable administrative console and management processes that will be familiar and straightforward to Windows system admins. For the purposes of this review, we used the MMC console running on the server. The product also includes a web-based console that can be accessed from any device on the local area network. Please note that Kaspersky Lab also provide a cloud-based management platform, Kaspersky Endpoint Security Cloud. This uses the same endpoint clients but provides different management capabilities, and is aimed more at smaller organisations. The Kaspersky Endpoint Security client software is also used in other Kaspersky Lab enterprise solutions such as Kaspersky Anti Targeted Attack and Kaspersky Endpoint Detection and Response.
Part 1: Product Installation and deployment
Installing the management console on the server is a straightforward process for an experienced administrator. An SQL database is required; if this has not already been set up, the admin can download the free Microsoft SQL Server Express 2014 or MySQL from links provided in the setup wizard. When installation is complete, the Protection Deployment Wizard starts. This automatically discovers devices on the network, and allows the mass installation of the network agent and endpoint protection software to desktop and server computers by remote push, and is simple to use. So far it is possible to discover desktop or server devices by leveraging on their IP subnet, Microsoft Active Directory membership, domain names and Amazon AWS API. The wizard can be rerun by clicking AdvancedRemote Installation in the console tree to add new devices at a later stage. Kaspersky Security Center additionally offers an auto-deployment policy, which means that when devices are discovered and placed into a managed group, the appropriate endpoint protection software will be installed automatically. It is also possible to create an installation package, which can be distributed via web link, network share or USB device, for individual installations. The home page of the console (Kaspersky Security Center 10) is subtitled “First steps: devices, tasks, policies and reports. Interface configuration”. It provides a comprehensive range of instructions and descriptions to help the admin with everyday tasks, including “How to find your devices”, “Where to view a list of all tasks”, and “Where to view summary information about Administration Server operation”.
Part 2: Ongoing use
Kaspersky Lab make use of the Microsoft Management Console framework for the administration interface. This will be familiar to anyone with experience of Windows administration, and makes navigation very simple. Daily operational tasks are carried out using the Administration ServerStatistics, Managed Devices, Device Selections, Policies, Tasks and User Accounts items in the console tree.
Administration Server/Statistics tab shows a clear overview of network security using pie charts, with a traffic-light colour-coding scheme for OK, Critical and Warning states, as shown in the screenshot above. This page can be customised to show different items or change the chart style.
Managed Devices shows a list of the computers on the network, along with status and device information. There are very useful customisation options here, allowing the admin to add and sort columns such as operating system and architecture, real-time protection status, IP address, last update, and viruses detected.
Device Selections uses a simple report-like function to search for computers that need attention. The feature is extremely easy to use. There is a list of properties that you might want to search for, such as “Devices with Critical status” and “Many viruses detected”. To run a search, just click on the relevant criterion and then Run Selection. The results are shown in a separate Selection Results tab.
Reporting options can be found under Administration ServerReports.
The Policies page lets the admin view, create and edit configuration policies for network computers. There are separate policies for the network agent and the endpoint protection software. Again, this is a very straightforward feature to use.
Tasks displays a list of tasks that have already been run, and lets the admin create new ones, or import them from a file. There is a clear and manageable list of jobs such as remote application installation, update, virus scan, and send message to user.
User Accounts in the Advanced section of the console tree shows a complete list of all Windows users on the network. Here you can add users and groups, and run a report of users of the most infected devices.
In keeping with its target group of larger enterprises, the product’s philosophy is that the endpoint software should be managed by the IT staff, without any distractions for the end user. The program window is essentially a comprehensive status display, which shows security status and detection statistics for the different technologies involved, such as machine learning. Although there is a Settings button, by default the configuration is locked, and the admin makes changes to the settings from the console by using a policy. However, users can run scans of drives, folders or files by means of the context menu in Windows Explorer.
Part 3: Remediation and outbreak containment
The Statistics tab of Administration Server is an obvious place to start in the event of a malware outbreak. This will show the proportion of computers with Warning or Critical status, and lets the admin see a list of all affected computers with a single click. It is then easy to select all the computers from this list, and run an appropriate task, such as scan or update. Running a Threats Report from Administration ServerReports will rapidly produce a very detailed report of the specific detections, locations and times. It is also possible to set event notifications in the applicable policy. This allows the admin to receive alerts by e.g. email or SMS text message for critical events, errors and warnings etc.
What is it?
Cloud-based management console with desktop AV package. Endpoint Security is a client that runs on the desktop, with clients provided for macOS and Windows. There is a web-based console called ePolicy Orchestrator Cloud. The cloud-based product is aimed at businesses of 1-10,000 users. There is also a server-based version of ePO available as an option, which has additional capabilities. However, we felt that the McAfee website is unclear as to their various offerings, and finding information about this product is not easy. There are clients for Windows and macOS.
Product information vendor’s website:
Online support: https://community.mcafee.com/t5/Business-Product-Support/ct-p/mcafee-business
Summary
This product is undoubtedly powerful, and as part of a wider McAfee managed platform it offers a lot. However, the management of the ePolicy Orchestrator Cloud console requires some training. We felt that the range of functionality within the product means that items required for day-to-day AV management are not as easy to find as in less-sophisticated products. However, it should be regarded as a product which will reward the initial learning phase with easier management procedures later on.
Part 1: Product Installation and deployment
Access to the web portal is straightforward via a standard username/password login combination.
The user interface is quite modular, depending on your current task. Across the top is a main menu starting with a full menu dropdown picker. Then there are main menu items of Dashboards, Getting Started, Systems and Queries & Reports.
The best place to start is at the Getting Started menu. Here you get a fairly simple page where you can download the installation client package for the platform which you are currently running.
Running the endpoint protection setup package is quick and easy. Initially, just the agent itself is installed, with the selected protection components then being downloaded and installed automatically over a time period of 20 minutes or so.
Once installed, there is a program window for the client endpoint software that you can address if you wish to. It picks up the installation locale and sets the language of its UI to this automatically. This can be changed by policy, although we feel it is not immediately obvious to first-time users how to do this.
There is an icon in the System Tray area. Clicking on this offers Update Security, the main app window, Show security status, the Status monitor, and an info page.
The main desktop client window is quite clear and clean, offering scanning, updating, and the status of each component.
Part 2: Ongoing use
On the endpoint client, the default policy allows the user to run scans and updates, and see component status. Most other controls – such as the event logs and quarantine – are disabled by default for standard users. However, the admin has fine-grained control of this from the console, so any or all of the controls can be enabled or disabled as desired. Rather unusually, the main client window is resizable but the content doesn’t resize to fit. The user can right click on a file to initiate a scan for threats.
The web console is usefully split into several main working areas. Dashboards offers up a wide range of reports and views, covering areas such a Compliance Status, Protection Summary, Web Control Activity and so forth. The Systems tab lists all installations together with their status and last communication timestamp.
We found one aspect of the GUI to be unclear here. All of the date/time stamps in the management console appear to be on Mountain Time zone, because the headquarters for McAfee’s datacentre is apparently in Denver, Colorado. We feel it is far from obvious to the first-time user how to change the time zone to a local one.
The Dashboards tab has a wide range of reports and views available, and each of them allows you to click through to more data. We found this functionality to be useable, although not quite as intuitive as we would have liked.
It should be noted that in general, ePO Cloud becomes easier to use the more you become familiar with it. Admins using ePO Cloud for the first time should bear in mind that time spent learning about how it works will pay dividends later on. There are a number of ways that daily tasks can be made easier by automatization, and also opportunities to customize the interface, e.g. by adding commonly used functions to the quick-links bar at the top.
Part 3: Remediation and outbreak containment
The remediation and outbreak containment area must be considered from two angles. There is a lot of information here, and a lot of deployment and management power. There is even a set of reports covering Threat Event Origins which can highlight the primary vectors of attack, the top infected users and so forth. All of this is admirable, even if the admin will have to spend some time learning how to use the features optimally.
What is it?
Intune is a cloud-based service that provides companies with security management for their devices, apps and data. Platforms covered are Windows Desktop, Windows Mobile, macOS, iOS and Android. This review covers the use of Microsoft Intune to manage Microsoft’s out-of-box antivirus and security features in Windows desktop operating systems. Please note that a dual management interface is available. In this review, we have covered the Classic interface, shown above. The alternative Azure interface, which we will be reviewing in the December 2018 report, is shown below:
Product information on vendor’s website: https://www.microsoft.com/en-ie/cloud-platform/microsoft-intune
Online support: https://docs.microsoft.com/en-us/intune/?WT.mc_id=UI
Summary
The Intune cloud console has a very clean, modern design, and is very easy to navigate using the single menu bar on the left-hand side. The Live Tiles on the Dashboard page provide an at-a-glance overview of the security situation, and the integrated links mean that the admin can find more information, and take the necessary action, with just a couple of clicks. The management agent can easily be deployed manually in smaller companies, or by Group Policy in larger enterprises. Intune can be used to manage thousands of devices, and its intuitive, easy-to-navigate interface make it an excellent choice.
Part 1: Product Installation and deployment
As the management console is cloud based, no installation is necessary. A management agent has to be deployed to the clients to enable them to be monitored and controlled from the console. This is easily found under Admin/Client Software Download, and can be installed manually on the client with just a couple of clicks. For larger networks, the admin can use Group Policy to deploy the software automatically.
In the case of Windows 10 and Windows 8.1 clients, Microsoft’s antivirus client is already incorporated into the operating system, and so no further software installation is required. With Windows 7 PCs, however, the antivirus client is not pre-installed, but is available as an update. If the Intune management agent is installed on a Windows 7 client without AV protection, the Microsoft AV client update will be downloaded and installed automatically.
Part 2: Ongoing use
The Intune console is navigated using a very neat, clean menu column on the left-hand side. The Dashboard (home) page displays the status of different components using Microsoft’s familiar Live Tiles layout. The Endpoint Protection tile shows the number of devices needing follow-up, and with resolved malware detections, in the form of colour-coded bar charts. Other tiles provide information on Warnings/Critical Alerts, and Device Health. Clicking on an element within a tile, such as Warnings, opens the relevant details page for the item concerned.
Under GroupsDevices, managed computers are listed, along with details such as operating system and date & time of last update. The Protection page provides a more detailed overview of malware detections, device status and most frequently detected malware, along with a list of all malware items that have been detected in the network. Alerts displays details of all security-related warnings, including reports any of failed client software deployments.
The precise nature of the client protection software GUI is dependent on the version of Windows installed on the PC. Up-to-date Windows 10 clients have the Windows Defender Security Center interface, shown below:
Older versions of Windows, including Windows 7 and 8.1, use the same GUI as Microsoft Security Essentials, which is similar to that of a typical consumer antivirus program. Regardless of the GUI, all variants allow the user to update malware definitions, and run full, quick, custom and context-menu scans.
Part 3: Remediation and outbreak containment
The alerts shown in the Live Tiles on the Dashboard page provide links to the relevant details pages, from which the administrator can take the necessary action. For example, clicking on the “Needing follow-up” alert in the Endpoint Protection tile opens the details page of the computer concerned. From here, the admin can use the Remote Tasks menu to run malware scans, update malware definitions or restart the computer.
What is it?
Cloud-console managed system with device clients. Client software has a simple interface, which allows users to run updates and various scans. Aimed at organisations of all sizes. Support for servers, desktops and mobile devices.
With regard to information and support pages on the vendor’s website, there was very little specific information about the Aether platform when we reviewed it. The only relevant page we could find about Aether was a brief description in the support section, please see link below.
https://www.pandasecurity.com/usa/support/card?id=700005
Panda tell us that more comprehensive information about Aether will be added to their website in due course.
Summary
A very strong product, powerful enough for larger organisations but simple enough for smaller businesses too. Very easy to set up as it requires no on-site server component. It has an excellent, very clear and useful administrative console, with a clear installation and deployment workflow and which delivers a strong ongoing operational platform. We were particularly impressed with the clean and obvious design of the user interface, and the speed at which it could be mastered. There is support for Windows servers, Windows/macOS/Linux PCs, and Android mobile devices.
Part 1: Product Installation and deployment
The product is wholly managed from a cloud-based console. Client deployment can be email based, where you issue a link for download and installation. This works on Windows, macOS, Linux and Android. The user clicks on the provided link to install the client, and this is then automatically licensed. Local and remote installations are also available from the Add Computers dialog.
Once a client device has connected to the management console, you can allocate it to a management group. This can be done manually, by IP address range or by Active Directory integration, and obviously helps with a multi-site organisation or one which might be split by IP address/VLAN into teams (sales, accounts etc).
Part 2: Ongoing use
Protection status and threat detection history are provided on the Status page, and this will be the first place an administrator will visit.
There are excellent graphics for detected threats, including malware types, detection origin, phishing and blocked URLs here, and it provides a solid daily overview of issues.
The Status page is particularly liked because it provides a headline view of the status, but allows you to click through for more detailed information. For example, clicking on the main Protection Status graphic takes you to the Computer Protection Status page. This is very clearly laid out, and shows three status categories – Antivirus, Updated Protection and Knowledge – as simple colour-coded icons. Our only criticism of the page is that we could not find a direct link to it – this would be a small but useful addition.
Sub-pages of the Status tab include Web Access and Spam, Licences, and Executive Report. The Executive Report page generates overview reports that can be emailed out on a daily, weekly or monthly routine. You can specify all computers or specific groups, and include any or all of the topics License Status, Protection Status, Detections, Web Access & Spam.
The Computers tab shows all the protected devices; despite the name, mobile devices are also included. A very simple Windows-like folder tree on the left lets you show devices by group. Basic information including IP address, operating system/version, and last connection date/time are shown.
Using the Settings tab, you can see the default configuration policies, and also create new ones. The Tasks tab allows the admin to run scheduled scans.
On the Windows client itself, there is a clean and clear application which pops up and allows access to solid end-user capabilities like Full Scan, Critical Areas Scan and Custom Scan. The user can force a synchronisation of the updates here too. This is a useful, clear and obvious tool which should be within the capabilities of most any user.
Part 3: Remediation and outbreak containment
The management console essentially uses the desktop client component for remediation and outbreak containment. We liked the strong graphical overview of the status of all clients, and this provided a clear indication of what was happening. This overview, with its detailed drill down, alongside the reporting capabilities, should be sufficient for an administrator to understand what has happened.
What is it?
Desktop AV package with a cloud-based deployment page. Max Anti-Virus is a desktop AV package which runs on Windows. There is a web-based console from which the client software can be downloaded, but this currently has no management or reporting capabilities. However, we are told that Saint are developing a management console which is to be released with version 2 of the product, due later this year. In its current form, the product is only suited to very small businesses. Licensing is unclear – the user account has a membership joining date, and a last access date. But it is wholly unclear as to how many seats are licensed or how this is paid for. There are clients for Windows only, with no client for macOS or mobile.
Product information vendor’s website:
Online support:
Summary
There is currently no central cloud management, it is controlled entirely from the client. The promised future release of a cloud management console will hopefully improve matters considerably.
Part 1: Product Installation and deployment
Having logged into the www.malwares.comsite and chosen MAX Anti-Virus tab, you can download the latest version of the Windows client. There is no macOS client nor mobile client.
Installation of the Windows client onto a Windows desktop is simple enough.
Max Anti-Virus has an icon in the System Tray area. Clicking on this offers the options to open the console, perform a scan, turn on/off real-time protection or to enable game mode.
The main program window is straightforward in its layout and use, and the user some basic tools. Turn real-time protection on/off, game mode on/off, initiate scanning, examine the quarantine, examine the log, and go into more detailed settings.
It is important to note that there is no centralised management console here, either provided by a local server or by a cloud service. Because of that, each installation of the client is effectively stand-alone and entirely independent. There is no lockdown of features and facilities – the user can disable the engine or change settings with no oversight or management from the IT function in a company.
The user would expect to have right-click access to initiate a scan against an unknown file. However, there is no shell integration provided here for Max Anti-Virus, and only the concurrently running “Scan with Windows Defender” is found by the user.
>Part 2: Ongoing use
Since there is no centralised management at all, there cannot be any reporting, statistics or control. The client installation should be viewed as being entirely self-managed on the desktop.
The MAX Anti-Virus client app is straightforward to use, but has very limited reporting capabilities. You are limited to looking at the Security Threat Log which is a simple listing of the malware events that have happened on that machine.
You can also view the Quarantine folder in the usual way. We were confused that the default background colour for this application is bright red, even when there is no threat.
In terms of ongoing operation in a business context, the lack of centralised management, deployment, policy and oversight means it can only be used by the smallest of businesses, until such time as centralised management functionality is provided.
Part 3: Remediation and outbreak containment
Control of outbreaks and remediation can currently only be tackled on a machine-by-machine basis, but we hope that the upcoming management console will allow both of these to be tackled centrally.
What is it?
Local server-based management platform with client AV packages. The server component is installed onto a Windows Server which needs to be Server 2008 or later. Clients are available for Windows and macOS, although there is limited information on the Mac client on the TrendMicro OfficeScan website. There is no support for mobile platforms.
Product information vendor’s website: https://www.trendmicro.com/en_gb/business/products/user-protection/sps/endpoint/officescan.html#
Online support: https://success.trendmicro.com/contact-support-europe
Summary
A local server-based solution to AV management. The server product is clear and relatively obvious to use, and it would scale well both up to the larger Active Directory installations and down to the smaller SME sites. Although the UI is quick to learn, it does benefit from some training and ongoing expertise to get the best from the product. However, we liked the good defaults and the clear client tool with its sensible end-user operational capabilities.
Part 1: Product Installation and deployment
Installing the server component follows the standard methodologies. It takes some time, but presents no roadblocks. Deploying Windows clients can be done in a variety of ways. You can email a download link, or use a share to the OfficeXG server from where the installer can be run by executing AutoPccP.exe. Installation of client is straightforward, but it does take some time, partly due to the enforced client scan that occurs as part of the installation process. This cannot be cancelled, but is probably a wise check when deploying into an unknown client estate.
On Windows, the client registers as an AV package and disables Windows Defender.
By default, the client installation presents the user with a wide range of capabilities. These can, of course, be managed by centralised policy. The client app has a clean interface presenting a clear overview of the status of the client and any recent events of note. There are two buttons – one offers Scan, and the other allows an immediate update. There is no right-click scan initiation facility in File Manager, but the Scan function within the OfficeScan client allows you to choose any folder or file.
There are also a few small icons on the client. You can unlock the client by supplying an administrative password, which is useful for a help desk function. The logs window gives a detailed breakdown of past events. The Settings button has configuration items, but these are usually under central policy control.
The administration console does not have a walkthrough for setting up the product. However, it is well laid-out with a clear and obvious workflow across the top-level menu items. Dashboard, Assessment, Agents, Logs, Updates, Administration, Plugins and Help
Creating users is quite straightforward, and there is a fine-grained UI here to allow specific permissions to be given to a particular role. Creating a help-desk role was quite straightforward. There is integration with Active Directory too if required.
Although there isn’t much support here for a smaller organisation, it would not be beyond the capabilities of an SME or smaller consultancy to get this platform installed and operational.
Part 2: Ongoing use
The desktop client is clear, clean and easy to use. It encourages the user to interact with it, and to run updates and scans at will. Obviously, these will be managed through default policy, but it is useful for a user to have some access here, especially in the smaller workplace.
The management console immediately impresses with its clear and clean design. Dashboard gives an overview of the estate of clients, immediately informing you about key metrics like number of known threats found, how many agents are deployed and so forth. They provide a good overview of what is happening, and the default time window is a reasonable 7 days, with 14 and 30-day options too.
The Assessment menu gives access to the underlying reports. These can be run on demand or can be scheduled. Reports can be emailed out to a list of administrators. It would be a useful improvement for reports to be auto-saved to a shared file location too.
The Agents menu expands to cover all aspects of the agent configuration. You can cluster agents into groups either by NetBIOS domain, active directory or DNS, or create a custom grouping here. Global Agent Settings allows policy control of the client agents. For example, the Agent Control sub-tab here allows you to “add manual scan to the windows shortcut menu on endpoints”. The firewall menu defines the policy applied to the clients, and again is policy defined. Agent Installation gives the tools to deploy the agent onto clients.
Outbreak Prevention opens a new window which covers the tools you can use to manage an outbreak.
Logs, Updates, Administration, Plug-ins and Help provide the expected functionality.
Operationally, the user interface is quite logically designed and obvious to use. The dashboard is clear, and the tasks that you can manage are placed where you would expect. Although the UI is fairly complex, and could benefit from more simplification, even a smaller SME should have little problem managing this on a day to day basis. And we are confident it should scale well with a larger Active Directory-driven installation.
Part 3: Remediation and outbreak containment
Unusually, OfficeScan XG has a dedicated panel to handle outbreaks. Firstly, you define the proportion of the installed base that you wish to manage, and then you start the Outbreak Prevention settings. This allows you to apply additional policy immediately to the affected clients. For example, this can include: limit or deny access to shared folders, block ports, deny write access to files and folders, deny access to executable compressed files, create mutex handling on malware processes and files. The user is normally informed that such a protocol is in place and that the administrator is enforcing enhanced policy.
We like this approach because it gives an obvious place for the administrative team to go to in order to apply additional emergency policy in a controlled and coherent way. Undoing this bundle of settings is easy to do, and normal client operation will return.
What is it?
Cloud-based management console with desktop AV package. The cloud package, called Endpoint Security Cloud Edition, claims that it “can be purchased, configured and have a site deployed in a matter of three clicks and less than 10 minutes” which is a bold claim. VIPRE Endpoint Security is the client that runs on the desktop. It isn’t clear on their website which platforms are supported, but the management console offers a Windows agent. There is no obvious support for macOS or mobile devices. VIPRE claims that its infrastructure runs on the Amazon AWS cloud, and that this brings unparalleled efficiency, scalability and growth.
Product information vendor’s website: https://www.vipre.com/cloud/
Online support: also offers live chat directly from the management console
Summary
This product impresses with its clear and clean design, its simple operational processes and the strong reporting features. Even a relatively inexperienced user should have little difficulty in getting the platform running well, and to have the agent deployed successfully onto the target desktop machines. We would have liked better clarity about the range of clients supported. It is clear from the product that there is a Windows agent, but not others, and the website doesn’t help. Nevertheless, the product both in its cloud implementation shows what clear thinking and good deployment flow can bring, along with strong reporting and an obvious process for day-to-day operation.
Part 1: Product Installation and deployment
Access to the web portal is straightforward via a standard username/password login combination.
The user interface immediately impresses with its clean and clear design. The first page you see has a Getting Started area, which covers deploying of agents, creation of users and the setting of appropriate policies. The next section deals with more advanced post-setup topics, such as Dashboard, Devices, Exclusions, Notifications and Reports.
Once you are up and running, the menus on the left-hand side come into play. From the top, the Monitor section covers Dashboard which is a straightforward view of the status of all the clients. It is obvious which ones need attention, what the device and threat count is, and the version numbering of the devices deployed.
Quarantine gives a strong overview of the quarantine actions over the past week. You can easily extend the reporting-time window using obvious choices such as “Last 24 hours”, “Last 3 days” and so forth. The reporting is clear and clean, showing what devices have had issues, and with which malware sources.
Reports lets you dig into the data in a more detailed fashion, for example by client, by malware, by action taken, by policy definition. All of these are clear and clean, but more designed to be used through the web console. You can set up notifications and reports to be sent through the System menu.
The next section is Manage which covers Devices, an area which shows which devices are in play, and their operational status. For any device or collection of devices, you can easily choose to assign policy, run a scan, update the definitions, reboot the device, delete the agent and other management functions.
Policies enables the creation of policy definitions controlling how the clients are allowed to operate, and the security policies that they will deploy. There is a wide range of customisation here, but the “Default Enterprise” settings will probably be appropriate for most users. It is here, of course, that you can allow users to interact with the VIPRE client, allowing them to scan items via a right click, or forcing USB devices to be scanned on insertion.
Exclusions allows you to create exclusion lists of files, paths, folders and so forth that are excluded from scanning. This might, for example, include some shared space that is managed in a different way to normal storage.
Finally, the Setup area covers System settings and all the main defaults of the platform. Deploy Agents allows you to download an agent installer package, to create a policy installer and to invite users via email.
Part 2: Ongoing use
Starting with the client, the available capability here will depend on the deployed policy. By default, we had the opportunity for the user to right click on items of concern, which always strikes us as a good balance. The user can see basic reporting, and have a daily operational relationship with the platform.
The web console impresses both from the initial setup and deployment through to the ongoing management. The defaults are sensible, the screens clear and clean, and it is obvious what it is reporting and how healthy the clients are. It is simple to get clients to do centrally managed tasks, and the configuration of policy is easy too. Creating users who are allowed to interact with the system is simple, and they can have the role of Admin or Analyst, which might be appropriate for a help desk operative.
It is simple to create ongoing reports, and you don’t need to specify a mail server to send it through – this is provided for you.
We can easily imagine this platform being appropriate for any size of organisation, from a small business deployment covering a few seats through to a larger organisation. The UI of the management console was always responsive under testing, although it is not known how well it would fare with thousands of desktops and large numbers of events. We suspect it will scale well.
Part 3: Remediation and outbreak containment
The clarity of the management console is a significant plus point here, showing clearly what is happening and on which devices. The ability to set policy in a visible way, with sensible defaults and clear explanations, is also important, as is the ability to easily get client machines to perform the required updating and scanning in the event of an incident. The reporting helps here too, allowing you to easily discover what happened, when and on which machines.
Business Security Test March-April 2018 – Factsheet
Malware Protection Test Enterprise March 2018 – Testresult
Real-World Protection Test Enterprise March-April 2018 – Testresult
Saint Security
Saint Security was founded in 2004, and is based in Seoul, South Korea.
The company collects and analyses malicious code, and makes a machine-learning-based antivirus program, as well as network security products.


