Introduction
We are an independent test lab, providing rigorous testing of security software products. We were founded in 2004 and are based in Innsbruck, Austria.
At the end of every year, AV-Comparatives releases a Summary Report to comment on the various consumer anti-virus products tested over the course of the year, and to highlight the high-scoring products of the different tests that took place over the twelve months. Please bear in mind that this report considers all the Consumer Main-Series Tests of 2019, i.e. not just the latest ones. Comments and conclusions are based on the results shown in the various comparative test reports, as well as from observations made during the tests (https://www.av-comparatives.org/test-methods/).
Tested Products
The following vendors’ products were included in AV-Comparatives’ Public Consumer Main Test-Series of 2019 and had the effectiveness of their products independently evaluated. We are happy that this year’s tests helped several vendors to find critical and other bugs in their software, and that this has contributed to improving the products.
Approved Security Product Award
The tested products of all the 16 vendors above are AV-Comparatives 2019 Approved Windows Security Products.

Management Summary
Tests
In 2019, AV-Comparatives subjected 16 consumer security products for Windows to rigorous investigation. All the programs were tested for their ability to protect against real-world Internet threats, identify thousands of recent malicious programs, defend against advanced targeted attacks, and provide protection without slowing down the PC.
Results and Awards
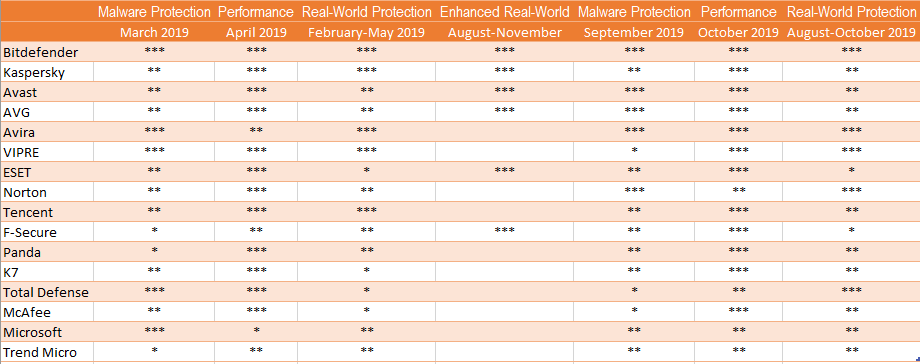
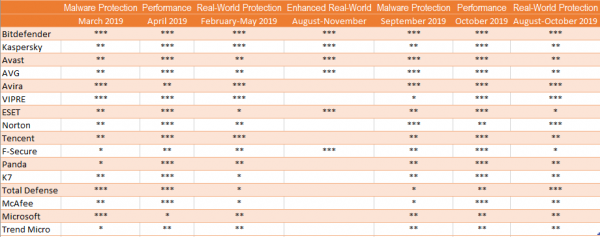
Whilst all of the programs in our test reached an acceptable level overall, some programs outperformed others. For details, please see “Overview of levels reached during 2019” on page 9. In order to recognise those products that achieve outstanding scores in our tests, we have given a number of end-of-year awards that highlight the best results in each test, and overall. The Product of the Year and Top Rated awards are based on overall performance in the Public Consumer Main Test Series; there are also Gold, Silver and Bronze awards for each individual test type. Please see the Award Winners section for more details of the awards. The 2019 Product of the Year Award goes to Bitdefender; the Top Rated Products are (alphabetically) Avast, AVG, and Kaspersky.
Overview of tested products
Here we provide a summary for each of the programs tested, with a note of each one’s successes during the year. Although the user interface does not affect any awards, we have noted some of the best UI features as well.
Avast is a Top-Rated Product in 2019. It received an Advanced+ Award in four of this year’s tests, and Advanced in the other three. It also takes a joint Bronze Award for Malware Protection and a joint Silver Award for Advanced Threat Protection. It has a very clean, modern interface, and the setup wizard offers ideal options for both expert and non-expert users.
AVG receives a Top-Rated Product award this year. In four of this year’s tests it took an Advanced+ Award, along with Advanced in the other three. It also received a joint Bronze Award for Malware Protection, and a joint Silver Award for Advanced Threat Protection. It has a touch-friendly interface and good setup options.
Avira took five Advanced+ Awards and one Advanced in this year’s tests. Additionally, it receives Gold Awards for Real-World Protection and Malware Protection, along with a Silver Award for the low number of False Positives. It features a modern, touch-friendly interface.
Bitdefender wins this year’s Product of the Year Award, having reached Advanced+ in all seven tests in 2019. It additionally receives the Silver Award for both Real-World Protection and Malware Protection, plus a joint Bronze Award for Advanced Threat Protection. Its well-designed user interface includes a customisable home page, and real-time protection is highly sensitive.
ESET takes this year’s Gold Award for Performance, the Bronze Award for the lowest number of False Positives, and a joint Gold Award for Advanced Threat Protection. It received three Advanced+ and two Advanced Awards in this year’s tests. Reviewers were impressed with the clear and simple layout of the GUI, and ease of use.
F-Secure received a joint Bronze Award for Advanced Threat Protection in 2019. It also took two Advanced+ and three Advanced Awards. It features an easy-to-use, simply laid-out interface.
K7 takes this year’s Bronze Award for Performance. It also got two Advanced+ and three Advanced Awards in the 2019 tests. Reviewers liked its simple design and impressive scanning speed.
Kaspersky is a Top-Rated Product this year, having got four Advanced+ and three Advanced Awards in the tests. In addition, it receives the Gold Award for the low number of False Positives, and a joint Gold Award for Advanced Threat Protection. It has an easy-to-use tiled interface, and a wide range of configuration options.
McAfee received two Advanced+ and two Advanced Awards in the year’s tests, along with a Silver Award for Performance. Its user interface is clean, modern and touch friendly. The program’s status alerts are exemplary.
Microsoft’s product is integrated into Windows 10, and has a simple, unobtrusive interface. It took one Advanced+ and four Advanced Awards in the year’s tests.
NortonLifeLock’s product took three Advanced+ and three Advanced Awards in this year’s tests. It has a well-designed overall user experience, with detailed malware information accessible from alerts.
Panda received two Advanced+ and three Advanced Awards in this year’s tests. Reviewers noted its Rescue Kit feature, which allows you to run a recovery environment from a bootable USB drive.
Total Defense took three Advanced+ Awards in its first year of testing. Its user interface stands out for its simplicity.
Tencent (Global English Version) took three Advanced+ and three Advanced Awards in this year’s tests. Its user interface has a clear, modern design.
Trend Micro received five Advanced Awards in this year’s tests. The user interface presents a simple overview, but allows easy access to advanced options. Its persistent malware and status alerts stand out.
VIPRE took five Advanced+ Awards in this year’s tests, along with a Bronze Award for Real-World Protection. It has a very clean design and good online help feature, which you can search directly from the program.
Advice on Choosing Computer Security Software
There is no such thing as the perfect security program, or the best one for all needs and every user. Being recognized as “Product of the Year” does not mean that a program is the “best” in all cases and for everyone: it only means that its overall performance in our tests throughout the year was consistent and unbeaten. Before selecting a security product, please visit the vendor’s website and evaluate their software by downloading a trial version. Our awards are based on test results only and do not consider other important factors (such as available interface languages, price, and support options), which you should evaluate for yourself.
Overview of levels reached during 2019
AV-Comparatives provides a wide range of tests and reviews in comprehensive reports (https://www.av-comparatives.org/test-methods/). Annual awards for 2019 are based on the Public Consumer Main Test-Series: Real-World Protection Test, Performance Test, Malware Protection Test, False-Alarm Test and the Enhanced Real-World Test.
All the programs tested are from reputable and reliable manufacturers. Please note that even the STANDARD level/award requires a program to reach a good standard, although it indicates areas which need further improvement compared to other products. ADVANCED indicates that a product has areas which may need some improvement, but is already very competent. Below is an overview of awards reached by the various anti-virus products in AV-Comparatives’ consumer main test-series of 2019.
Award Winners
Awards for individual tests
For each of the test types* in the Public Consumer Main Test Series (Real-World Protection, File Detection, Enhanced Real-World Test, Performance and False Positives), we give Gold, Silver and Bronze awards, for the first, second and third highest-scoring products, respectively.
Awards for all combined scores of all tests
As in previous years, in 2019 we are giving our Product of the Year Award to the product with the highest overall scores across all the tests in the Public Consumer Main Test Series. This depends on the number of Advanced+ awards received in all the tests. As all products receiving an Advanced+ award are considered (statistically speaking) to be as good as each other, a product can receive the Product of the Year award without necessarily reaching the highest score in any individual test.
As in previous years, we will also be giving Top Rated Awards to a select group of tested products which reached a very high standard in the Public Consumer Main Series tests. We have used the results over the year to designate products as “Top Rated”. Results from all the tests are assigned points as follows: Tested = 0, Standard = 5, Advanced = 10, Advanced+ = 15. Products with 90 points or more are given the Top Rated award, with two conditions. Firstly, any products that failed to win any award (i.e. got 0 points) in either of the Real-World Protection tests have not been considered. Secondly, good results in the Performance Tests cannot make up for weak results in the detection/protection tests.
To get the Approved Windows Security Product Award (see page 5), at least 35 points must be reached.
*For some test types, there may be two actual tests conducted in a year; the awards are based on the combined score of both tests.
Product of the Year 2019
AV-Comparatives’ 2019 Product of the Year award goes to:
Bitdefender

Top-Rated Products 2019
AV-Comparatives’ Top-Rated Award for 2019 goes to, in alphabetical order:
Avast, AVG, Kaspersky

Please see our summary and awards pages – links below:
https://www.av-comparatives.org/test-results/
https://www.av-comparatives.org/awards/
Real-World Protection Test winners
Security products include various different features to protect systems against malware. Such protection features are taken into account in the Real-World Protection Test, which tests products under realistic Internet usage conditions. Products must provide a high level of protection without producing too many false alarms, and without requiring the user to make a decision as to whether something is harmful or not.
The programs with the best overall results over the course of the year were from: AVIRA, Bitdefender and VIPRE.
For details and full results of the 2019 Real-World Protection tests, please click the link below:
https://www.av-comparatives.org/testmethod/real-world-protection-tests/
Malware Protection winners
The Malware Protection Test evaluates an AV product’s ability to protect against malware coming from removable devices or network shares. Products must provide a high level of protection without producing too many false alarms. In the Malware Protection Test, all samples not detected on-demand or on-access are executed.
Avast, AVG, AVIRA and Bitdefender scored well in both tests.
 |
AVIRA |
 |
Bitdefender |
 |
Avast, AVG |
For details and full results of the 2019 Malware Protection tests, please click the link below:
https://www.av-comparatives.org/testmethod/malware-protection-tests/
False Positivies winners
False positives can cause as much trouble as a real infection. Due to this, it is important that anti-virus products undergo stringent quality assurance testing before release to the public, in order to avoid false positives. AV-Comparatives carry out extensive false-positive testing as part of the Malware Protection Tests. Additionally, also false alarms from the Real-World Protection Test are counted for this category.
The products with the lowest rates of false positives during 2019 were Kaspersky (3), AVIRA, (7) and ESET (9). These figures represent the SUM of the false positives from all FP Tests.
False Alarm Testing is included in each Protection Test. For details about False Positives, please click the link below:
https://www.av-comparatives.org/testmethod/false-alarm-tests/
Overall Performance (Low System-Impact) winners
Security products must remain turned on under all circumstances, while users are performing their usual computing tasks. Some products may have a higher impact than others on system performance while performing some tasks.
ESET, McAfee and K7 demonstrated a lower impact on system performance than other products.
For details and full results of the 2019 Performance tests, please click the link below:
https://www.av-comparatives.org/testmethod/performance-tests/
Enhanced Real-World Test (Advanced Threat Protection) winners
This tests a program’s ability to protect against advanced targeted and fileless attacks.
In this year’s test, only few products took part in this challenging test, but all scored very well. ESET and Kaspersky blocked all 15 targeted attacks (out of 15), Avast and AVG blocked 14 attacks, Bitdefender and F-Secure blocked 13 attacks.
| The specified award is not available |
ESET, Kaspersky |
| The specified award is not available |
Avast, AVG |
| The specified award is not available |
Bitdefender, F-Secure |
For details and full results of the 2019 Enhanced Real-World Test, please click the link below:
https://www.av-comparatives.org/testmethod/enhanced-real-world-tests/
Product Reviews
Review Format
For each of the tested products, we have looked at the following points (where applicable).
About the program
To start off with, we state whether the program is free or has to be paid for. We don’t list individual protection components (e.g. signatures, heuristics, behavioural protection), for the following reasons. Our protection tests verify how well each program protects the system, whereby it is not important which component(s) are involved. It is not the number of features that is important, but how effectively they work. Also, different vendors may have different names for individual functions, or combine multiple types of functionality under one name. This could make it misleading to compare products using the vendors’ component names. For readers’ convenience, we do note any non-malware-related features, such as parental controls or spam filtering. With the exception of a replacement firewall (see below), we do not check the functionality of these additional features.
Setup
We note any options available, whether you have to make any decisions, and any other points of interest, such as introductory wizards that explain the program’s features. We suggest that there should be a simple installation option for non-expert users. If at any stage the user has to make a decision in order to proceed, the options should be explained simply and clearly.
System Tray icon
Here we state what functionality is available from the program’s System Tray icon. This can be a convenient way of accessing commonly-used functions, such as scans and updates. A System Tray icon is a standard feature for modern security programs for consumers. We regard it as a very useful means of showing that the program is running.
Security alerts
First, we disable the program’s real-time protection, and check to see what alerts are shown. We also look for a quick and easy means of reactivating the protection. An effective status display, which shows a clear warning if protection is disabled, is a very standard feature, as is a “Fix-All” button/link with which the user can easily re-enable protection. We regard both of these as important for non-expert users. Additional pop-up alerts, which the user would see even if the program window were not open, are a desirable bonus. Next, we check how each program reacts when malware is encountered. We look to see what sort of alert is shown, if there are any options provided for dealing with the malware, if any information about the malware is given, and how long the alert is displayed. For non-expert users at least, we feel it is appropriate for a security program to show an alert when malware is detected, so that the user understands why the file in question cannot be downloaded/accessed. Also for non-expert users, we regard it as ideal if the malware is deleted or quarantined automatically, without the user having to make a decision on what to do with it. We would definitely recommend that any alert box should not include an option to instantly whitelist the file (i.e. allow it to be executed there and then). A much safer option is to quarantine the file, after which power users could go into the program’s settings to whitelist and restore it if they wanted.
First, we download a malware test sample from a website, to see what sort of alert is shown when malware is inadvertently downloaded. We note whether the user has to take any action, how long the alert is displayed for, and if any information is provided about the detected malware.
The next step is to connect a USB flash drive to the review system, containing a mix of malware samples (highly prevalent and known to be detected by all the programs in the review) and clean files. We note if any action is taken automatically by the security program, or if it prompts to scan the drive. If a scan is offered, we decline it, and open the drive in Windows Explorer. If the malware is not detected at this point, we attempt to copy the files on the drive (good and bad) to the Windows Desktop, and to a second external drive.
All the programs in our Consumer Main-Test Series detect malware on execution, which is enough to keep the system free of infection. However, many users may expect their security program to detect malware on-access, i.e. when the drive or folder containing it is opened in Windows Explorer, or at the latest when it is moved or copied. This would prevent them inadvertently passing on malicious files to somebody else on an external drive.
Scan options
Here we look at the different types of on-demand scan provided by each program, how to access and configure them, set scan exclusions, schedule scans, and what options are provided for PUA detection. We also look at how the results are displayed at the end of an on-demand scan, and whether the user needs to make any decisions. If multiple malicious files are found in a scan, it should be easy to carry out a safe action on all of them at once, rather than having to select an action for each one individually.
Quarantine
In the program’s quarantine function, we look to see what information it provides about the detection location/time and the malware itself, and what options are available for processing it, e.g. delete, restore or submit to vendor for analysis.
Logs
Here we note what information is provided in the program’s log function.
Help
In this section, we take a quick look at whatever help features can be directly accessed from the program itself. Some vendors will have additional online resources, such as manuals and FAQ pages, that can be found by visiting their respective websites.
Access control
For users who do not share their computer with anyone, this section is not relevant. However, if you share a computer, e.g. with your family at home, or colleagues in a small business, you might want to read it. We look to see if it possible to prevent other users of the computer from disabling the security program’s protection features, or uninstalling it altogether. There are two ways of doing this. Firstly, access can be limited using Windows User Accounts: users with Administrator Accounts can change settings and thus disable protection, whereas those with Standard User Accounts can’t. Alternatively, a program can provide password protection, so that any user – regardless of account type – can only change settings by entering a password. Some programs provide both methods, which we regard as ideal. When testing access control, we try to find all possible means of disabling protection, to ensure that any restrictions apply to all of them.
Firewall
Some of the products in this year’s tests have a replacement firewall. That is to say, they include their own firewall, which is used in place of Windows Firewall. For these products, we perform a very simple functionality test, to check that basic functions of their replacement firewalls work as expected. In essence, this just verifies that network discovery and file sharing are allowed on private networks, but blocked on public ones.
For this test, we use a laptop PC, running Windows 10 Professional, with a wireless network adapter. We share the Documents folder, with read and write permissions for “Everyone”, and enable Remote Desktop access. In Windows Firewall/Advanced Sharing Settings, we turn on network discovery, file sharing, and Remote Desktop access for Private networks, but turn them all off for Public networks. We then verify that network access is working as expected in both Private and Public networks. It is initially connected to a wireless network that is defined as Private in Windows network status settings.
We then install the security product with default settings, and reboot the computer. If during installation the third-party firewall in the security product were to prompt us to define the current network as public or private, we would designate it as private at that point. After the reboot, we check to see if we can still ping the PC, open and edit a document in its shared folder, and gain Remote Desktop access. We would expect the third-party firewall to allow all these types of access.
We then connect the laptop to a new, unknown wireless network, which we define as Public in Windows’ network status prompt. If the third-party firewall were to display its own network-status prompt, we would also choose the public/untrusted option here. Next, we attempt to ping the test laptop (IPv4 and IPv6) from another computer on the same network, access its file share, and log in with Remote Desktop. We would expect the third-party firewall to block all these forms of access, as Windows Firewall would do.
In our opinion, a third-party firewall in a security program should either adopt Windows’ network status settings automatically, or achieve the same result by means of displaying its own prompts. This allows laptop users to share files when at home, but keep intruders out when using public networks.
We recognise that some users may like to use Windows Firewall – which is a known standard – rather than the third-party firewall in their security product. For such users, it is ideal if the security product’s own firewall can be cleanly disabled (i.e. permanently disabled, without security alerts being constantly shown), and Windows Firewall can be activated instead. We check to see if this is possible.
About the program
Avast Free Antivirus is, as its name suggests, a free security program. In addition to anti-malware features, it includes a manual software update feature and network-security scanner.
You can find out more about Avast Free Antivirus on the vendor’s website: https://www.avast.com/free-antivirus-download
Summary
The interface of Avast Free Antivirus is clean and modern, and makes most important features easy to find. Malware alerts and default actions on detection are good. By and large, it is very easy to navigate and use. The setup wizard provides the choice of a default, one-click installation, or a fully customisable install for power users, which we liked.
The program displays extensive advertising for other, paid-for Avast products. A number of the components and features shown in the setup wizard and program interface require the purchase of the premium version of the program, or a separate product. It is not always clear which features require an additional purchase. We would suggest that users obtain independent advice on what other types of security/performance-related products are appropriate to their needs before buying any additional products.
Status alerts can be easily supressed. Under some circumstances, a user could then think all is well when it isn’t. We feel that this should be improved.
Setup
By default, the setup wizard will install Avast Secure Browser, and make this the default browser on the system. You can easily opt out of this by removing the relevant ticks (checkmarks) on the first page of the setup wizard. We chose not to install the Avast browser for our functionality test. For a default installation, you only need to click Install, and setup will proceed. You can change the interface language if you want. A custom installation is also available, which lets you choose individual components to install, and change the installation folder. We used the default configuration here (all components are installed). The wizard asks you whether you want to join Avast’s anonymous data-collection scheme. It also prompts you to run a scan when setup is complete.
System Tray icon
The System Tray menu lets you open the program window, disable protection for a specified time, use “Silent Mode”, open quarantine, update the program and/or definitions, and see program and registration information.
Security alerts
If real-time file-system protection is disabled, a warning is shown in the program window. You can reactivate the protection by clicking Turn On.
If you click Ignore, the protection status will return to “all is well” status, as shown in the main screenshot at the beginning of the review, despite the fact that file-system protection is disabled. If all the protection components are disabled, and you click Ignore, the status display will change as follows:
We find this very confusing and misleading. There is no information provided as to why the status display has changed to yellow with an exclamation mark. You have to go into the settings to find out, and manually reactivate the protection there.
Once you have clicked Ignore once, the program stores the setting, and will not display the warning text or Turn on button again. Ideally, we feel the Ignore button should be removed. The only disadvantage to this would be that a few advanced users would find the standard alert aesthetically displeasing. Alternatively, a clearer status message could be shown if protection is disabled and the user has clicked Ignore. For example, “You are using Avast Free Antivirus as a second line of defence, real-time protection is off. To reactivate it, click Protection\Core Shields”.
If you should accidentally try to download a malicious file, Avast Free Antivirus will block it. A typical alert is shown below. You do not need to take any action. The alert persists until you close it.
If you click on See details, a panel opens at the bottom of the alert box, showing additional information, such as threat severity, originating URL, the process that encountered the malware, and the Avast protection component that detected it.
If a USB drive containing some malware is connected to the system, Avast Free Antivirus does not initially take any action. However, if you try to copy the malware to the system, Avast immediately detects and quarantines it. An alert similar to the one above is shown, and a warning sound is played. If multiple malicious files are found at the same time, separate alerts are shown one after the other. You have to close each of these individually. However, Avast tell us that an upcoming release will simplify this.
Scan options
The Smart Scan button on the home page runs a very quick malware scan, and checks for outdated apps and browser threats. It also displays “Advanced issues”, which is a means of promoting features only found in Avast Premium Security. The Protection\Virus Scans page additionally provides the options Full\Targeted\Boot-Time\Custom scans. A Custom scan can be scheduled. You can also scan a drive, folder or file by using Windows Explorer’s right-click menu. Under Settings\Protection\Virus Scans, you can change the default action to be taken when malware is discovered, and whether to scan for potentially unwanted applications. PUA detection is enabled by default for on-demand scans, but disabled for real-time protection. Scan exceptions can be configured on the General tab of the settings dialog. If malware is found in an on-demand scan, the scan results page is shown:
You can select an action for each individual file detected, or leave the default Auto, and then click Resolve to execute the selected actions. In our functionality test, the Auto setting quarantined the items.
Quarantine
Avast’s quarantine feature is called Virus Chest. Here you can see the file names and detection names of quarantined items, along with their location and date/time of detection. You can select individual files, or all of them, and take one of the following actions: Delete, Restore, Restore and add exception, Extract, Send for analysis. It appears that the Extract function lets you restore the file to a custom location. We could not find any further information about the malware on the quarantine page.
Logs
A basic log of scans completed can be found by clicking Protection/Virus Scans/Scan History. This shows the date of each scan, along with the detection name and file name/path.
Help
The help feature can be accessed by clicking Menu/Help/Help. This displays a series of frequently asked questions, such as “How do I scan my PC for potential threats?” and “How do I resolve my protection status?”, grouped together into categories. A simple text-only answer is provided for each question.
Access control
Standard Windows users have full access to the program’s settings by default, and so can disable protection features. However, they cannot uninstall the program. It is possible to password protect the program, and there are two options for doing this. The Protect only settings option locks the settings dialog. However, it is still possible to disable protection using the System Tray menu. The second option, Protect everything, makes it impossible to access settings or disable protection by any means. However, it also locks any form of access to the main program window and the functionality of the System Tray menu. The only thing a user can do then is to run a right-click scan from Windows Explorer, though it will not be possible to see the scan results or take any action on malware found.
Other points of interest
- The update function is found under Menu\Settings\General\Update.
- The Rescue Disk feature can be found on the Protection\Virus Scans
- None of the browser features shown in the setup components list (Browser Cleanup, Security Browser Extension, SafePrice Browser Extension) is installed for Chrome. The (system) Cleanup and Passwords features in the same list are separate, paid-for products.
- By default, Avast collects user data via 3rd-party analysis services. However, they inform us that this is only used in-house for e.g. product improvement purposes.
About the program
AVG AntiVirus FREE is a free security program, as its name suggests. In addition to anti-malware features, it includes a file shredder (secure delete) function.
You can find out more about the program on the vendor’s website: https://www.avg.com/en-eu/free-antivirus-download
Summary
The interface of AVG AntiVirus Free is straightforward to use, and makes most important features easy to find. Malware alerts and default actions on detection are good. By and large, it is very easy to navigate and use. The setup wizard provides the choice of a default, one-click installation, or a fully customisable install for power users, which we liked.
The program advertises other, paid-for AVG products on its home page and in the default scan. We would suggest that users obtain independent advice on what other types of security/performance-related products are appropriate to their needs before buying any additional products.
Setup
The default installation of AVG AntiVirus FREE includes the AVG Secure Browser, which is set as the default browser. However, we chose not to install this for our functionality test. You easily deselect installation of the browser by removing two ticks (checkmarks) from the first page of the setup wizard. Setup lets you change the interface language, after which you can simply click Install. For power users, a custom installation is provided. With this option, you can select individual components to be installed, and change the installation folder. At the end of the setup process (default and custom), the wizard asks you for permission to collect anonymous data. An optional first scan is then run.
System Tray icon
The System Tray icon menu lets you open the program, scan the computer, and disable protection
Security alerts
If real-time file-system protection is disabled, an alert is shown in the status area (and Computer tile) of the main program window. You can reactivate the protection by clicking Fix Now.
We note that if you disable real-time file-system protection in the settings using the Stop indefinitely option, it really is permanently disabled. This happens despite the claim that “Protection will be automatically enabled after PC restart”. However, AVG tell us that a new release due in early 2020 will fix this.
If you should accidentally try to download a malicious file, AVG blocks the download. A typical alert is shown below. You do not need to take any action. The alert persists until you close it.
If you click on See details, a panel opens at the bottom of the alert box, showing additional information, such as threat severity, originating URL, the process that encountered the malware, and the AVG protection component that detected it.
If a USB drive containing some malware is connected to the system, AVG AntiVirus FREE does not initially take any action. However, if you try to copy any of the malicious files to the system, AVG immediately detects and quarantines them. An alert similar to the one above is displayed. An individual alert box is shown is shown for each malware item detected, and each has to be closed individually. We understand from AVG that an upcoming release will simplify this.
If you click on See details, a panel opens at the bottom of the alert box, showing additional information, such as threat severity, originating URL, the process that encountered the malware, and the Avast protection component that detected it.
If a USB drive containing some malware is connected to the system, Avast Free Antivirus does not initially take any action. However, if you try to copy the malware to the system, Avast immediately detects and quarantines it. An alert similar to the one above is shown, and a warning sound is played. If multiple malicious files are found at the same time, separate alerts are shown one after the other. You have to close each of these individually. However, Avast tell us that an upcoming release will simplify this.
Scan options
The Scan Computer button on the home page runs a very quick malware scan, and checks for outdated apps and browser threats. It also displays “Advanced issues”, which is a means of promoting features only found in AVG Internet Security. If you click the cogwheel icon next to the Scan Computer button, the Other Scans page opens. This additionally lets you run a Deep Scan (full scan), removable media scan, file or folder scan, or boot-time scan. You can also set up a scheduled scan from here. It is also possible to scan a drive, folder or file using Windows Explorer’s right-click menu.
Under Settings\General\Exceptions you can configure scan exceptions. Basic Protection\Detections lets you change real-time protection’s default detection behaviour (automatic) and PUA detection (ignore). Under Basic Protection\Scans you can configure the same options for on-demand scans. Here, the default behaviour is to detect PUAs. If malware is detected in an on-demand scan, it is quarantined by default.
Quarantine
The quarantine page, along with available options for items in it, is shown below. We could not any means of getting additional information about the quarantined malware.
Logs
We could not find a separate log feature in AVG AntiVirus FREE. However, we are told by AVG that a notification centre and scan history will be introduced in the first half of 2020.
Help
The help feature can be accessed by clicking Menu\Help. This displays a series of frequently asked questions, such as “How do I scan my PC for potential threats?” and “How do I resolve a red protection status?”, grouped together into categories. A simple text-only answer is provided for each question.
Access control
By default, Standard Windows users are able to change settings and disable protection features, but not uninstall the program. If you share your computer, you might like to use the password-protection feature. If you choose the Protect everything option, nobody will be able change any settings or disable protection without knowing the password. The program window will be completely inaccessible, and the only action unauthorised users can perform is a right-click scan from Windows Explorer. It will not be possible to see the results, however. The Protect Only Settings option locks the settings dialog, but users can still disable protection from the System Tray menu, or the Computer tile on the home page.
Other points of interest
- The update function is found under Menu/Settings/General/Update.
- The SafePrice browser extension (shown in the setup components list) is not installed for Chrome.
About the program
Avira Antivirus Pro is a paid-for security program with anti-malware features. There is no free trial as such. However, Avira Free Antivirus has an identical interface, and can be upgraded to Pro by entering a licence key.
You can find out more about Avira Antivirus Pro on the vendor’s website: https://www.avira.com/en/antivirus-pro
Summary
Installation of Avira Antivirus Pro is extremely simple, and the program’s most essential features are easy to find. Safe default settings are provided. Access control options are outstanding. Behind the very modern, clean and touch-friendly main interface are some rather more complicated and mouse-oriented dialogs and alerts. Whilst these serve their purpose, we feel it would be an improvement if they could be updated to the new design.
Setup
To install Avira Antivirus Pro, log in to your Avira online account and download the installer. Just one click is required to install the program.
System Tray icon
The System Tray icon menu lets you enable/disable real-time protection, open the program window, and run scans and updates.
Security alerts
If real-time file-system protection is disabled, an alert is shown in the program window. You can reactivate the protection by clicking Fix Now.
If you should accidentally try to download a malicious file, Avira will pause the download and display an alert, shown below. Three options are provided: Deny access (default), Ignore, Move to quarantine. Unless you choose a different action within 10 seconds, the alert will close and the default action will be taken. If you choose the Ignore option, the file will be instantly detected and quarantined by Avira’s real-time protection.
If a USB drive containing some malware is connected to the system, Avira initially takes no action. However, when you open the drive in Windows Explorer, Avira’s real-time protection immediately detects and quarantines the malware. The alert below is shown – it persists until you close it. Clicking Details displays the program’s quarantine page.
Scan options
You can run a quick scan from the button of the same name in the centre of the window. Additional options – full, custom and scheduled scans – are found in the Scan menu in the left-hand column. You can scan a drive, folder or file using Windows Explorer’s right-click menu. Under Settings\PC Protection, you can set exceptions, and choose the action to be taken on detection. The General\Threat categories section of the settings page lets you choose very specific categories of threat to detect, including adware and spyware (both detected by default).
If malware is detected in an on-demand scan, the detections dialog is shown (screenshot below). At first glance, this appears to have limited information and options. However, mousing over the compressed paths displays a tool tip with the full path, and clicking one of the detection names opens Avira’s online malware encyclopaedia, with basic information about the threat. By right-clicking on an item, you can change the action to be taken to Ignore once or Ignore always. This would appear to be a reasonable means of providing non-experts with just one default safe option, whilst giving experts a choice.
Quarantine
This displays the threat name, file name and path, plus date and time of detection. You can select individual quarantined files, or all together, and rescan, restore or delete them. No additional information about the malware samples is provided.
Logs
The log feature is found under the Activity menu. It lists updates, malware detections, and the activation/deactivation of components and services. You can click on any item to get a brief summary of the details.
Help
Clicking Help in the ? menu opens Avira’s online manuals page. Under Antivirus you will find a searchable FAQ feature. Clear instructions are provided for each topic, many with annotated screenshots and even videos.
Access control
Standard Windows users cannot disable protection features, or uninstall the program. This is as it should be. There is also a password protection feature, which lets you specify in detail which actions are password protected. This can prevent other users disabling protection or uninstalling the program, amongst other things.
Other points of interest:
- The Firewall feature in Modules is a switch for the Windows firewall, there is no Avira firewall.
- Subscription information can be found by clicking the ? menu, then License management. This opens the subscriptions page of your online Avira account.
- The opening page of the Avira window shows a list of other Avira products that you can install. You just need to click Antivirus Pro at the top of the page to get to Antivirus Pro’s home page.
About the program
Bitdefender Internet Security is a paid-for security program. In addition to anti-malware features, it includes a replacement firewall, vulnerability scanner, antispam, ransomware remediation, Wi-Fi security advisor, parental controls, file shredder (secure deletion), a basic VPN, and file encryption.
You can find out more about the program on the vendor’s website: https://www.bitdefender.com/solutions/internet-security.html
Summary
Bitdefender Internet Security is very straightforward to install and navigate, with almost all important functions easy to find. We liked the ability to customise the tiles on the home page. Malware on a USB drive is automatically detected in an instant, and access-control options are optimal. Default options are very safe for non-expert users.
Setup
The setup wizard lets you choose the interface language, and opt out of sending product reports. Otherwise there are no decisions to make, and installation completes very quickly. You have to create a Bitdefender account, or log in with an existing one. You can then enter a licence key, or opt to use the 30-day free trial. A very short introductory wizard runs when you first open the program.
System Tray icon
The System Tray icon menu lets you open the program window, run updates, see program information, and launch the program’s desktop widget.
Security alerts
If real-time file-system protection is disabled, an alert is shown in the program window. You can reactivate the protection by clicking Enable Now.
If you should accidentally try to download a malicious file, Bitdefender will initially show a warning page in the browser.
If you ignore the program’s good advice and click “I understand the risks, take me there anyway”, Bitdefender will quarantine the threat. A typical alert is shown below. You do not need to take any action. Clicking More details opens the program’s Notifications page, which shows you the file path and detection name. The alert closes after about 30 seconds.
If a USB drive containing some malware is connected to the system, Bitdefender immediately scans the drive automatically, and shows the scan results dialog box. From here, you can choose an action to apply to individual malware files, or to all of them together:
In our functionality test, we chose “Take proper actions”. This quarantined the malware and ran an additional scan, which took about 5 minutes. We note that if you choose Take no action, Bitdefender’s real-time protection will still prevent the malware being copied or executed.
Scan options
The Protection page, Antivirus tile lets you run quick or full scans, and set up custom scans, which can be scheduled. Using the Settings option in the same tile, you can choose whether to detect potentially unwanted applications (on by default), change the default action taken when malware is detected, set exceptions, and change the default action for USB drives (default is to scan them).
Quarantine
The Quarantine page (found under Protection) shows the file name and path, detection name, and time/date of quarantined items. From here, you can delete or restore individual items one by one. The dialog box notes that restoring a file automatically excludes it from future scanning. This can be changed in the settings. We could not find any further information about the malware on the quarantine page.
Logs
At the end of a scan, it is possible to see a log of that scan. Other than this, we could not find a log feature in the program.
Help
The Support page has links to the User’s Guide and Support Center. Both of these open pages on the vendor’s website, which are quite similar, including some frequently asked questions and providing a search function. Both provide simple, text-only answers.
Access control
Standard Windows users cannot disable protection features, or uninstall the program. This is as it should be. You can also password protect the settings, meaning that no users can disable protection without entering the password.
Bitdefender Firewall
In our functionality test, the firewall in Bitdefender Internet Security behaved almost exactly as expected. When connected to a network that we had previously designated as private in Windows Settings, the Bitdefender Firewall allowed file sharing and Remote Desktop access, as it should. However, we were no longer able ping the system, with either IPv4 or IPv6. This is a minor irritation, which of course has no bearing on security. When we connected to a network that we defined as public, Bitdefender blocked file sharing, Remote Desktop and ping access. This is exactly as it should be. If you prefer to use Windows Firewall, you can cleanly disable the Bitdefender Firewall in the program’s settings. This will activate the Windows Firewall.
Other points of interest:
- The update function can be found in the System Tray menu
- Subscription information can be found on the My Account page
- The tiles shown on the Dashboard (home page) can be customised
- The Utilities page is simply an advertisement for Bitdefender Total Security
About the program
ESET Internet Security is a paid-for security program. In addition to anti-malware features, it includes the ESET Firewall, Connected Home Monitor, Anti-Theft, Anti-spam, Anti-Phishing, and Banking & Payment Protection.
You can find out more about the program on the vendor’s website: https://www.eset.com/int/home/internet-security/
Summary
We found ESET Internet Security to be very well designed and easy to use. Non-expert users are provided with safe default settings and a clean, easy-to-navigate interface. All the essential features are very easily accessed. The settings dialog – which has a useful search function – has plenty of advanced options for power users. Real-time file-system protection is very sensitive and reacts very quickly when needed. Help features are excellent. Our only complaint is that ESET’s malware encyclopaedia was a little sparse.
Setup
You can download the program from its page on the vendor’s website. The installer lets you enter a licence key if you have one, or opt for a 30-day free trial. Setup is straightforward, and starts by letting you choose the interface language. You have to decide whether to enable LiveGrid (data sharing), PUA detection, and the Customer Experience Improvement Program. However, the wizard provides an explanation of what each of these things does. At the end, you are prompted to set up Anti-Theft and Parental Control, though these are optional. There is also a link to password protection, if you want to configure this. An initial scan is run after installation.
System Tray icon
The System Tray icon menu lets you see protection status, pause protection, pause firewall, block all network traffic, open settings, see log files, open the program window, and check for updates.
Security alerts
If real-time protection is disabled, an alert is shown on the program’s home page. You can reactivate the protection by clicking Enable real-time file system protection.
If you should accidentally try to download a malicious file, ESET will block it. A typical alert is shown below. You do not need to take any action, and the alert closes after 10 seconds. You can change this interval in the settings if you want. Clicking on the threat name in the alert box opens the relevant page of ESET’s threat encyclopaedia in a browser. Unfortunately, this did not have very much information about the malware samples used in our functionality test.
If a USB drive containing some malware is connected to the system, ESET offers to scan the drive. You can set the default action here to scan, not scan, or prompt, as you prefer. If you don’t scan the drive, ESET’s real-time protection detects and quarantines the malware as soon as the drive is opened in Windows Explorer. An alert, similar to the one above, is shown. If multiple malicious files are found at the same time, separate alerts are shown one after the other. You can dismiss all the alerts at once from the menu in the top right-hand corner of the alerts.
Scan options
The default scan, accessible from the home page, is a “Smart Scan”. The scope of this can be configured in the settings. The scan page, opened by clicking the Computer scan menu, has a number of options. You can run a complete system scan, custom scan, or removable media scan. There is also an option to repeat the last scan. You can scan a file, folder or drive by dragging it to the Computer scan page, or using the Windows Explorer right-click menu. Malware found in an on-demand scan is automatically quarantined. Under Advanced Setup/Detection Engine/Scanner Options, you can choose whether to detect potentially unwanted applications, potentially unsafe applications (e.g. hacker tools), and suspicious applications (e.g. those using typical malware obfuscation packing). Exclusions are also set here. Real-time file system protection lets you choose to detect malware on file open, creation, execution or removable media access (all on by default).
Quarantine
The Quarantine page can be found under the Tools menu/More tools. It shows the date and time of detection, file name and path, file size, detection name, number of occurrences, and user account that was active at the time. There is a Restore button, and also a Move to quarantine button, which confused us at first. It allows you to browse the file system for any suspicious files that have not been detected yet. Once they are in quarantine, you can submit them for analysis, or delete them, using the right-click menu.
Logs
The Logs page is under the Tools menu/More tools. It provides records of detections, events (such as updates), and scan results, along with events relating to the program’s other features, such as anti-spam and parental control.
Help
The Help and support page includes links to Open help and Search ESET Knowledgebase. The former opens an online manual, with topics such as System requirements, Installation and Beginner’s guide in a menu column on the left-hand side of the page. Each page opens detailed explanations and instructions, very clearly laid out, and well illustrated with annotated screenshots. The Knowledgebase lets you search for specific queries, such as exclusions, by using the Google search engine to find relevant articles in the ESET support pages. We tried a few queries and found this to work very well.
Access control
Standard Windows users cannot disable protection features, or uninstall the program. This is as it should be. Additionally, you can password protect the settings (Setup\Advanced setup\User interface\Access setup). If this is set up, users can use all the features of the program, but not access any settings or disable protection in any way.
ESET Firewall
In our functionality test, the firewall in ESET Internet Security behaved exactly as expected. It co-ordinated perfectly with Windows’ own network-type settings. It allowed network access such as file sharing in a network we had designated as private, but blocked it in a network we had defined as public. This is exactly as it should be. If you prefer to use Windows Firewall, you can cleanly disable the ESET Firewall in the program’s settings. This will activate the Windows Firewall.
About the program
F-Secure SAFE is a paid-for security program. In addition to anti-malware features, it includes parental controls.
You can find out more about the program on the vendor’s website: https://www.f-secure.com/en/home/products/safe
Summary
We found F-Secure SAFE to be straightforward to install and use. The program window is quite simple and clean, with a number of features found in the Tools menu and Settings dialog. Real-time protection is sensitive, and alerts are kept simple. One suggestion for improvement would be a “Fix-all” button, to reactivate any disabled protection features.
Setup
First of all, you have to create an account to download the free trial. To download the installer, you have to specify if you want to install SAFE on your own computer, your child’s computer, or another device. This allows for the parental control feature in the program. Once you have downloaded and run the installer, you have the option to allow sending anonymous user data. A single click then starts installation, and in less than a minute the program is up and running. A Chrome extension has to be approved.
System Tray icon
The System Tray menu lets you access your online account, check for updates, view messages and events, open settings, use gaming mode and see program information.
Security alerts
If real-time file-system protection is disabled, an alert is shown on the home page. Within about 30 seconds of protection being disabled, a pop-up alert also informs you that virus protection is off. This has a Turn on button, which reactivates protection with a single click. However, the alert is only shown for about 5 seconds, and then closes automatically. There is no “Fix All” button in the main program window, so if you miss the pop-up alert, you have to go into the settings to reactivate protection.
If you should accidentally try to download a malicious file, F-Secure quarantines the file. A typical alert is shown below. You do not need to take any action, and the alert closes after a few seconds.
If a USB drive containing some malware is connected to the system, F-Secure does not initially take any action. However, as soon as you open the drive in Windows Explorer, SAFE detects the malware and blocks copy or execution. An alert similar to the one above is shown for each file detected. To remove the malware, run a scan and choose the Handle All option.
Scan options
The Virus Scan button on the program’s home page runs a quick scan. You can run a full scan by going to Virus scan options in the Tools menu. A scheduled scan can be set up under Settings\Scanning settings\Scheduled scanning. You can also scan a drive, folder or file using the right-click menu in Windows Explorer. Exclusions can be set under Tools\App and file control\Excluded. We could not find a way to configure PUA detection.
Quarantine
You can open the Quarantine function from the main page of the Settings dialog. It shows the date and time of detection, plus file name and detection name. From here, you can allow or delete individual quarantined files. You can click on the detection name of any file to see a description of it in F-Secure’s online malware encyclopaedia. For the samples used in our functionality test, only generic descriptions were provided.
Logs
The log feature is found by clicking the Tools menu, then Recent events. It shows various system events, including installation, changes in protection status, and detections
Help
You can open the help feature by clicking the question-mark symbol in the top right-hand corner of the main window. A local help file opens, with a list of topics in a left-hand menu column. These explain the essential functions of the program and how to use them, using simple text instructions.
Access control
Standard Windows users cannot disable protection features, or uninstall the program. This is as it should be. We could not find a password-protection feature in the program.
Other points of interest
- When you first log in to a Standard Windows User Account, F-Secure prompts you to set up parental controls.
- Updates and subscription information can be found under Settings.
About the program
K7 Total Security is a paid-for security program. In addition to anti-malware features, it includes a basic parental control feature, with a blacklist/whitelist web filter and Internet time restrictions. There is also a replacement firewall, tune-up function, and secure delete feature.
You can find out more about the product on the vendor’s website: https://k7computing.com/us/home-users/total-security
Summary
We found K7 Total Security to be very simple to install, and straightforward to use. The most important everyday functions can easily be accessed from the home page. Real-time protection is very sensitive, and the default actions for connecting external drives and malware detection are ideal. Access control is excellent. However, we found two problems with the program’s firewall. One of these is potentially serious, as it could lead to users being unprotected when using public Wi-Fi networks.
Setup
Installation is very quick and simple, you just need to click Install. A very brief introductory wizard points out three new features in the program. At the end of the wizard, you have to enter a licence key or opt for the 30-day trial.
System Tray icon
The System Tray menu lets you open the program, run scans and updates, disable protection, stop network traffic, enable gaming mode, see product information, and access help features.
Security alerts
If real-time file-system protection is disabled, an alert is shown in the program window. You can reactivate the protection by clicking Fix Now.
If you should accidentally try to download a malicious file, K7 blocks access to the file. A typical alert is shown below. You do not need to take any action, and the alert closes after a few seconds.
If a USB drive containing some malware is connected to the system, K7 offers to scan the drive. If you choose not to do this, K7 detects and quarantines the malware as soon as the files become visible in Windows Explorer. An alert similar to the one above is shown. If multiple malicious files are found at the same time, all the alerts are shown within one alert box.
Scan options
The Scan button at the bottom of the program window lets you run quick, complete, custom, rootkit and scheduled scans. You can also scan a drive, folder or file using Windows Explorer’s right-click menu. Under Settings\Antivirus and Antispyware, you can choose whether to scan for PUA (on by default), and set scan exclusions. It’s also possible to change the default action on detection from here. If malware is found in an on-demand scan, the scan results page is displayed:
Visit the web site to know about the threats opens a page on the K7 website showing known software vulnerabilities, which has no direct connection to the malware found. Save results lets you save the scan log as a text file.
Quarantine
The quarantine feature is found under Reports\Quarantine Manager. From here, you can delete or restore detected malware items. The page shows date and time of detection, file name and path, malware type, and file hash.
Logs
You can find the logs feature under Reports\Security History. The Virus Found Events page shows the date and time of detections, current user at the time, application involved, file name and path, malware type, and action taken.
Help
If you click on Help in the top right-hand corner of the window, a local help file opens. This lists a variety of topics, covering the configuration and use of the product. Simple, clear instructions are provided for each topic, illustrated with screenshots where necessary.
Access control
Standard Windows users are not able to disable protection features, or uninstall the program. This is as it should be. You can also set password protection, so that all users must enter a password to disable protection by any means.
K7 Firewall
In our functionality test, we found that the K7 Firewall did not behave as expected under some circumstances. Firstly, it blocked write access to an existing read-and-write file share on a private network. We were not able regain access by changing the K7 Firewall settings, so only read access was allowed. Secondly, and more importantly, we found an issue with firewall settings when connecting to a public network. If the network you are connecting to is unsecured (i.e. no password needed), K7 will display an alert, and prompt you to choose a protection level
The second firewall issue is much more important. We connected our test laptop to a new wireless network, and defined this as Public in the Windows connection prompt. There was no prompt from K7. We discovered that ping, Remote Desktop and read-only file share access were still available, just as in a private network. We investigated, and saw that the network had been designated as Home in the K7 Firewall settings. This potentially puts laptop users at risk when using public Wi-Fi networks. Having designated the new network as Public at the Windows prompt, and in the absence of any prompt from K7, most users will assume that they are protected, when in fact they are not. If you change the network type to Public Network in the K7 Firewall settings, then ping, Remote Desktop and file-sharing access are all blocked effectively. We strongly recommend that K7 should designate all new networks as public by default. In the meantime, we would recommend users to manually check K7’s firewall settings whenever they connect to a public network.
About the program
Kaspersky Internet Security is a paid-for security program. In addition to anti-malware functions, it includes ransomware protection, banking protection, webcam protection, and browser privacy features. You can find out more about the product on the vendor’s website:
You can find out more about the product on the vendor’s website: https://www.kaspersky.co.uk/internet-security
Summary
Installation is straightforward, with safe default options. Kaspersky’s modern, tiled interface makes all essential features easily accessible from the program’s home page. The program deals with malware detection automatically, without requiring any user decisions. Advanced users will find a wide range of configuration options in the settings. The program promotes two other (freemium) Kaspersky products.
Setup
Having accepted a number of agreements, you just have to click Install to start setup. At the end of the wizard, four options are presented (all selected by default). These are: Turn on protection against ads to install only desired software and block additional installations; Delete malicious tools, adware, auto-dialers and suspicious packages; Detect other software that can be used by criminals to damage your computer or personal data; Take a tour through the application features. As expected, the introductory tour runs by default. This introduces the banking protection, webcam protection, browser privacy, and parental control features. When the program window first opens, it encourages you to create/log in to a My Kaspersky online account. However, this is not essential. If you close and re-open the window, the normal user interface will appear.
System Tray icon
The System Tray icon menu lets you see running scans, run an update, open Safe Money, open the program window or specific tools, shut down or pause protection, open settings, and see program information.
Security alerts
If real-time file-system protection is disabled, an alert is shown in the program window. You can reactivate the protection by clicking Details, then Resume.
If you should accidentally try to download a malicious file, Kaspersky blocks the download, and displays a block page in the browser. This includes a link to the Kaspersky online threat encyclopaedia. A Windows pop-up alert is also displayed – a typical example is shown below. You do not have to take any action, and the alert closes after a few seconds.
When we connected a USB drive containing some malware to the system, Kaspersky automatically scanned the root folder of the device, and quarantined the malware in it. This did not remove further malware samples in a sub-folder. However, as soon as we opened this folder in Windows Explorer, Kaspersky immediately detected and quarantined this malware as well. Alerts were shown (one for each sample), similar to the one above. We note that the default external device scan can be set to scan the entire drive, rather than just the root folder. Other actions options include prompting the user to scan the device, and scanning the entire device if the volume is under 64 GB.
Scan options
The Scan button on the program’s home page opens the Scan page. This provides a choice of full, quick, custom, scheduled, and removeable device scans. You can also scan a drive, folder or file from Windows Explorer’s right-click menu. Scan exclusions are available in the program’s settings (cogwheel icon in the bottom left-hand corner of the window), under Additional\Threats and Exclusions. You can specify which protection components – e.g. real-time protection, on-demand scans – the exclusion should be applied to. PUA detection is also found on the Threats and Exclusions page.
When we ran an on-demand scan of some inactive malware samples on the desktop of our review system, Kaspersky Internet Security quarantined the items and displayed the following dialog box
Quarantine
The quarantine feature can be found by clicking More Tools on the program’s home page. It shows the file name and path, detection name and date/time of detection for every item. From here, you can restore or delete individual files, or delete all files.
Logs
The log function can be opened by clicking the Scan tile, Task Manager, and then clicking the Detailed report link under any individual scan in the list shown. This then shows a summary of different scan types run; if you click on Details, you can see the individual file name and path for each detected item, along with detection time and action taken.
Help
The question-mark symbol in the opens Kaspersky’s online manual for the program. This is context sensitive, and so opens at the page relevant to the feature of the program you’re currently using. Straightforward text-only instructions for each feature are provided. A left-hand menu column lets you navigate easily to other topics.
Access control
Standard Windows users have full control of the program’s settings, and can disable protection features. However, only administrator accounts can uninstall the program. You can password protect the program. All users then have to enter the password to access settings or disable protection by any means.
Firewall
In our functionality test, the firewall in Kaspersky Internet Security behaved exactly as expected. It did not display any prompts of its own, but co-ordinated with Windows’ own network-type settings. It allowed network access such as file sharing in a network we had designated as private, but blocked it in a network we had defined as public. This is exactly as it should be. If you still prefer to use Windows Firewall, you can cleanly disable the Kaspersky Firewall in the program’s settings. This will activate the Windows Firewall.
Other points of interest
- The program’s home page displays a Protection for kids tile, which is shown in faded colours with a download symbol. If you click on this, an information page informs you that this is an additional download, and that a separate licence is needed to use all the features of Safe Kids. Safe Kids is a separate Kaspersky application that uses a freemium model.
- The setup wizard of Kaspersky Internet Security places a shortcut for Kaspersky Password Manager on the Windows Desktop. This is also a separate Kaspersky freemium application.
- During our test, KIS displayed an alert to say that a newer version of a third-party program had been found, and prompted to install this.
About the program
McAfee Internet Security is a paid-for security program. In addition to anti-malware features, it includes a vulnerability scanner, replacement firewall, performance booster and anti-spam feature.
You can find out more about the product on the vendor’s website:
Summary
McAfee Internet Security is very simple to install, and has a modern, touch-friendly interface. We liked the persistent pop-up alert that is displayed if real-time protection is disabled. We note that malware is only detected on execution, and there appears to be no means of enabling on-access detection. Configuration options are rather sparse.
Setup
Installation could not be simpler. You only have to click Install, and that’s it. When the program first runs, you need to sign in with a McAfee account, or create a new one. An optional introductory wizard then shows you the most important features of the program.
System Tray icon
The System Tray icon menu lets you open the program window, check for updates, run scans, open settings, and open the help page.
Security alerts
If real-time file-system protection is disabled, an alert is shown in the program window. You can reactivate the protection by clicking Turn it on.
Additionally, a pop-alert is shown above the System Tray, again with a Turn it on button. This persists until you close it. If you should accidentally try to download a malicious file an alert is shown in the browser window. Block download does precisely that, while Accept the risk allows the file to be downloaded.
If a USB drive containing some malware is connected to the system, McAfee does not take any action. It is possible to copy the malware from the external drive to the system, or from one external drive to another. Malware is only detected on execution. In this event, the alert below is shown. You do not need to take any action, and the alert closes after a few seconds. If you click Tell me more, the detection name, plus file name and path, are shown.
Scan options
The Scan for viruses button on the home page lets you run a quick or full scan. You can schedule a scan from the Settings menu (cogwheel icon in the top right-hand corner of the window). You can also scan a drive, folder or file using Windows Explorer’s right-click menu. In the settings menu, under Real-Time Scanning, you can exclude specific files from real-time protection. We could not find any means of excluding an entire folder, configuring exclusions for on-demand scans, or configuring PUA detection. If malware is discovered in an on-demand scan, McAfee displays a summary of the items found and states All issues fixed.
Quarantine
This is found under Settings\Quarantined items. It shows the file name, threat type, and date/time of detection. You can restore or delete individual items, or all items together.
Logs
The log feature is found under Settings\Security History. You can see the threat type and date and time of detection.
Help
The help features are found on the My info tab, under Get help and support. The Help link opens an online manual for the product. This provides brief, text-only explanations of the program’s features. There is a search box at the top of the page, but in our functionality test, we could not get this to work with Chrome, Edge or Internet Explorer. The McAfee Support Website link opens the McAfee knowledge base, which covers all McAfee consumer products. The search function finds answers relating to all of these, so some sifting through search results may be necessary to find relevant answers. Simple text-only explanations are provided.
Access control
Standard Windows users cannot disable protection features (the switches are deactivated), or uninstall the program. This is as it should be. We could not find a means of password protecting the settings.
Firewall
In our functionality test, the McAfee Firewall behaved exactly as expected. Ping, Remote Desktop and file-sharing access were allowed in private networks, but blocked in public ones. It is not possible to use Windows Firewall with McAfee Internet Security, as McAfee locks the Windows Firewall settings.
Other points of interest
- The main status display panel of the program window shows a variety of reports and prompts regarding different features of the program.
- The update function can be found in the System Tray menu.
About the program
Microsoft Windows Defender Antivirus is a free security program that is included with Windows 10. Similar protection features are built into Windows 8.1, albeit with a different interface.
You can find out more about the program on the Microsoft website: https://www.microsoft.com/en-ie/windows/comprehensive-security
Summary
Microsoft Windows Defender Antivirus includes all the essential features of an antivirus program in a clean, touch-friendly interface. Safe default options are provided for non-expert users. In the scan results dialog, and the quarantine page, you can only take action on malware items individually. A “select all” button would be helpful in dealing with multiple malware detections
Setup
No setup is required, as the program is built into Windows.
System Tray icon
The System Tray icon menu lets you run a quick scan, check for updates, view notification options, and open the Windows Security window.
Security alerts
If real-time file-system protection is disabled, an alert is shown in the Windows Security window. You can reactivate the protection by clicking Turn on.
If you should accidentally try to download a malicious file, Windows Defender will block the download. A typical alert is shown below. You do not need to take any action, and the alert closes after a few seconds. If you click on Get details, the Protection History page (scan log) is displayed.
If a USB drive containing some malware is connected to the system, Windows Defender does not take any immediate action. However, as soon as the drive is opened in Windows Explorer, Defender detects and quarantines the malware. An alert similar to the one above is displayed.
Scan options
If you click on Virus and threat protection\Scan options, you can run a quick, full or custom scan. You can also run a Windows Defender Offline Scan, to deal with hard-to-remove malware. The program informs you that this will restart the device and take about 15 minutes. Exclusions can be set under Virus and threat protection settings. We could not find any means of configuring PUA detection. If malware is detected in an on-demand scan, the Scan options page is displayed. This lists the malware found, and displays the Start actions button, which by default removes the malware. You can change the action for any individual threat by clicking on it; this provides the additional options Quarantine or Allow on device. If you choose the latter option, it will be possible to execute the malware.
Quarantine
The quarantine function is found under Virus and threat protection\Protection history. It lists detected items by date and time detected. By clicking on any item, you can see more details of the threat, and restore or remove it. Clicking on Learn more opens Microsoft’s online threat encyclopaedia, with details of that threat.
Logs
The log feature is effectively combined with quarantine under Protection history.
Help
Clicking Get help on the Virus and threat protection page opens the Microsoft Virtual Agent, which is an automated chat service. You can type in a query, and search. Depending on the question you asked, an answer may appear in the chat window, or a link to an online article may be shown. Some of the answers appear to be aimed more at IT professionals than home users. For example, our query “Set scan exclusions” brought up a link to an article entitled “Configure Windows Defender Antivirus exclusions on Windows Server”.
Access control
Standard Windows users cannot disable protection features or restore items from quarantine, which is as it should be.
About the program
Norton Security is a paid-for security program. In addition to anti-malware features, it includes a replacement firewall, banking protection, anti-phishing and performance tune-up features.There is no free trial.
You can find out more about the product on the vendor’s website: https://us.norton.com/products/norton-360-deluxe
Summary
Norton Security is very simple to set up, and has a very modern, touch-friendly interface. Essential features are easy to find, and safe default settings are provided. We liked the detailed information in malware alerts, and the manual and how-to videos in the help service. Access control is excellent. Our only significant criticism is that there is no free trial or unconditional money-back guarantee.
Setup
You can opt in to Norton’s data sharing scheme, and change the installation folder if you want. Otherwise you only need to click on Install. When the program first starts, an optional product tour points out the main features of the interface.
System Tray icon
The System Tray menu lets you open the program, run scans and updates, access support, enable gaming mode, and disable antivirus and firewall features.
Security alerts
If real-time file-system protection is disabled, an alert is shown in the program window. You can reactivate the protection by clicking Fix Now.
If you should accidentally try to download a malicious file, Norton blocks the download. A typical alert is shown below. You do not need to take any action, and the alert closes after about 30 seconds. Clicking Details opens up a comprehensive information page, with information such as detection name, source and destination IP addresses, protocol used, application involved, and action taken. You can disable notifications from this page if you want.
If a USB drive containing some malware is connected to the system, Norton does not initially take any action. However, as soon as you open the drive in Windows Explorer, Norton’s real-time protection detects the malware and quarantines it. An alert similar to the one above is shown.
Scan options
The Scans button on the Security page lets you run quick, full and custom scans, whereby a custom scan can be scheduled. You can also scan a drive, folder or file using Windows Explorer’s right-click menu. Under Settings\Antivirus\Scans and Risks you can set exclusions and specify treatment of Low Risks, which we assume means PUAs. If malware is detected in an on-demand scan, the scan results page is shown. This shows the threat name, risk level and status/action taken. You do not need to do anything.
Quarantine
This is found under Security\History. Resolved Security Risks shows you risk level, detection name, plus date and time of detection. Any individual file can be restored, restored and excluded, or submitted to the vendor for analysis.
Logs
This is combined with the quarantine function.
Help
Clicking Help in the top right-hand corner of the window displays a number of help options, including Product Manual. This opens a very comprehensive .PDF manual of over 100 pages. It covers all aspects of installing, configuring and using the program, and includes a few screenshots. The Help dialog also includes a link to Norton’s online video tutorials, which explain a wide range of common tasks, such as installation, updating and scanning.
Access control
Standard Windows users cannot disable protection features, or uninstall the program. This is as it should be. Protection settings are greyed out when the program is used by a non-administrator account. There is also a password protection feature. This makes it impossible for other users to change settings or disable protection without knowing the password.
Firewall
In our functionality test, the firewall in Norton behaved exactly as expected. When connected to a network that we had previously designated as private in Windows Settings, the Norton Firewall allowed ping, file sharing and Remote Desktop access. When we connected to a network that we defined as public, Norton blocked file sharing, Remote Desktop and ping access. This is exactly as it should be. It is not possible to use Windows Firewall with Norton Security, as Norton locks the Windows Firewall settings.
Summary
We found Panda Free Antivirus to be very straightforward to install and use. The program interface is simple to navigate, and safe default options are provided. Although Panda Free Antivirus promotes other, paid-for Panda products, this is done in a very subtle, non-intrusive way, by means of a thin strip along the top of the window.
Setup
Installation is very straightforward. You can change the installation folder, interface language, and opt out of installing “Panda Smart Shopping”. Otherwise, you only need to click Accept and Install. When setup is complete, a page of the Panda website opens, showing the additional features available in Panda paid-for products. This re-appears when you first open the program. You are prompted to enter an email address, which has to be verified.
System Tray icon
The System Tray icon menu lets you open the program window, enable gaming mode, reach help and support services, disable/enable protection, and use Panda’s VPN feature.
Security alerts
If real-time file-system protection is disabled, an alert is shown in the status area. You can reactivate the protection by clicking Fix, and then Enable.
If you should accidentally try to download a malicious file, Panda immediately quarantines it. A typical alert is shown below. You do not need to take any action, and the alert closes after a few seconds.
If a USB drive containing some malware is connected to the system, Panda prompts you to scan the drive. If you choose not to do this, Panda takes no further action. However, if you try to copy the malware to the system, Panda immediately detects and quarantines it. An alert is shown, similar to the one above. Alerts can be supressed in the program’s settings, if you want.
Scan options
The Scan button on the home page lets you run Full, Custom and Critical areas scans. The Antivirus page enables you to set a scheduled scan. You can scan a drive, folder or file using Windows Explorer’s right-click menu. Under Settings\Antivirus, you can set exclusions and choose whether to detect PUAs (on by default). If malware is found during an on-demand scan, the Panda scan window simply states Done! and shows the number of files detected. If you click on Show details, you can see the file paths and the action taken:
Quarantine
This feature is found on the Antivirus page. It shows you the detection name, file name and path, plus date and time of detection. You can recover or delete quarantined items one by one. No further information is provided about the threats detected.
Logs
You can find the log feature on the Antivirus page, by clicking View report. It shows the same information as the quarantine page, plus the action taken (e.g. “Deleted”). It opens the vendor’s online help page in a browser.
Help
The help feature is located in the “hamburger” menu in the top left-hand corner of the window. A menu column on the left-hand side of the page shows various topics. Selecting one of these displays simple, text-only answers in the main pane.
Access control
Standard Windows users can disable protection features, but not uninstall the program. You can password protect the program, in which case other users cannot change settings or disable protection by any means.
Other points of interest
- The download link for Panda Free Antivirus on the Panda website redirects to cnet.com.
- The setup wizard states that free support is included for “any PC or Internet related problems”. UK, USA and Canadian telephone numbers are provided.
- The “Aa” symbol in the bottom right-hand corner of the window lets you show or hide the names of the symbols on the home page.
- The program’s settings are found in the “hamburger” menu in the top left-had corner of the program window.
About the program
Tencent PC Manager is a free security program.
You can download it from the Tencent website:
Summary
Tencent PC Manager is simple to install, and has a clean, modern interface. However, some aspects of the program may make it more suitable for experts than for the average user. The fact that the status display is not included in the main program window, but in a separate window that has to be launched from the system tray, is one example. Another is that by default, malware is only detected on execution. Malware samples can be copied to and from among external drives and the system, without being detected. Standard Windows User accounts cannot open the main program interface or run scans, but can restore detected malware from quarantine. They can also shut down the program and all its protective features. We suggest that this is precisely the opposite of what it should do. No help feature is provided.
Setup
The setup wizard allows you to change the installation folder. Otherwise, you just have to click Install now. Installation completes in less than a minute.
System Tray icon
The System Tray icon menu lets you open the main window, open settings, run a quick scan, open quarantine, open the system components status window, check for updates, quit the program, and open Download shield.
Security alerts
If real-time file-system protection is disabled, no alert is shown in the main program window. You have to launch the Active Defense window from the System Tray icon, which shows the following alert:
You can reactivate the protection by clicking Activate all. If you should accidentally try to download a malicious file, Tencent quarantines the file. A typical alert is shown below. You do not need to take any action. The alert persists until you close it.
If you click Detail, a brief description of the detected malware is given.
If a USB drive containing some malware is connected to the system, Tencent does not take any action. It is possible to copy malware in any direction among external drives and the system without it being detected. Malicious programs are only detected when you execute them. In this case, the malware is immediately quarantined, and an alert similar to the one above is shown. We note that this alert is green – as opposed to the red of the download alert – even though the malware has been safely quarantined in both cases.
If you change the real-time protection options to High (under File system protection), malware is detected if you try to copy it from an external drive to the Windows Desktop. However, you can still copy malware from one external drive to another.
Scan options
You can perform a quick scan from the button of the same name in the program window. The drop-down menu to its right lets you run a full or custom scan instead. You can also scan a drive, folder or file using Windows Explorer’s right-click menu. You can set exceptions under Settings\Antivirus Settings\Go to Whitelist Center.
If malware is detected in an on-demand scan, the scan results window is shown. Apply action will carry out the action noted in the Processing method column on the selected items. The down-arrow button lets you click Ignore, in which case no action will be taken. In this case, the program window will continue to display the number of untreated threats, but no obvious means of removing them. Any malware that you ignore after the scan will still be detected on execution by Tencent’s real-time protection.
Quarantine
The quarantine feature can be opened from the System Tray menu. The window displays a list of quarantined files, along with the path and file name, and date/time of detection. You can select individual files, or all together, and delete or restore them. No further information about the malware is provided.
Logs
The scan logs feature is a separate tab of the quarantine dialog box. It shows the date and time of each scan, scan type, number of threats detected, and number processed.
Help
We could not find any kind of help feature for the program.
Access control
Standard Windows users are not able to open the main program window, or run scans or updates. However, they can restore detected malware from quarantine, and shut down the program completely, using the System Tray menu\Exit. In our functionality test, we found that Tencent did not reliably report to Windows Security that it was deactivated. This meant that the system was sometimes left in a completely unprotected state. Standard users cannot uninstall the program. We could not find a way of password protecting the settings.
Other points of interest
- Update and settings are found in the “hamburger” menu in the top right-hand corner of the main program window, and the System Tray menu.
- The Download Shield window, accessible from the System Tray icon, shows a list of all downloaded files, whether malicious or not. We are uncertain what the intended purpose of this feature is.
About the program
Total Defense Essential Anti-Virus is a paid-for security program, which offers phishing protection in addition to anti-malware features.
You can find out more about the product on the vendor’s website: https://www.totaldefense.com/shop/anti-virus
Summary
Total Defense Essential Anti-Virus presents a very simple program interface that makes status and scan functions easy to find. Automatic scanning of external drives, combined with sensitive real-time protection, make it impossible to copy malware to the system. Help articles are clear and well illustrated. The use of symbols rather than text for menu items means that it may take a little bit of exploring to find the more advanced functions. However, everything is neatly laid out, and we soon managed to find our way around the program. One suggestion for improvement would be to provide password protection for the settings.
Setup
There is a custom installation option, which just lets you change the installation folder. Other than this, there are no options or decisions to make. Setup completes very quickly once you click Install. An update runs when you first open the program window.
System Tray icon
The System Tray icon menu lets you open the main program window, check for updates, and pause any running scans.
Security alerts
If real-time protection is disabled, the status tile displays a clear warning. You can reactivate the protection by clicking Fix all.
If you should accidentally try to download a malicious file, Total Defense quarantines it. A typical alert is shown below. You do not need to take any action, and the alert closes after 5 seconds. If you click on Details, the file will be shown in the program’s quarantine page
If a USB drive containing some malware is connected to the system, Total Defense immediately scans the drive automatically, and notifies you that it is doing so. The malware is quarantined, and then an alert like the one above is shown. If you choose to cancel the automatic scan, Total Defense’s real-time protection will detect and quarantine the malware as soon as you open the drive in Windows Explorer. A separate alert is shown for each malicious file found. Auto-scanning of external drives can be disabled in the settings if you want.
Scan options
Scans can be run by clicking the Security tile and going to the Overview page. There is a choice of quick, full, or custom scans. The Suspend Scans button on the same page temporarily deactivates real-time protection for a specified number of minutes. You can scan a drive, folder or file using Windows Explorer’s right-click menu. Malware found in an on-demand scan is automatically quarantined. On the Security page/Settings tab you can set the scan security level to Low, Recommended (default), or High. The Custom setting lets you decide whether to scan network, archive and hidden files, and whether suspicious files should be treated as infected. Exclusions can be set on the tab of the same name. We could not find a way of configuring PUA detection as such. However, Total Defense tell us that the default setting for the application control feature (Recommended) enables PUA detection.
Quarantine
This feature is found on the Security page, Quarantine tab. It shows the date and time of detections, file name, threat severity, threat name, and threat type – although the Trojans used in our functionality test were all listed as “virus”. You can restore or delete quarantined items from here. We could not find any further information about the detected malware.
Logs
The Reports tab of the Security page displays a list of threats found, along with the time period and scan type that detected them. This can be displayed as a summary, showing how many of each threat type has been blocked.
Help
Clicking the question-mark icon in the top right-hand corner of the window opens the About page. Here you can click Support Info/Online Support. This opens the support page of the vendor’s website. If you click Product Support, a searchable FAQs page opens. Each article provides simple, step-by-step instructions for the task in question, generously illustrated with annotated screenshots.
Access control
Standard Windows users are able to disable all protection features, and we could not find a means of password-protecting the settings to prevent this. An administrator account is needed to uninstall the program, however.
Other points of interest
- The status display prompts you to run a full scan if you haven’t done this recently.
- The cogwheel icon in the vertical menu bar handles updates, notifications and proxy settings; scan settings are found on the Security
- The Devices page shows all the devices you have installed. Actions you can perform on these are limited to changing the device name, and the avatar representing the user. More usefully, the Add Device function allows you to send an email to a colleague, friend or family member, with a link to the appropriate installer for their device.
- To find subscription information, log in to your Total Defense online account.
Summary
The program is very easy to install, and most important features are easy to find. Safe default settings are provided. We liked the persistent malware and status alerts, and the online manual is simple and clear.
Setup
The free trial can be downloaded by clicking Downloads/Free Tools on the Trend Micro home page. The setup wizard asks you to enter a licence key or opt for the free trial. Other than this, there are no decisions to make. At the end of the wizard, you are invited to set up the ransomware shield. By default, this covers Windows’ Documents, OneDrive and Pictures folders, but you can add further folders if you want.
System Tray icon
The System Tray icon menu lets you open the main window, run a scan, check for updates, disable/enable protection, run a troubleshooting tool, and quit the program.
Security alerts
If real-time file-system protection is disabled, an alert is shown in the program window. You can reactivate the protection by clicking Enable Now.
An additional pop-up alert is shown above the System Tray. This persists until you close it. If you should accidentally try to download a malicious file, Trend Micro deletes the file. A typical alert is shown below. You do not need to take any action. The alert persists until you close it.
If a USB drive containing some malware is connected to the system, Trend Micro does not initially take any action. However, as soon as the drive is opened in Windows Explorer, the malware is immediately detected and deleted. An alert, similar to the one above, is shown.
Scan options
The Scan button in the main program window runs a quick scan by default. If you click the small down arrow symbol to its right, the choice of quick, full or custom scans is shown. The program’s settings dialog lets you schedule scans. You can also scan a drive, folder or file from Windows Explorer’s right-click menu. Under Settings\Scan Preferences, you can configure detection of PUAs (enabled by default). The Exception Lists page of the settings dialog lets you set scan exclusions. If malware is detected in an on-demand scan, the scan results page is shown:
If you click Show Details, the malware file names and paths are displayed.
Quarantine
The pie-chart symbol to the right of the settings icon opens the Security Report page, which shows a summary of threats found. If you click See more details and select Viruses, you can see a log of malware detections. This shows the date and time of detection, file name and path, threat name, and action taken. Clicking on an individual item displays the Restore button.
Logs
Logs are combined with the quarantine feature.
Help
Clicking the ? menu, Product Support opens the program’s online manual. The first page has an overview of the program’s main functions. There are simple explanations and instructions, illustrated with screenshots. Hyperlinks in the text take you to detail pages for the features in question.
Access control
Standard Windows users can disable protection features, but not uninstall the program. Under Other Settings\Password, you can password protect the program to prevent other users changing the settings.
Other points of interest
- The program prompts you to install the (free) Trend Micro Toolbar for browsers. The prompt states that it protects “Gmail and Outlook against scams and safeguard your financial transactions”.
- A free trial of Trend Micro’s Password Manager is offered on the Data
- The update function is found in the System Tray menu.
Summary
VIPRE Advanced Security is very simple to install, and has a very modern, touch-friendly interface. Real-time protection is very sensitive, and default settings provide safe options for non-expert users. We liked the online help feature and the ability to search it directly from the program. One suggestion for improvement would be to allow password protection, to prevent other users changing settings.
Setup
You can change the installation folder if you want. Otherwise installation completes very quickly with a single click.
System Tray icon
The System Tray icon menu lets you open the program window, check for updates, shut the program down, enable/disable protection components, and run scans.
Security alerts
If real-time file-system protection is disabled, a (rather subtle) alert is shown in the main program window. You can reactivate the protection by clicking Turn On.
If you should accidentally try to download a malicious file, VIPRE will block the download silently, i.e. without showing an alert. If a USB drive containing some malware is connected to the system, VIPRE offers to scan it. If you choose not to scan the drive, VIPRE’s real-time protection detects and quarantines the malware as soon as you open the drive in Windows Explorer. The alert below is shown. You do not need to take any action, and the alert closes after a few seconds. If you click on Learn more, the relevant page of VIPRE’s online malware encyclopaedia will open in a browser, with a description of the threat.
Scan options
If you mouse over the Scan button on the homepage, a dropdown menu appears, with the options of full, quick and custom scans. The Schedule Scan button to its right lets you do precisely that. You can scan a drive, folder or file using Windows Explorer’s right-click menu. Exclusions can be set under Manage\Antivirus. You can also set detection of PUAs here (on by default), under Include Low-Risk Programs. If malware is detected in an on-demand scan, the scan results page is displayed. This shows the number of processes, files, registry entries and cookies scanned, and how many of these have been cleaned. No action is needed.
Quarantine
The quarantine function is found under Manage\Antivirus. It shows the name, level and type of the detected threats, and allows you to delete, restore, or always allow each one.
Logs
These are also found under Manage\Antivirus. There are separate logs for on-demand scans, real-time protection, blocked websites, and Edge Protection. The latter is intended to block the download of online threats, “in most web browsers”. The scan log shows the date, time, duration and type of scan, along with the number of files detected and cleaned.
Help
The help features are found on the Account page. VIPRE Help opens a Windows Help window, which lists various topics. Simple text instructions are provided for each topic. You can also type a search term into the program’s search box, which will search the online FAQs and open the results in a browser window. Our search for “exclusions” found simple, step-by-step instructions, well illustrated with annotated screenshots.
Access control
Standard Windows users can disable protection features, but not uninstall the program. We could not find a means of password protecting the settings.
Firewall
In our functionality test, the VIPRE Firewall behaved mostly as expected. When connected to a network that we had previously designated as private, ping and file-sharing access continued as before. However, we were unable to make Remote Desktop connections to our test system. When we connected to a network that we defined as public, ping, file-sharing and Remote Desktop access were all blocked, as they should be. It is possible to disable the VIPRE Firewall, in which case Windows Firewall will be activated. A (fairly subtle) alert will be shown in the main VIPRE window if you do this.
Other points of interest
- If you don’t like the default dark mode of the interface, you can easily change it to another colour scheme under Account. There are 7 different colour schemes to choose from.
Feature List
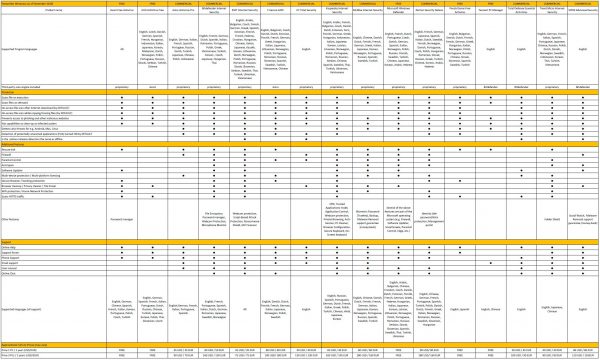
Copyright and Disclaimer
This publication is Copyright © 2020 by AV-Comparatives ®. Any use of the results, etc. in whole or in part, is ONLY permitted after the explicit written agreement of the management board of AV-Comparatives prior to any publication. AV-Comparatives and its testers cannot be held liable for any damage or loss, which might occur as result of, or in connection with, the use of the information provided in this paper. We take every possible care to ensure the correctness of the basic data, but a liability for the correctness of the test results cannot be taken by any representative of AV-Comparatives. We do not give any guarantee of the correctness, completeness, or suitability for a specific purpose of any of the information/content provided at any given time. No one else involved in creating, producing or delivering test results shall be liable for any indirect, special or consequential damage, or loss of profits, arising out of, or related to, the use or inability to use, the services provided by the website, test documents or any related data.
For more information about AV-Comparatives and the testing methodologies, please visit our website.
AV-Comparatives
(February 2020)